The following is an excerpt from How to Make Your Electric Guitar Play Great, second edition, by Dan Erlewine, published by Backbeat Books/Hal Leonard Performing Arts Publishing Group. Re-printed with permission.
Adjustments are what setups are all about, and the first adjustment to make is the truss rod. Almost all electric guitars have adjustable truss rods, and few setups would be complete without tweaking the truss rod.
Occasionally a guitar neck is perfect as is, and doesn't require adjustment. If you have one of those, don't mess with a good thing. This chapter will show you how to recognize a neck that's perfect, and how to adjust a neck that's up-bowed or back-bowed. Our goal is a state of controlled straightness, with a very slight curvature called "relief."
Up-bow refers to a fretboard that curves in the direction of the string pull, creating a valley under the strings. This makes for high, stiff action.
Back-bow refers to a fretboard with a hump in the center, occurring when a truss rod is so tight that it bows the neck away from the string pull. Back-bow makes a guitar completely unplayable because the strings buzz against the humped frets.
Relief is a controlled up-bow, deliberately adjusted into a straight neck to create string-to-fret clearance that allows for the strings to vibrate without buzzing. Not every guitar benefits from relief, and not everyone likes it. The choice between relief or a straight neck is up to the player. But such a great majority of setups require relief that you can consider it a standard.
Truss rod control of the fretboard's straightness goes hand in hand with setting the string height at the bridge and the nut. These adjustments together produce the playing action, so a professional will simultaneously adjust a truss rod while raising or lowering the bridge and measuring string height at the nut. This process involves watching, measuring, and adjusting the neck, then measuring, watching and adjusting some more. It's a dance involving all of this at once, so you'll need to refer to the nut and bridge chapters as you work with the truss rod information presented here.
Truss rod adjustment tools
You need very simple tools to adjust truss rods. Many guitars adjust at the peghead with a socket driver or an Allen wrench; vintage Fenders and their many clones adjust at the body end of the neck with a flat or Phillips head screwdriver (some imports use an Allen wrench). Usually, imports require metric tool sizes and American-made guitars require fractional and decimal tool sizes. Depending on the guitar brand, the tool you'll need will be one of these:
- Flat blade screwdriver: 5/16"
- Phillips head screwdriver: No. 2
- Socket driver: 1/4", 5/16", 9/32", 7mm, or or 8mm (9/32" will substitute for 7mm)
- Allen wrench: 1/8", 9/64", 3/16", 1.5mm, 2mm, 2.5mm, 3mm, 3.5mm, 4mm, 5mm, 7mm, or 8mm.
Truss rod types and how they work
The one-way, or single-action, rod is a very common style of adjustable truss rod. It's just a round steel rod with threaded ends. It lays in a very shallow curve, with one end anchored in the wood of the neck. The other end has the adjustment nut. This rod is designed for one action: to pull back against the tension of the strings, straightening out up-bow in the neck. Tightening the rod pulls it back away from the string tension, while loosening it allows it to be pulled back up by the strings.
There are other designs, such as a U-shaped metal channel instead of a round rod, but they're performing the same function. These typical designs are one-way, or single action, truss rods. They apply tension in one direction only.
 Some truss rods are two-way designs. When tightened, they exert pressure against the strings like a one-way rod, but if turned the other direction, they will push the neck forward rather than relying solely on string tension.
Some necks are not adjustable at all, with a truss rod that is simply a stiffener embedded in the neck (rare these days). And some older inexpensive guitars such as Kays, Harmonys, and early imports have adjustable rods that work so poorly they may as well be considered non-adjustable. These are rare too, and it's a pretty safe bet that your guitar's truss rod will do the job.
Some adjusting nuts screw onto the threaded end of the truss rod (vintage Gibson, Guild, Gretsch, and Fender models), and these can be removed for cleaning and lubrication. On other designs, such as PRS guitars, the adjusting nut is welded to the rod and can't be removed.
 Use a backlight to read the neck
White paper lit by a desk lamp makes a bright backlight for assessing a neck. Here I'm laying a large carpenter's square along the fret tops to see how straight or curved this neck is. The white backlight makes it easy to see the gap between the straightedge and the bowed neck.
Mark the nut so you can return to your starting point if needed.
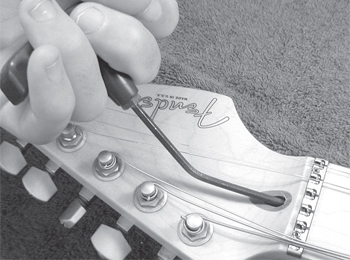
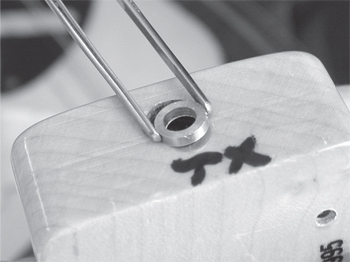
Mark the adjusting nut before turning it
Before turning a truss rod adjusting nut, I always mark it with a fine-point permanent marker. Put this mark in a location you can recognize and return to again: probably at the very top center of the nut. When you tighten the nut, this mark will show how far you've turned it.
Adjusting standard one-way truss rods
Simple one-way rods are typical for vintage Fender, Gibson, Gretsch, Guild, Harmony, Kay, and most imports.
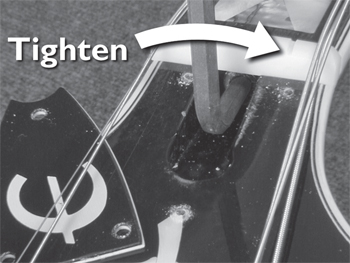 Tighten: To tighten the truss rod, turn the adjusting tool clockwise. This straightens an up-bowed neck, pulling the peghead away from the tension of the strings. This reduces relief, lowering the string action (height of the strings over the frets).tighten
Turn the nut clockwise to tighten the rod.
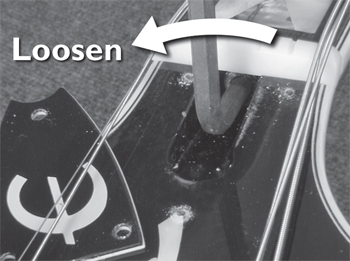
Loosen: To loosen the truss rod, turn counterclockwise. This adds relief to the fretboard by letting the string tension pull the peghead forward. The result is higher string action.loosen
Loosening a truss rod nut can't harm anything, but over-tightening can. Loosening the truss rod adjusting nut simply allows the neck to relax and be pulled by the strings. No problem. If you over-tighten the nut, however, you can cause damage. If the nut has been tightened to the end of the threads on the truss rod, then continuing to crank it can strip the threads out of the nut or off the rod. In worst-case scenarios, I've seen the threaded end of the rod completely break off in this situation. This renders the truss rod useless, but I've repaired dozens of these with the "Truss Rod Rescue Tool" from Stewart-MacDonald.
Turning the adjusting nut counterclockwise loosens the truss rod.
 Always loosen the adjusting nut first By loosening the nut before tightening, you know that you're starting at the beginning of the nut's travel. If it's a removable nut, this is also a good time to take it off to clean and lubricate the threads inside the nut and on the exposed truss rod. Vaseline applied with a Q-tip is a good lubricant.
Replace the nut and tighten it only to the point that it's beginning to engage against the neck but not quite exerting pressure. This is the starting point, or zero point, of the truss rod's action. At this point, I put a mark on the nut with a finepoint marker so I can see how far it's being rotated.
Do not start turning the nut as if you were tightening a bolt. Starting from the snug zero point, the adjusting nut will do its work immediately, and an ideal neck adjusts perfectly with a mere quarter or half turn. In extreme situations, a nut may require one full turn, but be careful—this isn't like winding a clock!
Adjusting two-way truss rods
Examples of two-way rods are Fender's Bi-Flex truss rod (which they started using in the early 1980s and use today on many models), and the PRS doubleaction truss rod, used since 1992. These rods push/pull the neck in either direction. Many smaller companies and individual luthiers also build with twoway adjustable truss rods available from guitar shop suppliers (i.e. StewMac's "Hot Rod"). Two-way rods save the day in cases when a neck back-bows, warping away from the strings.
Fender supplies a 1/8" long-reach Allen wrench to adjust its Bi-Flex truss rod, which is accessible through a hole in the peghead near the string nut. Paul Reed Smith guitars use a truss rod nut that resembles Gibson's traditional acorn nut. The PRS nut, however, is welded to the rod and, like the Bi-Flex, is not removable. It adjusts with a 5/16" socket driver that drops into the truss rod cavity to do its work. Also pictured is my long-handled version of a Gibson truss rod wrench, which gives easy access while keeping the turning action well away from the peghead.
To pull the neck against the string tension, lowering the strings and reducing relief, turn the adjusting tool clockwise just as with one-way rods.
Loosen the rod and give relief to the fretboard (letting it go with the pull of the strings) by turning the tool counterclockwise.
To correct a back-bow: (Two-way rods can perform this trick, while standard rods can't.) When a back-bow causes the neck to curve away from the strings, loosen the two-way rod counterclockwise until you feel the slack zero point of no tension, then continue turning counterclockwise until you feel resistance. You are straightening the neck by forcing it upward, in the direction of the strings.
Many imported guitars have adjustable truss rods that adjust at the peghead and with an Allen wrench. Sometimes a standard Allen wrench isn't really long enough for the job. In this case, I recommend buying a long-shaft, T-handle Allen wrench. I heated and bent mine into an L-shape that keeps my hand clear of these Fender tuners. You might want to do the same with the help of a metalworking shop.
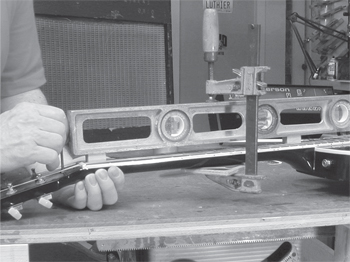
Using a straightedge and a clamp to “pre-adjust” the truss rod.
Help for difficult truss rods
Usually, a truss rod will work as intended by the factory and described above. But problem necks are out there, and they're downright frustrating. Here are some tips that will help you with troublesome necks.
Bend the neck, so the truss rod doesn't have to.
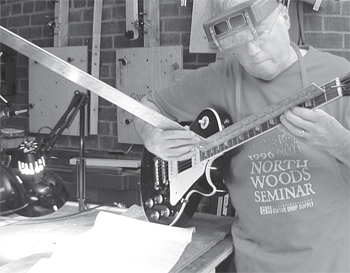
This idea is important for any neck that needs a big adjustment. I almost always use this method for non-troublesome necks too, just to be safe.neck
I put a bend into this T-handle Allen wrench for adjusting truss rods.
A truss rod is a pretty slender length of steel, and we ask it to do quite a job. Not only does it maintain neck position by countering the force of the strings, we expect it yank the neck and strings into new alignments, too. That's too much to ask. It causes unnecessary strain on the truss rod.
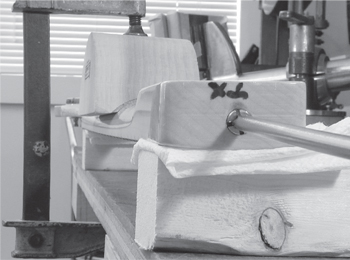
 I like to help the neck by bending it to a new position externally, so the truss rod only has to hold it in position. It amounts to "pre-adjusting" the rod beforehand. Here's how I do this.
I loosen the strings and place a small block of soft pine over the frets at each end of the fretboard. If I want to leave the strings on, I use blocks that are notched to fit over the strings. I lay a metal bar (my carpenter's level) across these two blocks. With a rubber-padded protective block against the back of the neck, I use a small bar clamp to apply gentle pressure to the neck and the metal bar. This curves the neck into a slight back-bow. With this back-bow established, I tighten the adjusting nut. Now the neck has a back-bow without the truss rod having to work to get it there; it just has to hold the position. From here on, I just loosen the truss rod to let the neck pull itself into the straightness or relief I want for this setup.
You can do this without the metal bar and clamp. Have a friend hold the guitar body firmly on a table, with the neck hanging off the edge. You can pull back on the neck as you adjust the truss rod. If you're working alone, you can clamp the body to the table while you make the adjustment. (Be sure to protect the body's finish with some padding.)
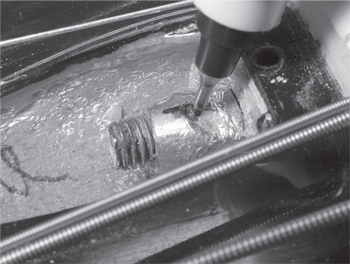
Here's a tougher case: The truss rod nut being marked on page 48 is on an old Les Paul. It was as tight as it could go, yet there was still too much relief in the neck (a whopping .027" at the 9th fret). There was also a lot of truss rod thread coming out of the adjusting nut, which isn't normal. This nut was over-tightened by someone who didn't realize the nut was maxed out. They didn't stop when the nut didn't want to turn any more. They pressed on to the point that the nut compressed the wood of the neck itself. There's a metal washer in front of the adjusting nut, and it was crunched deeply into the wood. With a little more of that, I suspect the threaded portion of this truss rod would have snapped right off!
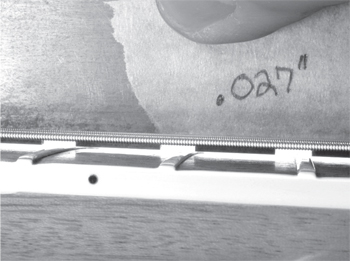
This neck shows too much relief (.027") at the 9th fret.
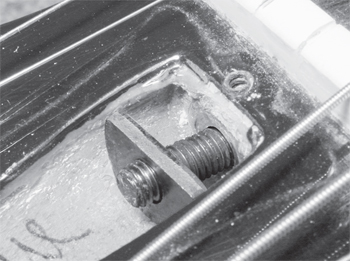
The metal washer in front of this adjusting nut is there to spread the nut's pressure evenly against the wood, and provide a low-friction surface for the nut to turn against. It's a half-moon shape, with a flat side facing the truss rod cover. I removed the nut to clean and lubricate it, leaving the washer where it was. Before the nut went back on, I added a second half-moon washer. That doubled the metal's thickness, lessening the amount of protruding thread and giving the adjusting nut a fresh start.
From here on, I used the same adjusting methods described above: marking the nut, clamping the neck with a metal bar, etc. The neck straightened up nicely, without turning the adjusting nut anywhere near its limit.
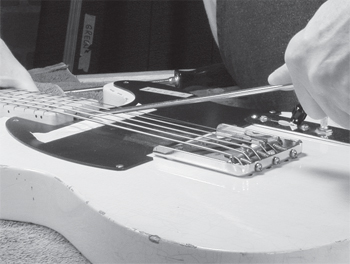
Adjusting at the body end of the neck, Fender style
On a vintage style Fender, the truss rod nut is located at the body end of the neck. The neck's fastened in a neck pocket, with the adjusting nut down below the surface, creating a puzzle of how to get at it. You'll see instances where someone gave up on this puzzle and used a chisel or file to gouge their way down through the pickguard and body to get at that nut.
Don't do that!
 The answer, of course, is to loosen the neck and lift it out of the pocket. This isn't as difficult or time-consuming as you might think. Here are two ways to do it.
The first way is the easiest (and therefore the most common) method, although it's not the one I prefer. I think it's a little risky since the neck is never completely removed from the body. If you're not extremely careful, you're likely to scratch the body or a pickup with your adjusting screwdriver. Still, it's the most common method, so here goes.
- Loosen the strings I like to tie the strings with a rubber band or use a capo so they don’t spring out of the tuners and flop all over the place.
- Loosen the neck mounting screws with a screwdriver (vintage Fenders use straight-slot screws, later models use Phillips' head). Don’t remove the screws, just loosen them.
 Tape the pickup down If the pickup is springy, push it down and tape it to hold it as low as possible. Tip the neck until the adjustment nut is uncovered enough to get a narrow, long-handled screwdriver into the slot. You’ll only be able to get the blade into half of the slot; this is a problem if you need to apply much pressure because the nut can break with only half the slot taking the load. This shortcut method is okay for necks that adjust easily, but it’s not for me.
A better plan is to remove the neck entirely so that you can adjust it properly, with a screwdriver tip engaging the full slot (Phillips head or flat blade). The downside of this method is that you have to be patient. You'll often take a neck off and on four or five times before the rod is adjusted to your satisfaction. Experience is a big help, and eventually, you'll get it right with only one or two adjustments.
- Remove the strings carefully from the tuners so they'll go back on easily and without breaking. Lay the treble strings to one side and the bass strings to the other to keep them from tangling.
- Remove the neck mounting screws Hold your fingers around the screwdriver tip to keep the screwdriver from slipping onto the finish.
 Separate the neck from the body Lay the guitar on a soft towel and carefully remove the neck from the body. Set the body and the strings aside.
Now that the neck's free from the body, it's easy to adjust using the methods described above (lubricate the nut, help the neck by clamping, etc.).
A brass spacer compensates for over-compressed wood.
If the nut has been over-tightened to the point of crushed wood (like the Les Paul example), this is the time to add a metal spacer. It's a pretty small hole compared to the Gibson, however; I have sometimes made brass spacers on a small lathe in my shop for this purpose. At other times I've used small flat washers from the hardware store, ground or filed down so they'll fit in the hole. If you stop by a local machine shop and show them the problem, they can make you a spacer easily.
 When there's no hurry, I leave the neck strung overnight to settle in before making a judgment. The truss rod will continue to exert pressure (or give way to string pressure), and the neck may look different the next day. Patience is a virtue.
Now that the truss rod has the neck in the shape we want, let's move on to the ends of the neck. We'll start at the nut.
Need to know more? Pick up a copy of Dan Erlewine's book, How To Make Your Electric Guitar Play Great!