I think I can. I think I can… the little engine that could certainly comes to mind when talking about the Hughes & Kettner GrandMeister 36, a compact powerhouse of an amp that seems cute and sweet on the outside, but inside packs more capabilities than most full-sized heads.
As a compact, light weight, low wattage tube amp, it would have been enough to just say that it’s a four-channel Hughes & Kettner amp in a small package, but that’s just the start. Next, throw in a some extremely useful, high quality, effects. Then, add memory to store a ton of sound presets, and give it all simple, integrated MIDI control. Next, offer a foot controller easy enough for the typical rocker to use just as if it were a common footswitch.
You want more? The GrandMeister 36 adds lower-wattage power settings, silent operation, and a built-in, Red Box, cabinet simulated DI. All of this adds up to an amp that is very well thought out, easy to use, and highly versatile.
Features
The Hughes & Kettner GrandMeister 36 is a versatile, 36-Watt, four-channel, tube amplifier that combines classic analog tone with modern digital features—like onboard effects and MIDI programmability.
At the heart of the GrandMeister 36 is a low-wattage tube amp built around three 12ax7 preamp tubes and four EL-84 power tubes. The amplifier features four modulation effects including chorus, flanger, phaser, and tremolo as well as a digital spring reverb, delay, lead boost, and noise gate; the settings for which can be saved as presets in one of 128 memory locations all accessible via MIDI.
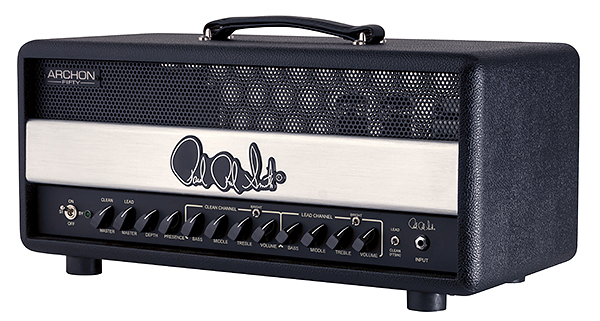
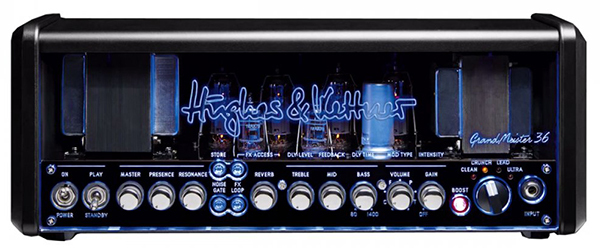
The amplifier is housed in a compact aluminum casing, weighs only 17 pounds, and sports the classic Hughes & Kettner transparent front casing and blue LED design. It’s narrow enough that you can stuff it on a shelf in a standard 19” equipment rack if desired.
The front of the Grandmeister is relatively straightforward, yet extremely dense with features. It includes a three-band EQ, reverb control, volume and gain controls, a boost switch, master controls for volume, presence and resonance, and a dial that switches between the amp’s four channels fittingly named “Clean,” “Crunch,” “Lead,” and “Ultra”.
A small section of switches also on the front of the amp includes buttons to activate the amplifier’s noise gate and effects loop, a button to store presets, and an FX-Access button which “converts” the channel tone control knobs into controls for the effects including delay level, feedback, delay time, modulation type, and intensity.
Speaking of effects, it should be noted that the digital delay only serves up ¼ note and 1/8 note repeats—no dotted time values are accessible.

The back of the amp boasts a serial effects loop (no wet/dry balance or level controls), MIDI In/Thru jacks, Power Soak buttons that allow for switching between the four power settings of 18W, 5W, 1W, and silent operation, and one 8-16 ohm speaker output. Less conventional features located on the back include the control knob for the noise gate, a line out for use with an external power amp or tuner, and an XLR output for Hughes and Kettner’s built-in Red Box DI and speaker simulator (with Classic and Modern speaker emulation options).
The button for silent operation isn’t specifically important, though. If you unplug your speaker cable, the GrandMeister 36 automatically goes into silent/headphone/Red Box mode! If only every tube amp of ours could operate safely with a load removed from the speaker output. Awesome!
The noise gate is worth specific mention. Utilizing “Intelligent Dual Breakpoint” technology, the gate analyzes the instrument signal at two points: at the input jack, and after the preamp section, before effects. Besides enabling the gate to optimize its response, this pre-effects placement it won’t cut off reverb tails or delay repeats.
Each preset on the amplifier can be saved to 128 memory locations and recalled via any MIDI foot controller. We were happy to note that the MIDI In jack is a 7-pin DIN connector that supplies phantom power to foot controllers that support it.
The GrandMester 36 features Tube Safety Control, Hughes & Kettner’s version of “No Biassing Required.” Go ahead and swap tubes if you like (or let your tech do it if you’re not so inclined). LEDs indicate tube health over their life, and whenever you should choose to swap tubes, the amp automatically and constantly biases/re-biases itself. Nice!

The matching Hughes & Kettner FSM-432 footswitch makes sound selection a breeze. Sounds are arranged into 32 banks, and four footswitches provide access to the sounds in a bank. The footswitch also features a tap tempo button for setting the tempo of the on-board delay, plus two 1/4” inputs for attaching expression pedals. A toggle switch on the rear changes the foot controller from Preset mode to Stomp Box mode. In the latter, the bank select and tap buttons become controls for activating modulation, delay, and the lead boost stomp box style, while the four footswitches select between the four channels on the amp.
A free iOS app can also be used in conjunction with the FSM-432 to access all of the amplifier’s controls directly from an iPad. The WMI-1 wireless MIDI interface can be used to facilitate the iPad/amplifier connectivity if you don’t already have an interface for your iOS device.

Usability
The Hughes & Kettner GrandMeister 36 was very easy to operate once we learned the basics, which required a quick trip to the manual in order to figure out how to adjust effect settings (after which it was quite obvious) and save our settings.
Creating a sound, with or without effects, was a simple affair. First, we turned the large knob to select between the four channels: Clean, Crunch, Lead, and Ultra, and next, we moved on to the rear of the head to select our desired wattage for the sound. While we typically favored clean tones with plenty of headroom and left most sounds at the default 18W setting, for some of our crunch sounds, we enjoyed dropping the wattage to 5W for extra gain and compression at reduced volume levels.
Independent of the globally-applied master volume, presence, and resonance controls, each sound that we created had its own volume control, so it was easy to balance volume levels from one sound to another.
Pressing the Noise Gate button activated the gate on our sound, and we found that setting the gate’s control (on the rear of the amp) to 12:00 provided gating that worked beautifully to control noise and not interfere with the decay of our notes. Adjusting +/- from the 12:00 midpoint changed both the attack and the closing gate relationship.
After adjusting the gain and tone controls, plus other niceties like effects loop active/bypass or utilizing the onboard effects, saving our sound was an easy affair. We could do it one of two ways:
- Press and hold the Store button a few seconds until it blinked, overwriting whatever sound had previously occupied the current location in the amp’s memory.
- Press and release the Store button (it begins to blink), then select a bank and preset number via the foot controller, and the sound was written to that memory location.
Typically, we used the first option: select a bank and preset via the footswitch, then tweak the tone to taste, and finally hold the Store button to overwrite that particular sound with our new one. But method 2 came in handy when we created a cool sound and suddenly thought, “I’d rather save this in that other bank of sounds I’m working on.”
Speaking of footswitches, consider a MIDI foot controller a required component for any rig built around this amp, whether it’s your own advanced controller or the very straightforward, Hughes & Kettner FSM-432 MK III footswitch, which we utilized throughout the review.
From the footswitch, it was simple to scroll up or down through 32 banks of settings and then select one of the four sounds saved within each bank from buttons A—D (for a total of 128 patches/presets/sounds/etc.). For sounds incorporating digital delay, the Tap button enabled us to instantly tap in our desired tempo whenever it was different than the saved value.
Tip: You might be wondering about the need for 128 memory locations, but the arrangement of banks containing four presets each is ideal for building a set list. We suggest using each bank for a single song, and within each song, you have four amp tones. Save your clean tone to button 1, crunch to button 2, lead tone to button 3, and then use button 4 for “special effect” tones, like if you’ve got a song that starts off with a strange delay/flanger part. Be consistent across all of your banks of sounds so you always find tones going from clean to heavy to your optional fourth “special” sound for each song. Even if you’re a pretty straightforward player and most of your sounds are identical across banks, this setup would enable you to save each of your songs with just the right delay and/or chorus settings, for example.
Using the effects was easy. Once the FX Access button was enabled, the tone knobs became controls for the effects. As we rotated the Volume knob, which has small indicators for Chorus, Flanger, Phaser, and Tremolo, as we rotated the dial through the range of effects, the rate of each effect would increase, making it super easy to select effects and set their speed at the same time. The Bass knob offered delay settings ranging from 80ms to 1400ms, while the other EQ controls let us adjust delay level and feedback. Reverb was always controlled with a dedicated control, whether or not we were in the effects editing mode.
Another nice detail: the state of the FX Access button gets saved with presets, too. So if we had a sound that required constant tweaking for its effect, we could choose to save that preset with the FX Access switch engaged, so touching the knobs would instantly be in control of the effect instead of the tone stack.
Tone tweakers will love the advanced MIDI capabilities. All of the amp’s controls are directly accessible via MIDI continuous controller (CC) messages. Beyond the basic program change (PC) messages, you can assign CC values to control the effects, mute the amp, solo boost, etc. And if you desire, you can even control settings such as Gain, bass, treble, etc. via a continuous control, which is pretty awesome.
The Silent Output feature proved to be of somewhat limited value. Although we could save this setting with any preset just like other wattage values, simply unplugging our speaker cable was all it took to achieve operation through an in-ear monitor system or headphones. This function was useful, however, if we wanted to save a preset for silent tuning while using the FSM-432 MK III footswitch. With other advanced MIDI foot controllers, we could simply assign a CC value to a switch of our choosing to activate the amp’s Mute feature.
Sound
We weren’t prepared to enjoy the sound of this amp nearly as much as we did, but the Hughes & Kettner GrandMeister 36 proved to be a highly versatile tone machine, with more than enough volume on tap to drive our 2x12 cabinet at rock band levels. We played the amp with a variety of single-coil and humbuckers-equipped guitars.
The Clean channel was highly adept at delivering Fender-esque clean tones, and our single-coil solid-bodies delivered tone with plenty of spank like we’d seek. With our high-gain humbucking guitars, the range of clean tones were softer and rounder in nature, more like what you’d expect from a Les Paul into a Marshall JVM or DSL amp.
We found the meatiest heavy tones in the Crunch channel, which had a decidedly British flavor. All of our classic hard rock and metal tones were satisfied here, and varying the Resonance control left or right of 12:00 let us change the feel of the amp’s response from looser to tighter, though overall, the amp tended to respond more like a British amp than its German amp compatriots are known for.
Note definition was excellent, and fusion and prog rock players will appreciate the GrandMeister 36’s clarity when playing complex chord voicings through medium-to-high gain crunch.
The Lead channel was more scooped and gainier than the crunch channel, and had more of a nu-metal personality than the crunch channel. Even without the noise gait, we found the GrandMeister 36 to be on the quiet side of high-gain amps. Many players wouldn’t even think to need a gate with this amp.
As you might imagine, ratcheting things up to the Ultra channel produced a further scooped, compressed tone, which we found well suited as much to classic Van Halen tones as it was to extreme metal. The third channel on the EVH 5150 III came to mind a bit when playing through this highest-gain-but-generally-less-useful channel.
Between the Lead and Ultra channels, our general feeling was a lack of depth to the tone that we fully attribute to the use of EL-84 power tubes. They just don’t have the depth of EL-34 or 6L6 power tubes, and therein lies the great trade-off when you opt for the current breed of low-gain amps (or a modeling amp, for that matter). You can’t truly have it all. With the super-high-gain tones, the GrandMeister 36 delivers the sonic signature and tone definition—and volume, but the depth of the tone is constrained. We pine to have a version of this amp built around larger bottles… Oh wait! That would obviously be the TriAmp Mk III.
The effects sound fantastic! Although we lament the limited capability of the delay values, the sounds themselves are excellent, and we could easily forego our larger effects rig and pedal board for smaller gigs with just the GrandMeister 36 and foot controller in tow. The Modulation effects were beautiful sounding, and the tremolo was especially fantastic.
The Hughes & Kettner Red Box was one of the first DIs for guitar amps, and while cabinet simulation technology has evolved significantly from the days of the Red Box (it was pretty much the industry standard for some time), it still provides reasonably acceptable amp/speaker emulation output straight to the mixing board for live use. We found the modern voicing was a little bit brighter than the classic setting (and more favorable), but as the DI lacked the body of a miked cabinet or a modern cabinet modeling solution, we’d skip this output option in the studio and mike our cabinet.
Bottom line: If the amp only offered the Clean and Crunch channels, we would rate the sound quality higher, as those channels deliver fantastic tones with great variety. So if you lean towards more traditional blues, rock, alternative, and metal tones, you’ll be quite happy with those channels, while the Lead and Ultra channels are certainly decent enough for your occasional ventures into nu-metal and heavier territory, though players who live in the heavier realm of molten metal tone would be better served by amps with bigger power tubes.
Documentation and Product Support
The user’s manual for the GrandMeister 36 is excellent. All features are very well documented. Even novices scared by the idea of a MIDI foot controller will find everything explained in a super, easy reading manner
Price
The Hughes & Kettner GrandMeister 36 (MSRP $1,499) sells for approximately $1,200. The FSM432 MKIII MIDI Footswitch (MSRP $249) sells for approximately $200. For $1,400, you get a fully programmable amp with very nice tones, excellent effects, and a compact package with a wealth of capabilities.
Contact Information
Hughes & Kettner
www.hughes-and-kettner.com
Overall Rating - Product Summary
| Category | Value | Rating |
| Features | 20% | |
| Usability | 25% | |
| Sound | 25% | |
| Documentation & Support | 10% | |
| Price | 20% | |
|
|
||
| OVERALL RATING = 3.5 Stars
3.6 stars or better: Outstanding, WIHO Award
|
||