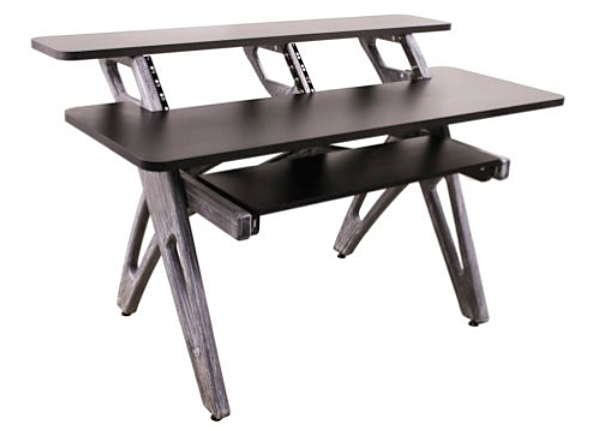
 |
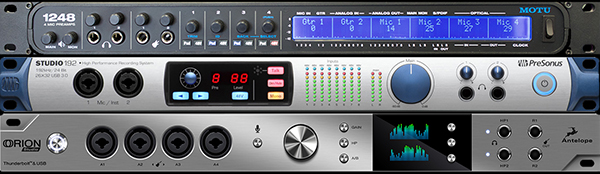
| MOTU 1248 PreSonus Studio 192 Antelope Orion Studio |
If you’re in the market to upgrade your recording studio or project studio’s computer audio interface, there are an overwhelming number of choices on the market today. One of the first questions you need to consider is this: What kind of interface to the computer do you need? If you’re not looking at PCIe card solutions (like Avid Pro Tools HDX), the choice today mainly comes down to Thunderbolt and USB.Audio professionals who run their studios with Apple Macintosh computers face tough decisions when it comes to purchasing audio interfaces today. Apple abandoned FireWire, leaving the choice of USB or Thunderbolt for connectivity, and sadly, many manufacturers prematurely jettisoned their support of FireWire from their current product lineups (MOTU being one of the exceptions, though this particular MOTU interface doesn’t include it).
If you’ve got a home studio running off a MacBook Pro or an iMac, you will be well served by Thunderbolt interfaces, which support far more data streams with low latency than you’re likely to ever record at one time when tracking typical rock/pop band instrumentation. But for thousands of studios built around the aluminum tower Mac Pro, which only offers USB 2.0 and FireWire 800 ports for connectivity, Thunderbolt just isn’t an option. You can’t even add Thunderbolt to a pre-2013 Mac Pro via a PCIe card—the technology requires different/newer motherboard capabilities.
But all is not lost: USB 2 is capable of handling twenty-four or more tracks of simultaneous audio recording with low latency, and you can install a USB 3 card in the Mac Pro for less than $60 which can take advantage of significantly faster data transfer rates with audio interfaces that support it. USB 3 is nearly ten times faster than USB 2, though its 5GB/s throughput is a casual jog in the park compared to Thunderbolt 2’s speedier 20Gb/s. Ultimately, the real performance gain from USB 3 would be higher simultaneous track counts.
On the Windows side of things, USB is your primary interface option (the latest Wintel PCs include USB 3.1 ports that achieve up to 10Gb/s), with minimal—but growing—Thunderbolt support. The inclusion of USB Type-C connectors on new PCs should further increase adoption of the Thunderbolt protocol, as it can run over these interfaces (and in related good news, MOTU supports Thunderbolt on Windows, and FireWire, too).
With Apple’s apparent abandonment of the high-end workstation (see our feature story about this issue here), the fate of Mac Pros in the studio remains unclear to many engineers, as the trash can-shaped Pro appears to be a dead-end configuration that hasn’t been upgraded since it was released three years ago.
This leads us to the subjects of this product roundup: an exciting collection of computer audio interfaces that includes the MOTU 1248, PreSonus Studio 192, and Antelope Orion Studio. These capable interfaces offer either USB, Thunderbolt, or both, so you’ll have a choice of connectivity options in the event that your next computer upgrade dictates a change—like replacing your Thunderbolt-equipped Mac with a USB-equipped PC.
Each interface has a different feature set surrounding some basic commonalities, so given their very comparable levels of sound quality and performance, the right tool for you will likely be dictated by your studio environment and future expansion requirements. The good news: there is no bad choice among these.
Features
All three of these audio interfaces feature multiple interfaces, preamps, and expansion capabilities. On the computer interface side of things, the MOTU 1248 and Antelope Orion offer both Thunderbolt and USB 2.0 interfaces, though the Thunderbolt ports are single and do not offer any subsequent daisy-chain capabilities. The PreSonus Studio 192 lacks Thunderbolt but offers high-speed USB 3.0 connectivity. All support both Macintosh and Windows computers, though Thunderbolt connectivity on the Antelope Orion Studio is presently Macintosh-specific.
Each interface has impressive 24-bit audio specs all the way up to 192kHz, and they support anywhere from 24 to 128 channels of simultaneous i/o while tracking, though realistically, we doubt the majority of users will be pushing these devices to anywhere near the limits.
| 48kHz Sample Rate
# Channels over |
48kHz Sample Rate# Channels over Thunderbolt |
192kHz Sample Rate
# Channels over |
192kHz Sample Rate# Channels over Thunderbolt |
Dynamic Range | |
| MOTU 1248 | 64 | 128 | 24 | 64 | 117-118dB in 123dB out |
| PreSonus Studio 192 | 26 | n/a | 8 | n/a | 118dB in/out |
| Antelope Orion Studio | 24 | 32 | 24 | 32 | 120dB in/out |
What kind of connectivity do these devices offer? All of them feature a pair of ADAT ins and outs that let you add either sixteen or eight additional input channels depending on whether you’re connecting to external preamps at 44.1/48kHz or 96kHz. They all feature BNC connectors for external clock sync and S/PDIF digital audio on familiar RCA jacks.
Before we get into the differences in line inputs and preamps, let’s take a look at what comes out of these interfaces:
| Main Outs (pair, ¼” TS) |
Individual Outs | Headphone Outs | Internal Talk-back mic |
Other | |
| MOTU 1248 | 2 (Main, Monitor) | 8 x ¼” TRS | 2 | No | n/a |
| PreSonus Studio 192 | 1 (Main Out) | 8 x ¼”TRS | 2 | Yes | n/a |
| Antelope Orion Studio | 2 (Mon A, Mon B) | 16 (2x DB25) | 2 | Yes | 2 x TS Guitar Re-amp Outputs |
What makes one of these interfaces better for you than the next? The input section, which is a major point of product differentiation.
All three of these audio interfaces feature digital mixer interfaces that are controlled from your host computer (or, in some cases, from a tablet), and they offer a variety of additional features related to their mixer sections that you can’t see from the surface, like onboard dynamics processing, effects, and more.
Let’s explore some of the differences between these interfaces:
| MOTU 1248 |
 Click image to enlarge... |
 Click image to enlarge... |
MOTU 1248
The rear of the MOTU 1248 provides connectivity to four preamps on XLR jacks (each with independent control over phantom power and a -20dB pad), eight line inputs on ¼” TRS jacks, and the front of the 1248 has two Hi-Z instrument inputs on ¼” TS jacks for tracking guitars and basses. The preamp gain goes up to 63dB in 1dB increments.
The MOTU 1248 adds AVB/TSN (Audio Video Bridging/Time Sensitive Network) Ethernet operation, too. With AVB, you can connect additional AVB-supported interfaces over standard Ethernet cabling, and on Thunderbolt-equipped Macs, you can even use Ethernet as your primary connection to the computer itself. The advantage of AVB compared with Thunderbolt and USB is distance: You can set up a MOTU preamp in one room and then run a single Ethernet cable up to 100M (328 feet) back to the primary interface on your computer. Although latency between devices on an AVB network is low (just a handful of samples), we would still favor USB or Thunderbolt for best results if you don’t specifically require AVB’s distance capabilities.
Management of the 1248 is accomplished via a web-based application that can run on any Mac, PC, or tablet as long as that device is attached to the same network (wired or wireless) as the computer to which the 1248 is connected.
 Click image to enlarge... |
The MOTU 1248 offers up to 32 assignable input channels and 34 outs at 48kHz, and each channel strip includes a high-pass filter, noise gate, four-band parametric EQ, and compressor (accessed via the AVB Control web browser interface, explored later). The mixer itself supports up to 48 assignable input channels. The MOTU MasterWorks Leveler is modeled after the Teletronix LA-2A compressor, the EQ is modeled after British console EQs, and the onboard Classic Reverb has tails up to sixty seconds long (and three frequency bands with adjustable crossover points).
You can configure up to seven stereo aux busses and four mix groups, and individual band members/musicians can use an iPad app to manage their own monitor mixes.
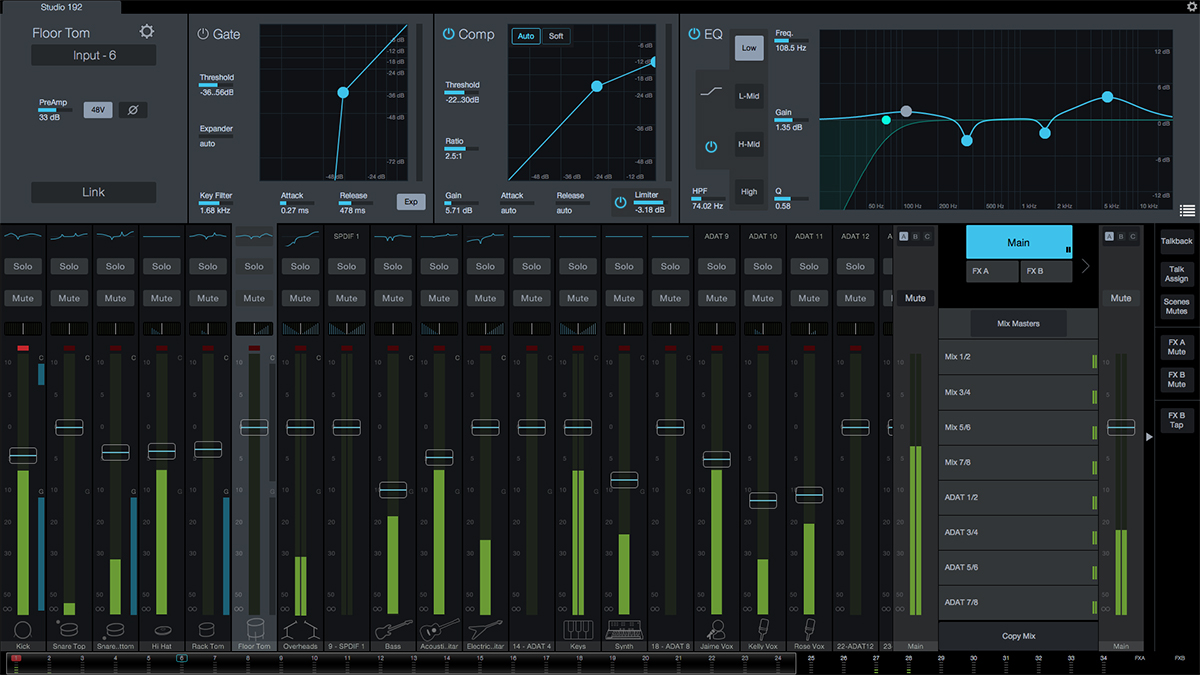
| PreSonus Studio 192 |
 Click image to enlarge... |
 Click image to enlarge... |
PreSonus Studio192
If you’re familiar with the PreSonus StudioLive mixer series, you’ll be instantly at home with the Studio 192, which is functionally similar and relies upon the same software to operate.
The front of the Studio 192 has a pair of combo XLR preamp/TS instrument inputs, and the rear has six XLR/TRS combo preamp/line inputs. Each channel has assignable phantom power from the front panel, while other settings are addressed via software. Connecting via ¼” TRS cables bypasses the XMAX preamp circuitry (important when connecting your pricey outboard preamps).
PreSonus UC Surface software runs on Macintosh and Windows computers, and through its digital mixer software interface, UC Surface provides detailed controls over all of the inputs. Besides 180° polarity control, the PreSonus Fat Channel interface provides a high-pass filter, parametric EQ, compression/limiting, and noise gating on the first sixteen inputs. This is cool, because if you add eight additional preamps via a PreSonus DP88 or other ADAT-attached preamp, you can take advantage of the onboard signal processing.
UC Surface also runs remotely on iPads, iPhones, and other laptops on your network, so you can control the device’s settings without taking up screen real estate on your workstation computer. If you happen to run PreSonus Studio One as your DAW, the Studio 192 and its Fat Channel feature set integrate directly into the software.
 Click image to enlarge... |
What’s especially impressive is that the Studio 192 also provides Fat Channel processing on its first ADAT interface, so you can apply this processing to up to eight additional inputs (such as when paired with the DigiMax DP88, which adds eight PreSonus XMAX preamps on XLR combo jacks to any ADAT-equipped interface). Unlike the other products in this roundup which provide emulated versions of classic dynamics and EQ processors, PreSonus audio processing is entirely to their own spec.
There are two effects busses within the Studio 192; the first dedicated to reverb, and the second dedicated to delay effects.
An unusual feature unique to the Studio 192 is that it supports MIDI control via continuous controller messages! You can actually configure host applications to adjust Trim and Phantom Power, assigning those features to virtual knobs or buttons, and then save the settings with your individual project sessions.
| Antelope Orion Studio |
 Click image to enlarge... |
 Click image to enlarge... |
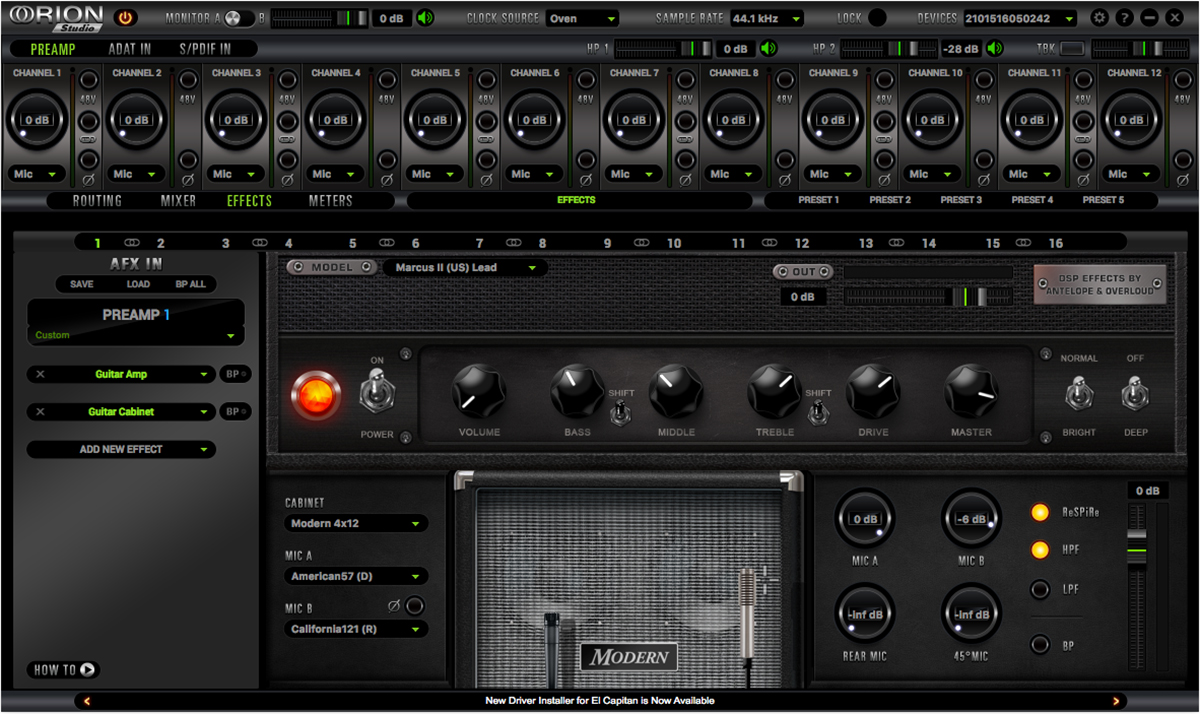
Antelope Orion Studio
The Antelope Orion Studio offers a different blend of options that make it extra useful in the pro studio, or when your needs include tracking a lot of live instruments. To start, the Orion Studio has four combo XLR preamp/TS line/instrument inputs on the front panel, and eight combo XLR preamp/TRS line inputs on the rear. As with the Studio 192, line inputs bypass the preamp circuitry.
The rear of the Orion Studio also includes a pair of ¼” TRS insert jacks dedicated to inputs 1 and 2, useful if you have a prized compressor or other hardware that you’d like to place in the signal chain immediately following the preamp. Additionally, the Orion Studio offers sixteen direct outs via a pair of DB25 connectors (beyond two pair of main ¼” outputs).
The front panel offers another unique feature among these interfaces: a pair of ¼” re-amp outputs for re-amplifying dry guitar signals taken from your DAW session files. The output of the re-amp jacks is designed to provide your guitar amplifier with an appropriate impedance response so that it responds and reacts to the incoming instrument signal appropriately, as if it were being hit by an actual electric guitar or bass.
Managing this expansive i/o is handled from the Orion Studio Launcher software application on a Mac or Windows PC, and the software unlocks additional capabilities not found in the other interfaces reviewed here. As with the other products reviewed here, a mobile app for iOS and Android facilitates remote control from tablets or smart phones.
 Click image to enlarge... |
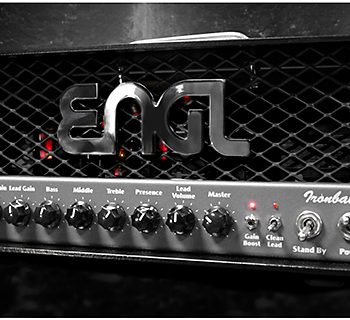
Inside the Orion Studio application, you’ll find a large collection of effects ranging from modeled EQs, classic compressors, Antelope’s original Auraverb reverb, and… guitar amp and speaker modeling! Our Orion Studio was loaded up with digital recreations of classic amps and speaker cabinets from Marshall, Mesa/Boogie, ENGL, Fender, and more, each identified with names and graphics sure to give you a clue as to which amp and speaker cabinet you’re using. There are microphone models for the cabinets, too, and you have control over the placement of two mics on each cabinet. The mics are familiar choices for recording guitars. You can track dry guitar tracks alongside the processed ones, too, for future use in a re-amping situation.
Usability
All three interfaces were comparably easy to use, though each interface had unique attributes that distinguished one from another. To begin with, though, all followed a similar path: connect a Thunderbolt or USB cable to the computer, install the accompanying software (we recommend downloading the latest release from each company’s website), and then begin the configuration process. We tested each audio interface on both a 2010 Apple Mac Pro running OS X 10.11 and a custom-built Windows 10 PC, each running the latest available release of Avid Pro Tools 12.5 and 12.6 (we happened to upgrade Pro Tools in the midst of the review cycle).
Audio interfaces have evolved over the years, and performance keeps getting better and better. All three manufacturers boast various specs for low latency and zero-latency monitoring, etc. Without getting bogged down in the details of milliseconds, we will simply say that the manufacturer claims of super-low latency held true with each of these devices throughout testing. Hosting effects and processing directly in the interfaces instead of relying on your host computer and associated plug-ins makes it easy to track with compression, gates, reverb, etc. across multiple tracks with zero performance impact on the host computer—and zero latency if relying upon direct monitoring of the audio outputs.
We had no trouble tracking inside Avid Pro Tools with a buffer setting of just 128 Samples on either the Mac or PC, and could actually select/achieve lower buffer settings on our Wintel machine if desired (but truthfully, most musicians tend to be perfectly happy—or blissfully unaware—with buffer settings of 256 Samples during tracking, other than (perhaps) shredders soloing over extremely fast, technical, music material).
Here are some specific differences we experienced with each of the interfaces:
MOTU 1248
MOTU’s AVB Control software is relatively platform agnostic, running inside a web browser after the initial launcher application and drivers are installed on the host workstation where the interface will be attached. Technically, the user interface is served from a web server installed within the MOTU hardware, and then virtually any web browser on any device attached to your network can access and control the MOTU 1248, and firmware updates to the 1248 subsequently make all changes available to any devices you connect with for administering the interface.
Before we delve into the software, we’ll point out that the physical interface to the four onboard preamps (happily) required no computer interaction. While the 1248’s display showed all inputs and outputs by default, as soon as we adjusted one of the four Trim controls for signal level, the interface changed to a detailed meter for that specific channel running across the entire display, which made it a breeze to set our levels.
[Tip: the display switches back to the standard trim control display within a second of releasing the trim control, but simply press the trim control knob in to “pin” the channel focus display to the detailed channel meter mode.]While each preamp input has a soft button for Pad and another for 48V phantom power, we had to utilize the software/browser interface in order to adjust phase/polarity on our channels. Further, it should be noted that the monochromatic display made it hard for us to observe at a glance when our signals clipped.
The software interface itself is split across three different panes or tabs in the browser interface, and while we’ve read complaints about the speed with which you can jump from one screen to the next, we found that this was only a concern (and minor one, really) on our Windows 10 Professional workstation, and not an issue on our Mac Pro—which was surprising given that the PC had specifications that are more than twice the speed and performance of our studio’s Mac.
We used Safari on the Mac and Chrome on the PC for testing. Obviously, if performance is an issue, just try a different web browser, as your results will certainly vary. Between Safari, Chrome, Firefox, Edge and Explorer on Windows, you’ll probably find one clear-cut performance champ among them.
From an operations perspective, the software was straightforward to use, and anyone familiar with a grid-like matrix to map ins and outs, and a computer-based mixer interface, will be up and running with relative ease. We appreciated the setup wizard that automatically configured the inputs and outputs based on our intended use of the hardware.
While the web browser-based interface wasn’t as speedy to navigate overall as the other products’ dedicated Mac and Windows software applications, it did prove perfectly useable once we got the hang of it. Having spent more than a decade Opt-/Cmd-/Ctrl-clicking through various Mac and Windows audio applications to return controls to their default positions, it never occurred to us to double-click controls in the MOTU web interface for this purpose. Resetting knobs and sliders to their default positions for panning, trim, level, etc. drove us crazy until the folks at MOTU pointed out that simply double-clicking controls in their interface returned them to default settings. Nice!
A few oddities we experienced: although the interface will most likely be attached to your computer via USB or Thunderbolt, firmware updates require connecting via Ethernet. Fortunately, plugging into our Mac Pro’s second Ethernet port required no configuration at all—the software automatically found the attached 1248 interface in order to update its firmware to the latest version. On one of our computers, the MOTU Discovery application ran but failed to see our attached 1248 interface until we disabled our Mac Pro’s McAfee anti-virus/firewall software.
PreSonus Studio192
The PreSonus Studio 192 is as easy to use as interfaces get, and anyone familiar with the StudioLive range of mixers will find the Studio 192 just as straightforward to operate since it uses the same UC Surface software as other products from PreSonus.
But even before we launched the software, it was easy to get up and running with the Studio 192. Besides dialing in our levels from the front panel, we were also able to easily connect a PreSonus DigiMax DP88 eight-channel preamp via ADAT (to expand our input count) and lock the DP88 clock to the Studio 192 for an expanded recording interface.
Ease of connectivity was less exciting from the pro studio perspective, though, as the Studio 192 falls victim to a limitation we see with many other low-cost alternatives: two inputs on the front and six on the rear. Whether running an audio snake to your live tracking area or using d-sub connectors with various high-end preamps, ultimately, XLR cables arrive at the mixing work area in bundles of eight. As such, we couldn’t physically connect eight microphones from our drum kit directly to the Studio 192 because the first (or last) two connections on the front of our equipment rack at the mix desk were beyond the reach of our audio snake’s cable fan-out! This could be a real deal breaker for your studio use unless you plan to treat the Studio 192 as your core, and then expand from it. The PreSonus DigiMax DP88 (reviewed here), an eight-channel preamp, was designed with connectivity to the Studio 192 specifically in mind, and if you add one of those to your setup, it places all of its connections on the rear, where they are most useful to the pro studio. But still, you’ll always have this annoying six-count on the back of the Studio 192. In the small project studio, this may be a non-issue entirely, and it speaks nothing of the overall product quality.
Launching the UC Surface application checked for the latest firmware automatically, and our system updated itself prior to first use without a hitch. The main window reveals a mixer interface with a somewhat flat appearance that strives for clean lines and easy operation with touch surfaces. The basics are extremely easy to navigate, with all of the Fat Channel settings for each selected channel displayed in the upper third of the window. From here, it was easy to adjust all settings related to our channel’s inputs, EQ, and effects. But configuring signal routing, the talkback mic, and finding the Presets section were less intuitive than the rest of the product’s operation, requiring a trip to the manual a few times before we got the hang of things.
For basic tracking and audio monitoring, we didn’t need to adjust anything within UC Surface. All routing settings for tracking and playback were easy to adjust directly within Pro Tools, and the built-in talkback mic was handy when recording other people.
Remote operation via iPad, and remote control of individual monitor mixes, was easily handled via the same apps that users of StudioLive products are already familiar with, though there aren’t enough mix busses in the Studio 192 to substitute for the larger StudioLive digital mixing boards (which can handle as many as ten monitor mixes).
Direct monitoring worked hassle-free, though we were able to select buffer settings too low to be useful without clicks or dropouts. There were no issues at settings of 128 or 64 samples, though, and the system worked great on our Mac Pro equipped with a Sonnet Technologies Allegro USB 3.0 card (for great advice on easy updates to the pre-2013 Mac Pro line, see our feature here).
To further aid less experienced engineers, the Studio 192 includes fifty presets for Fat Channel configurations that we were easily able to apply to our various input sources (one we figured out where they were hiding in the interface). An audition feature let us try out the presets before overwriting our channel’s current settings. We found it convenient to load some default settings and then quickly tweak them to taste.
Antelope Orion Studio
Antelope’s Orion Studio was also easy to use, and the Orion Studio Launcher control panel (application) provided a complete antithesis to the flat color scheme of the other products under review. Here, Antelope takes full advantage of color and shading to provide one of the most elegant software interfaces we’ve seen for controlling its equally polished looking hardware. Fortunately, the glitz on top is backed up by fantastic operational control once you familiarize with the interface. But let’s explore the hardware, first.
The Orion Studio is “interface done right” when it comes to a self-contained, multi-preamp and audio interface. We loved that there was a full set of eight combination XLR/TRS jacks on the rear of interface, as this enabled us to easily attach the first group of eight XLR cable runs from an audio snake running to the drum kit in our tracking area. Having four additional preamp interfaces on the face of the unit was actually overkill in our books, but hey, it’s hard to argue with too much of a good thing, right?
The one area where the Orion Studio falls short is on its front-panel controls, because you have no real clue what most of them do from a simple glance at the device! After reading the manual, we were able to make use of the front panel controls, and there was in fact easy control over signal levels for recording, headphone levels for monitoring, and more. In fact, the Orion Studio provides more hardware control from the front panel than either of the other products, but this control comes at the expense of a lack of intuitiveness. Fortunately, we could control everything from within the software.
If we were to evaluate the usability of each audio interface based on software alone, then the Orion Studio would be our hands-down favorite of the bunch. Happily, we could do everything possible without ever needing to touch the front panel of the interface, convenient if it lives in a rack beyond arm’s reach from your mix/tracking position.
The software uses a colorful matrix for mapping every conceivable combination of inputs and outputs, accomplished via simple drag-and-drop from the top half of the interface (Ins) to the bottom (Outs). We were able to easily set up the interface’s guitar amp modeling on one audio channel to the computer, while simultaneously directing the dry, unprocessed guitar signal to a second audio channel. This way, we could record with a modeled amp tone, but still retain the source guitar audio for re-amping through a real guitar amp or processing through other modeling software after the fact.
Similar to the other products here, the software interface presents multiple pages. We appreciated the software interface design, which kept the physical preamp controls accessible across the top of all pages, so as we adjusted effects and processing controls, we could make subtle (or not so subtle) tweaks to our input gain without having to jump to another page and back. Again, it was easy to route processed audio to one channel and unprocessed audio to another, or simply use the on-board effects for monitoring purposes only.
Antelope also provides apps for tablets/phones to remotely operate the Orion Studio as well, though we didn’t have an opportunity to explore those in the studio.
Sound
The good news here is that all three of these interfaces deliver clean, uncompromised audio to your computer, whether you prefer Thunderbolt or USB as your means of connectivity. Any of these interfaces can be put to use on your professional recording projects if it offers the right combination of ins and outs to meet your requirements. They each provide useful processing on the signal path in: parametric EQ and compression or limiting that we would gladly commit to our tracks, plus various other effects.To evaluate audio quality, we conducted recordings of a seven-piece, maple, Drum Workshop/PDP drum kit as well as a Taylor 614CE acoustic guitar, each a great sounding instrument that delivered a wide range of nuanced tones that were sure to test the preamps adequately. We used a matched pair of Blue Dragonfly overhead mics, a Shure SM-57a dynamic mic on the snare, and a Shure Beta 52 kick drum mic, while the acoustic guitar was recorded into a Shure KSM-44 condenser. Although we could have recorded drums with additional tom mics, we limited our evaluation to just those four mics since that was the limit imposed by the MOTU 1248 (it only has four internal preamps), and we wanted to make direct observations across all three preamps. [Editor's Note: The MOTU 8M interface is nearly identical to the 1248 and features eight preamps on XLR/TS combo mic/line inputs.] And while our first choice when recording acoustic guitars typically includes a secondary mic, to reduce variables in mics/position/phase across three different preamp setups, we opted for simplicity.
One product went above and beyond, though: the Antelope Orion Studio, which includes guitar amp and speaker cabinet modeling! Although this is the last thing we would consider essential in our audio interface, those of you relying on modeled amps for tracking guitars will be quite happy with Antelope’s solution—it’s a great “bonus” that may prove somewhat indispensable.
 Click image to enlarge... |
We were able to select from a variety of amps and cabinets from the likes of Marshall, Mesa/Boogie, Fender, and ENGL (among others), with different matched (or not) speaker cabinets, and two modeled mics that we could arrange on/off axis and at varying distance from the cabinet. These were excellent sounding models, and because the modeling runs directly in the hardware, we experienced no latency issues whatsoever as we might encounter from amp plug-ins running in our DAW host. Feature-wise, this isn’t quite as expansive as a dedicated product like Amplitube, ReValver, or POD Farm (there are no effects pedals or effects loops in the amps, for example), but for your basic tracking needs, we were pleasantly surprised by just how good the amps sounded.
If we had to give the nod to any one interface in particular for its audio quality, we have to tip our hats again to the Antelope Orion Studio. While all three interfaces were quiet and pristine in their audio capture, we noticed a real difference in the “air up there”—the Orion studio had a brighter and more open sounding top end, which was particularly noticeable on our cymbals. Results with the MOTU and PreSonus interfaces were virtually indistinguishable from one another, though if you were to dial in some of the onboard EQ and dynamics within each interface, you might hear subtle differences. But at the end of the day, any of these interfaces would serve you well overall.
Documentation and Product Support
All three products provide plenty of documentation, both written as well as video tutorials. PreSonus and MOTU have particularly thorough, user friendly documentation, while the Antelope documentation is a bit light on some details (like understanding the abbreviations for the various input sources in the i/o matrix). Fortunately, all of the products have useful getting started/configured videos.
Price
The MOTU 1248 sells for $1,495 and includes one USB 2.0 cable.
The PreSonus Studio 192 (MSRP $1,199.95) sells for approximately $900 and includes one USB 3.0 cable.
The Antelope Orion Studio (MSRP $2,795) sells for approximately $2,500 and includes one USB 2.0 cable.
Clearly, the PreSonus Studio 192 delivers an outstanding value, providing comparable audio quality to the other interfaces in this roundup for significantly less money than the other two products. If you have the need for AVB networking, long cable runs from the interface to the computer, or more line inputs than onboard preamps, the MOTU 1248 with its very flexible i/o options may be just the ticket. And if you don't need the networking capability but otherwise want to have your cake, some bonus candles and sparklers, and you want to eat it, too, the Antelope Orion Studio delivers a gourmet experience from both the hardware and the software. It’s pricey, but satisfying down to the very last bite.
Contact Information
MOTU
www.motu.com
PreSonus
www.presonus.com
Antelope Audio
www.antelopeaudio.com
| Category | Value | Rating | ||||||
| Features | 20% |
|
||||||
| Usability | 25% |
|
||||||
| Sound | 25% |
|
||||||
| Documentation & Support | 10% |
|
||||||
| Price | 20% |
|
||||||
|
|
||||||||
| Overall:
MOTU 1248 = 3.6 Stars, which earns it a WIHO Award! 3.6 stars or better: Outstanding, WIHO Award |
||||||||