 It may be difficult for some industry pros to imagine a world where musicians haven’t used Pro Tools, or even seen it in action, but with millions of people using other digital audio workstations, those musicians and engineers are out there. However, despite many artists affinity for other DAWs, Pro Tools is still the de facto industry standard recording and mixing platform. This is for good reason: With its great audio quality and easy-to-use interface that harkens back to the days of multi-track recording on large format mixing boards and reel-to-reel tape, Pro Tools enables sophisticated digital workflow with analog-style conveniences.
| Category | Value | Rating |
| Features | 20% | |
| Usability | 25% | |
| Sound | 25% | |
| Documentation & Support | 10% | |
| Price | 20% | |
| Overall: 3.6 Stars, which earns it a WIHO Award! 3.6 stars or better: Outstanding, WIHO Award 3 stars or better: Worth considering 2 stars or better: Suited to specific needs 1 star or less: Not recommended |
||
Although Pro Tools’ main strength lies in audio recording, editing, and mixing, it is also a strong music production program for artists who spend equal time dealing with sequencing MIDI performances. The learning curve for Pro Tools is not particularly steep—and if you’ve avoided computer-based recording entirely until now, there’s no easier digital audio workstation to learn.
As for musicians and engineers who been using Pro Tools for years, a surprising number of you are still running Pro Tools versions 8 and 9. Stop that right now! Pro Tools has advanced significantly since those older releases, and there is simply no compelling reason to use the older software if you have a relatively current computer running the latest operating system.
With so many magazines publishing reviews on the latest version of Pro Tools, they always seem to focus on what’s new, which means nothing to people who don’t actually use Pro Tools. So with that in mind, we decided to approach this review from the perspective of a musician/producer/engineer who has been working on other platforms and has limited-to-none Pro Tools experience. This gave us the opportunity to objectively revisit our DAW of choice as if it were any other new product. In the end, we’re still sold on it. And while some of us complement it with other products from time to time, there is simply no replacing it: Pro Tools is still rightfully the standards bearer for computer-based audio recording and music production.
Introduction To Digital Audio Workstations
Unless you’ve been living under a rock for the past decade, you know that Digital Audio Workstations (DAWs) exist. But that doesn’t mean that you’ve ever used one (or more than one). This review is both for musicians and engineers who are just now venturing into the world of DAWs and musicians using other DAWs and wondering about making the switch to Pro Tools.
The modern DAW covers all bases, from MIDI sequencing and production to audio recording and editing. Plug-ins are programs made by third-party developers (including Avid) that run within the host DAW. Think of them as virtual pieces of studio gear—everything from compressors to EQs to reverbs, sometimes modeled to faithfully recreate classic bits of studio gear, and often times adding new sounds and capabilities that don’t even exist in the hardware world. Virtual instrument plug-ins provide everything from modeled guitar amplifiers and effects to vintage synthesizers to the latest sound design tools.
Pro Tools is the granddaddy of DAWs. It started off in the late ‘80s as a pretty basic (although amazing for the time) audio recording software package called Sound Designer, then through a company acquisition, it morphed into OSC’s multi-track software, Deck. In the ‘90s, MIDI was added into the feature set, and with the proliferation of soft-synths in the 2000s, Pro Tools gradually become more and more evolved in its capabilities for electronic music production (on top of the always-improving audio recording/mixing feature set). But even though Pro Tools can do a whole lot more now than when it started, at its core, it is still easy to use, and has retained the same basic workflow that has existed since the days of tape-based recording.
[Jan 2016: This review focuses on Pro Tools 11, and it will get everyone up to speed on what makes Pro Tools the studio staple that it is. Part 2 of our review focuses on Pro Tools 12 and the specific features that have been added. The user interface remains nearly identical, as do most of the plug-ins. So start here if you never made it past Pro Tools 10, or if you are new to the world of Pro Tools.]
Features
As one would suspect from a product that’s been around as long as Pro Tools, almost all of the audio-editing and music production bases are covered. From MIDI writing and editing to the score window, to audio recording and editing, everything is covered, and thanks to the two-window visual design, it’s straightforward to use and easy to see what’s going on. Below, we will go into a few key features that stand out in a crowded DAW market:
Workspace
Part of Pro Tools’ ease-of-use comes from its two main windows working environment: Mix and Edit. Almost everything can be controlled from these two spaces. This is a big contrast to other DAWs, where you edit the MIDI or audio from separate regions off to the side or bottom of the main window. All editing in Pro Tools can be done directly on each track in the Edit window, which means that visually lining up audio clips or MIDI data spread across multiple tracks is a breeze.

Really, the backbone of Pro Tools is the Edit window. If your monitor is big enough, you can see mixing (level, pan, solo, mute) and Send attributes for each track, all in one space. But, we don’t recommend trying to do all of that within the confines of a thirteen-inch MacBook Pro! If you did, there would be no space left for editing anything! The straightforward, two-window design, makes for a very streamlined production process.

The Mix window in Pro Tools has got everything you need to build a great mix quickly and easily. Ten insert plug-ins can be placed on each track, and there are ten busses per track for sending audio out to other places (either to virtual destinations within the DAW or to outboard hardware). Tracks can be grouped together easily so that moving the fader on one will automatically move the fader on other tracks in the group. All this makes for a very smooth and fluid workflow.
Old Frustrations No More
Historically, people standing around the water cooler liked to complain about three main aspects of Pro Tools: hardware dongle, track count, and real-time bounce. Over the years, as each successive version of Pro Tools has been released, those issues have been addressed, and as things stand today, none of these are issues. Pro Tools uses the new Pace iLock 2 Smart Key, which means that you can use it on any machine, with any audio interface (in the pre-Avid days, you were locked into Digidesign-branded hardware interfaces exclusively).
The track count for the standard version of Pro Tools offers 96 tracks of 24-bit audio at up to 48kHz (mono or stereo). You can record at higher audio resolution, too, but that reduces the track count totals. For most projects, 96 tracks is plenty, and if you’re planning on doing more than that, you can upgrade to Pro Tools | HD, which delivers a total maximum of 768 tracks (but HD requires an investment in additional, dedicated hardware made by Avid).
While support for third-party audio interfaces and large track counts were addressed in earlier versions of the software, Pro Tools 11 is the first release to address improvements to the core audio engine with a complete re-write to modern, 64-bit coding standards. An interesting byproduct of the re-written software is that computers that were deemed unsuitable to run Pro Tools 9/10 are actually capable of running Pro Tools 11 quite well (though not officially supported) because the new code makes significantly better use of CPU resources.
The Pro Tools re-write enabled the most critical, formerly-missing feature: offline bouncing. Offline bounce means that when you finish a song, you click a button and your mix records to disk faster than real time. In Pro Tools 9 and earlier, all bounces occurred in real-time, which consumed hours of time in the studio as every change you made to a mix required listening to the entire track again from the start. Related capabilities like bounce-in-place and frozen/freeze tracks have just been introduced in the new release, Pro Tools 12, and we’ll explore them later when we take an in-depth look at version 12’s collaboration capabilities.
By The Numbers
Pro Tools has plenty of power to go around. Track counts, busses, Instrument and MIDI tracks, and inputs are all available in numbers which should be plenty for virtually all studios.
With 128 Auxiliary tracks (512 in Pro Tools HD) and unlimited busses at your disposal, there should be no limitations to any wacky audio routing schemes you may cook up. Aux tracks, like their physical studio counterparts, don’t contain source audio files directly: they work and function operationally like tracks in your session, but they are logical audio paths where you typically insert shared effects and processing (like a reverb plug-in used across ten drum or vocal tracks), or MIDI data and virtual instruments.
As for audio inputs, you can record on up to 32 tracks at a time (up to 192 in Pro Tools HD version), which is more than adequate unless you’re tracking an orchestra.
If music production is your thing, you’ll find 128 Instrument tracks on which to insert virtual instruments/soft-synths (256 with HD) and 512 MIDI tracks per session. We’re finally at that stage where stated product specs are far beyond what ninety-nine percent of us will ever require.
As mentioned earlier, each Audio or Aux track can handle up to ten insert effects (nine on the Instrument tracks, because the instrument takes up one slot).
What’s In The Box
These days, all of the major DAWs come loaded with plug-ins and virtual instruments so that you can get creative straight out of the box. Whether you are a beat maker or a recording guitar player, Pro Tools comes with plenty of virtual toys to get started in style. Over sixty plug-ins (instruments and effects) are provided, some installed by default and others available as optional, free downloads. There are several EQs, compressors, reverbs, delays, and modulation effects ready to go straight from the start.
A feature that is unique to Pro Tools, which falls within the realm of plug-ins, is its Audio Suite processing. Audio Suite plug-ins process and re-write audio files directly, so for processor-intensive tasks, you can make direct changes to the source audio files, either as a whole or simply applied to selected ranges of audio. Whether using Auto-Tune to fix a single bad note or applying a high-pass filter to remove some vocal plosives, there are times when you may find it useful to fix one or two spots on a track without leaving a plug-in on the track, cluttering your perspective on the “active” processing that you’re doing to your mix. (Note: this re-writes your raw audio data, so you may want to duplicate the audio file prior to performing destructive audio correction, especially if you’re just learning how to take advantage of this feature).
Groups: Because Two Is Better Than One
Pro Tools has two really cool features that fit into a category we will call groups. These are track groups and clip groups, and they both focus on, you guessed it, grouping things together. With track groups, you can connect several tracks together so that they can all be controlled as one. For example, if you group all your drum tracks together, you can then solo them by clicking the solo button on only one of the tracks. Other parameters that can be controlled in this way are fader levels, and mutes. Edits can also be grouped together with track groups. Using our drums example again, if you have these tracks grouped together, you can edit all the clips on the tracks at the same time.
Clip groups glue your clips together into one giant clip. This is great for when you’ve got a selection of clips across tracks that you’re using for the chorus of a song, and you want those same clips in every chorus. You can just group them and then click anywhere within the group to move the entire section around. Clip groups make laying out and editing the various sections of a song extremely easy.
Time to Stretch
Pro Tools includes a feature called Elastic Audio, which enables you to adjust the timing of notes without adjusting the pitch. What’s more, these timing adjustments are editable and can be tweaked at any time. What does this mean for you? It means that you can easily bring in loops and samples with any tempos, and quickly layer them together in your song. It also means that if your singer records a fantastic performance, but one note hits out of time, you can quickly adjust just the timing of that one note, and still keep everything sounding natural. If you wonder about some of those modern prog metal bands deftly delivering incredibly precise rhythms, you can certainly attribute some of those technical performances to a little help from our friend, Elastic Audio, effectively quantizing audio recordings.
Time stretching audio is a feature that most DAWs have these days, but the Pro Tools implementation of it is extremely well done. When dealing with stretching audio, the transients (hard attacks of the audio wave) become very important. Most DAWs have the transients and the warp markers (what you use to actually manipulate the audio data) in the same screen. Pro Tools splits these into two separate locations to make editing easier. The result is less clutter, so you can work more clearly on what you need to.

Volume curves drawn in with a few mouse clicks.
Automation
Automation is a great time-saving feature, and if you’re used to mixing on hardware, it will really improve your workflow. This allows you to record or draw in changes to your tracks over time. For example, volume adjustments and fades are easily accomplished with the click of a mouse. Pro Tools has two ways to utilize automation: drawing on the screen and recording with a hardware controller/interface. If you feel more comfortable “playing” your adjustments in, you can do so with a mixing controller. Depending on the Automation Record Mode you have enabled in Pro Tools, you can either write in entirely new automation (overwriting existing automation for all parameters at once), or you can just write in automation data for specific parameters.
MIDI & Notation/Scoring
The MIDI feature set in Pro Tools is mature and easy to use. It has a whole host of MIDI editing tools, and everything is laid out in an easy-to-use manner. As with audio editing features, everything you need is readily accessible from the Edit window.
If you’re into scoring for live performance, you’ll be happy to know that Avid bought Sibelius a few years back, and they have incorporated Sibellius notation functionality directly into Pro Tools. If you are composing in Pro Tools and you want to print out your music for people to play from, it’s a straightforward process, and you don’t even have to know a thing about music theory to use it. The feature set for notation is basic—you can’t mark in dynamics or things like staccato, legato, etc.—but if you own the complete Sibelius package (version 5 or higher), it’s easy to export your song data directly to that program for more detailed editing.
Usability
Pro Tools runs on any modern machine, and although you can get away with low-end specs, to have a truly productive studio machine, you’ll want to have something reasonably current and with a minimum of 8GB RAM and a fast processor to start. But when it comes to the latest and greatest operating system, it’s a good idea to NOT update to the newest Mac or Windows operating system until Avid officially blesses compatibility with their software. Better to be safe than sorry when production work is on the line.
One of the reasons that Pro Tools is the DAW of choice for the vast majority of studios is because of how straightforward and easy to use it is. While there are hundreds of keyboard shortcuts and a number of advanced settings and capabilities for the power user, getting up and running with the basics takes only a matter of minutes for anyone who ever worked on an analog mixing board and/or tape-based multi-track recorder.
As described previously, the Edit window makes it easy to see how clips relate to each other—and to line up audio and MIDI, and the Mix window is perfect for those who are used to mixing on an analog board. You’ll find that many studios have computers set up with two displays, and even in our studio, we routinely have the Edit window open on one display and the Mix window on another. This arrangement provides the ultimate flexibility and instant-access to everything happening in your session, and if you have a modern Macintosh computer, no special hardware is required to add an additional display. If you’re trying to record and mix on your Mac laptop, an external display will definitely prove helpful, though you can mix from a single display.
Because of its legacy, Pro Tools has features that will help analog board users feel right at home immediately. An example of this is the fundamental way that routing is achieved in Pro Tools:
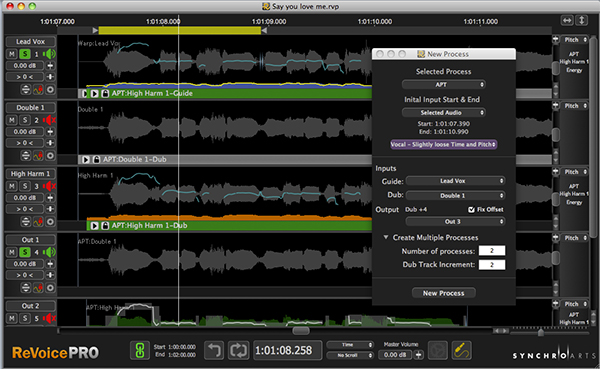
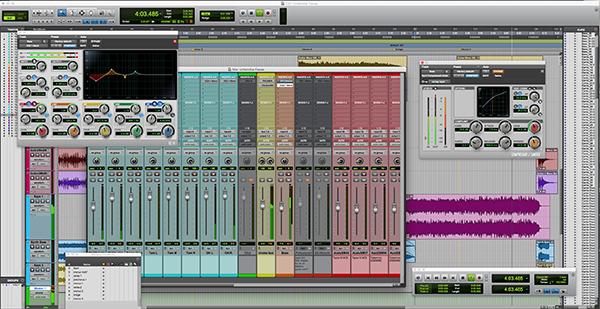
 Let’s take a look at busses. The main way to route audio through bussing is by setting up the sends or outputs to a specific bus number (for example, Bus 1-2). Then the input of whatever track you want to be the receiver is set to the same bus number (Bus 1-2). Setting both locations to the same bus number creates a connection between the two, much in the same way as connecting a cable would in the physical world. See the screenshot at right, where you'll observe some drum tracks that were routed to a drums bus that we created. On the drums bus, we placed a master compressor and reverb for the drum kit, and we route the audio output from that bus to outputs 1-2.
What’s great is that Pro Tools doesn’t stop there. If you are looking for a more modern way to connect your tracks, you can send your outputs to a specific track name in a drop-down menu, and Pro Tools will make the bus connection for you automatically. A third (and possibly easiest) way to route audio around is by selecting the “New Track…” option, which creates a new track (the type of your choice), and busses the audio for you automatically.
First of all, setting up for drum recording is a snap with some of Pro Tools’ numerous time-saving features. We created six tracks to capture our drums (Kick, Snare, Tom 1, Tom 2, OH L, OH R). Pro Tools lets you create multiple tracks of different types in a single window, and we could instantly create mono and stereo audio tracks, aux busses, a master fader, and instrument/MIDI tracks.
Power user tip: To route these drum tracks to the appropriate audio inputs on our interface at creation time (instead of after the fact), we used the cascade feature: select the tracks you want to cascade, then hold COMMAND+OPTION+SHIFT while selecting the lowest numbered input on the left-most track. What this does is immediately sets the inputs for each track to the next highest input number for every track. So, instead of having to click on six individual tracks and set the inputs for each, you just do it once, and Pro Tools automatically takes care of everything else.
After we recorded some drums, it was time for some EQ house-keeping. We like to cut out our low frequencies on tracks where they're not important. So, we left our kick alone but inserted a low-cut EQ (set at 150 Hz) on the other drum tracks. This was easy to do quickly: Just insert the EQ 1 plug-in on the snare track and make the settings we wanted. Then, we held down the Option key and dragged the plug-in to the other tracks. This copied the plug-in to the other drum tracks along with the same settings.
Finally, we put the Pro Tools busses to work. We created a stereo Aux track and renamed it “Drum Bus.” Then we selected all the drum tracks (excluding the new bus). While holding down OPTION+SHIFT we went to the output of one of the tracks and select “Track → Drum Bus.” Immediately all the tracks we had selected switched their outputs to the new Aux channel, and we could hear the drums coming through the Drum Bus Aux channel. The advantage to this is that when we want to adjust the volume on the drums as a whole, we only need to adjust one channel. As with our track creation tip, it bears repeating that these tricky keyboard commands are all just options to speed up your workflow. Just as easily, but with a few more repetitive steps, we could have individually assigned each drum track to the drum bus with nothing more than a mouse click on each channel in the Mix window, just like working on a physical mixing console.
Finally, we then grouped the drum tracks so that we could edit the audio more easily in the future. Since the tracks were still selected, all we needed to do was hit COMMAND+G to group the tracks. Tip: Make sure that Edit & Mix groups are selected in the subsequent pop-up window so that the track grouping will be usable from both the Mix and Edit windows. This means that when it comes time to record if your drummer plays something slightly off rhythm, you can fix it for all the drums at once using elastic audio and the grouped tracks. Super-easy!
Super-Bonus Tip: It’s easy to overlook the obvious… how the heck do you turn a group Off if you want to make individual track adjustments or create new groups? There’s no keyboard shortcut for this one, and opening the Groups window provides no clue, either. Look to the lower portion of the Mix window on the left-hand side, though, and you’ll see a list of your groups, all selected/highlighted by default. Click on the appropriate group name to deselect it.
The Tricky Stuff: Latency (Major Improvements in Pro Tools 11)
While mixing and editing are super-easy and highly flexible within Pro Tools, there are a few things that drive people crazy (particularly newcomers to the Pro Tools life): control over latency/system responsiveness, and the actual signal routing between your session file and your audio interface.
Latency is the delay time experienced between your performance and hearing the audio returned through your monitors or headphones, and adjustments to the system responsiveness are made in the Playback Engine… settings area. On an older, slower computer, the delay (measured in milliseconds) can be enough that it negatively impacts your ability to perform/record. For example, hitting a string on your guitar and having a noticeable time lag before hearing the mic’d and/or processed sound. Adjusting the hardware buffer size from its default of 256 samples to a lower value reduces the latency, but this increases overall demands on your computer’s CPU. On a session with high track counts or lots of plug-ins, the result would be that you get a playback error message because the computer just can’t respond quickly enough. To remedy the problem, we would temporarily disable some power-hungry plug-ins, or disable tracks we didn’t need to listen to during recording. Then, after recording, we would re-enable whatever we had disabled, and then bump the latency value back up to a higher value. Fortunately, a few things changed for the better with Pro Tools 11 to improve the situation just described.
It should be noted that this problem is not encountered on Pro Tools | HDX systems because Avid’s dedicated audio hardware and accompanying interface cards installed into a Mac Pro computer have co-processors that handle most of the audio processing, freeing up your computer’s CPU. On non-HDX Pro Tools systems—like your typical project studio, home studio, or any pro studio using third-party audio interfaces, all of the processing is handled by your computer’s CPU, so the speed of your computer’s CPU, its bus, and the storage subsystem (hard drives) each play a part in impacting overall system throughput.
Years ago, adjusting the Playback Engine… settings was a regular thing throughout our session work. But as processors got faster, RAM got cheaper, and SSD drives became widely available, the need to finesse the buffer setting decreased. And with the complete re-write of Pro Tools as a 64-bit native application in version 11, performance was so greatly improved that there is less latency right off the top. Pro Tools 11 (and the closely associated version 12) runs more efficiently than all previous versions, and if your computer is a few years old, you’ll feel the improvements right away (assuming you’ve got at least 8GB RAM and are running OS X Mavericks or Yosemite).
Big feature reveal: As of Pro Tools 11, the hardware buffer size setting only applies to record-enabled tracks! So finally, you don’t have to toggle the buffer size back and forth between tracking and mixing.
Big reveal #2: There’s another setting in here that should definitely be checked—Dynamic Plug-in Processing. When plug-ins aren’t processing audio, they no longer steal CPU power.
You’re probably looking for some suggestions, too, as the software only does as you ask, so here come some of our general user recommendations: If you’re recording typical rock and pop music, guitar players and drummers are usually fine with a buffer size set as high as 256 Samples, while shredders and fusion drummers may need you drop this down to 128 on occasion. We can’t recall ever needing to drop the settings lower. We used to advise subsequently bumping the buffer up to 512 or higher for mixing, but that’s now handled automatically for you. So once you find a buffer size that works adequately on your computer—which will vary based on the speed of your system, you will rarely need to make adjustments here.
Tip: To turbocharge performance and make your Pro Tools Native system respond as fast as any pro studio, invest in solid state hard drives (SSDs) to replace your Mac’s traditional hard drives. We use one SSD for our 2012 Apple Mac Pro’s operating system, applications, and plug-ins, and a second (and third) SSD for recording audio. We still have higher capacity traditional drives, and use those to save archived backups of the sessions we’re actively working on.
Tip: As a general rule, never record sessions to the same drive that the operating system and Pro Tools software are running from. Always record audio to a separate drive. This advice holds true for any DAW.
The Tricky Stuff Part II: Audio Input/Output
The I/O settings are adjusted from the IO Setup menu option, and the subsequent window presents a grid-like interface in which you map the outputs from your audio interface to the virtual mix environment that is your Pro Tools studio. The settings you make in here become the options you can select in the Mix and Edit windows when you assign specific tracks to specific input channels.
It’s usually best to delete all of the existing paths and create new ones based on your specific hardware, and many manufacturers provide useful help documents with suggestions for how to precisely configure their I/O settings. Some even provide downloadable I/O Setup files for you to import right into Pro Tools.

You can see that on our digital mixer, we assigned channels 17-18 and 23-24 as stereo inputs to Pro Tools.
Note that there are separate tabs in the i/o Setup window for input settings and output settings! We typically don’t worry too much about bus settings in here because they are so easily created on the fly as you track and mix, but if you have some favorite outboard hardware permanently wired into your studio setup, you can assign friendly names to the appropriate busses here, so your classic outboard EQ/preamp/compressor shows up by name instead of as “Bus 1-2,” for example.
Once you have set all of your I/O properly, be sure to save your configuration by clicking the Export Settings button at the bottom. Consider this task critical! Once you start living with Pro Tools, you’ll see just how easily these settings get changed accidentally. The reason is that Pro Tools defaults to the I/O settings used in the last saved session file (project). So imagine, for example, if a friend/client/nemesis sends you a mix to work on from his/her studio—you open the file and Pro Tools re-assigns all of your I/O settings to the ones in the session file. This can really wreck havoc with your settings and render your Pro Tools environment silent. But if you’ve heeded our warning, at this point, you can simply click the Import Settings button to reload your settings. However, once you’ve made changes to the I/O settings, you may have to go back through your session’s tracks and re-assign the audio outputs on each channel.
The thing about Pro Tools is, if you're coming from a world where you’re doing everything on a digital recorder, it may take a bit to get used to it. Your workflow might even slow down at first when you make the switch—which can probably be said of moving from any DAW to another. But if you came from a legacy of analog style recording and “classic” computer-based sequencers, you’ll find the learning curve extremely minimal.
Click here for an in-depth look at how the new collaboration features of Pro Tools work in the real world.
Sound
It’s no secret Pro Tools sounds great. Most of what you hear on the radio, or at the movies, or on TV has been touched by Pro Tools at some point. It is the industry standard, and the sound quality is up to par with any expectations that implies. But these days, there are many variables that contribute to overall sound quality, including your choice of audio interface, analog-to-digital converters, software plug-ins, and more.
In the old days, Pro Tools required hardware manufactured by Avid (Digidesign at the time) exclusively, and even now, Avid makes Pro Tools HD, a version of Pro Tools that takes advantage of dedicated processors embedded in many of the latest Avid-manufactured audio interfaces and audio co-processing cards that can be installed into previous generation Mac Pro computers (or PCs with PCIe slots).
Assuming your hardware is of sufficient pro quality, we can focus on the quality of the sound achieved “in the box,” and that sound is largely influenced by the plug-ins you use for tracking and mixing. Fortunately, the plug-ins that ship with Pro Tools are quite good, with some doing an excellent job and others sounding just fair.

One of Avid's excellent, supplied EQ plug-ins.
For example, Avid’s EQ is great for pure EQ tasks like cutting low frequencies and boosting others, but it lacks interesting character. So, if you're looking for a clean, surgical EQ, the ones that ship with Pro Tools do a great job. But when you want your processing to impart some color or brand-specific vibe, you’ll then want to look into third-party alternatives. The 1-band EQ, in particular, is used by some of us all of the time for instant high-pass filtering and polarity flipping.

Another great plug-in that we use regularly is Maxim. If you're trying to get a demo recording out to your friends, or to play it out at a club, you'll need to do some basic mastering before you want to show off the track in public. Maxim is a very basic brick-wall limiter, but it does the job, if that's what you need. As a general rule, we don't recommend mastering your tracks on your own, but there are definitely situations where you just don't have time to do that, and Maxim will help in those cases.
Filter Gate is a fantastic plug-in for effects. This is not a normal EQ or Reverb plug-in, but rather a special effect plug-in that you will use sparingly (or not). It will definitely inspire you, especially if you're into creative sound design. Creating slicer-type effects is just the tip of the iceberg with this one.
A popular topic among engineers and producers is how to get your mixes feeling and sounding more analog (it is no longer a question of whether to use digital or not). Well, the answer here is plug-ins. Namely, third-party plug-ins. One of the secrets of great mix engineers is that, in general, they aren’t doing the mixes with only the plug-ins that ship with Pro Tools. They almost always add third-party plug-ins [when not using outboard hardware devices, of course]. These plug-ins come from many different makers, and a lot of them focus on one main thing: making your mix sound as analog as possible. While it takes a bit of extra effort with your mix, it is certainly possible to get a great, warm mix while working strictly on the computer, and there are numerous plug-ins that emulate both vintage analog consoles and outboard gear, which truly add that something “extra” to a mix.
Having said that, Avid’s included plug-ins are a great place to start and cover all the bases quite well, but once you start mixing seriously, you’ll certainly add more plug-ins and virtual instruments to Pro Tools, just as any studio would add additional signal processing tools.
Stretchy Sounds
One other thing we need to point out—besides overall sound quality—is how great the elastic audio sounds when you alter the clips. A big factor in determining this is how far you can stretch a sound before it begins to sound “digital” and strange (think The Matrix). With Pro Tools 11, sounds can be stretched (or squeezed) quite far before they begin to break apart and become unusable. This technology is pretty much best-in-class.
Documentation and Product Support
Pro Tools has a great manual (Pro Tools Reference Guide) that can be accessed directly from within the program. As with most software these days, a giant printed book is no longer the norm, which is great for some of us, and annoying to others (definitely can’t please everyone on this point).
In addition to the manual, Pro Tools also has a Shortcuts Guide that shows all of the keyboard shortcuts. This is really useful to dive into when you’re first starting out, as the keyboard shortcuts make your workflow super-fast.
Avid has an extensive Knowledge Base and active support community on their website.
Price
Pricing has gotten a bit tricky with the latest release of Pro Tools as you now have options to either purchase the software in familiar style or pay as you go with a monthly service charge.
For a straight purchase, non-upgrade, Avid Pro Tools 12 currently sells for $899, while upgrades from Pro Tools 9, 10, Express, or M-Powered cost only $199 (great deal) for one year of use, after which you will then have to purchase a license renewal.
If you don’t have $900 to lay out up front, there is a much better deal to be had: For $24.92 per month on an annual contract, you can now license use of Pro Tools, and all upgrades are immediately available as they are released ($29.99 lets you pay monthly without a contract, useful for people who don’t need to use Pro Tools during the eight months of the year they are on the road touring).
College students and teachers qualify to purchase the product at a significant educational discount, so if you fall into one of these groups, the deals are significantly better.
A scaled-down version of the program, Pro Tools First, is free (but in limited release as of May 2015). Its functionality is limited to managing three sessions files, which are all hosted in Avid’s cloud environment online (and then you can pay extra if you want to work on additional sessions). It’s a nice way for newcomers to get to know Pro Tools without having to work under the stress of a traditional 30-day trial that expires just when you finally get around to finishing up your recording.
As it stands today, we think Pro Tools is worthwhile at its current price point, with the upgrade pricing making it an immediate, necessary purchase for anyone using version 10 or older. There are less costly DAW options, but those limit you to a much smaller world of collaborators, and some of those choices could make it impossible for you to bring your project studio or home studio masterpiece into a larger professional facility to apply the finishing touches at mix time.
Pro Tools Version Comparison chart:
http://www.avid.com/US/products/pro-tools-software-comparison-table
Other Comments: Pro Tools 12 Cloud and Collaboration
Pro Tools 12 has just been released (April 2015), and the update is all about cloud-based collaboration with others, simplifying and streamlining the process through which musicians work collaboratively on Pro Tools sessions in separate studios. We’re super excited, as this will put the current session sharing methods of FTP, DropBox, and YouSendIt behind us, offering a much more refined and integrated way of collaborating with others.
There are very few significant differences in the actual feature set between versions 11 and 12 outside of the collaboration capabilities (other than incorporating freeze track capabilities that coincide with the collaboration feature).
We will publish a detailed look at those collaboration features in a few months, after we’ve gotten to use them on some real-world projects, to provide a hands-on perspective.
[Jan 2016: Ready to see what's new in Pro Tools 12? Check out our in-depth look at Pro Tools 12 in Part 2 of our Pro Tools review coverage.]
Contact Information
Avid
www.avid.com
| Evaluation Short-List |
|