In 2022 the choice of available DAWs is pretty extensive, but if you work professionally in pro audio, it can be very difficult to deviate from the world of Pro Tools. When you work by yourself, or make music at home just for the fun of it, a world of options are available to you, each with their own strengths and weaknesses, and different workflows optimized for different scenarios, such as live performance, producing music with virtual instruments, etc. They all tend to do basically the same things, albeit a little differently from one another. But for pro-level studio work, the choices are a bit fewer. If only there was a worthy alternative to the twenty-pound gorilla?
| Category | Value | Rating |
| Features | 20% | |
| Usability | 25% | |
| Sound | 25% | |
| Documentation & Support | 10% | |
| Price | 20% | |
| OVERALL RATING = 3.6 Stars, which earns it a WIHO Award! 3.6 stars or better: Outstanding, WIHO Award 3 stars or better: Worth considering 2 stars or better: Suited to specific needs 1 star or less: Not recommended |
||
Decades ago, Steinberg Cubase was the sequencer of choice for the Apple platform, and over the years it moved to Windows and became a full-fledged DAW. Early developers, Wolfgang Kudrus and Matthias Juwan worked for Steinberg, where Wolfgang was on the early team of Cubase developers, and Matthias was one of the developers of the VST format. They eventually moved on to form a new company, KristalLabs Software, where they developed an entirely new DAW. PreSonus partnered with their company and asked them to write a basic recording app for their digital mixers. Studio One already existed in a basic form as Kristal, based on Matthias’ custom framework. In early 2009 when they partnered with the PreSonus team, though, Studio one was born. Right from the start, it was a powerful and great-sounding alternative to Pro Tools, and today we confidently recommend Studio One 5 for professional use in a wide range of scenarios. If you’ve been looking for an alternative to Pro Tools but weren’t sure which of the many alternatives would be truly worthy of your time and energy to learn, you can stop searching right here.
PreSonus launched PreSonus Sphere in July 2020. Sphere is a member-based global online community that includes a subscription that includes nearly every PreSonus software product (including Studio One 5 Professional 5.5, for which this review is based) for an affordable price of $14.95 a month (or $164.95 annually). Sphere continues to add features at a rapid pace, continuously adding to the feature set and enhancing the value of the subscription.
We would like to start this review by saying virtually no one will use or even know how to use every single feature available in a DAW like this. It is just too mind bogglingly extensive. And, depending on the type of music you wish to produce, you will end up with a different workflow that will utilize different aspects of the DAW. So instead of covering every single feature much like a stale user’s manual, we would like to speak about why we love Studio One so much that some members of our editorial team have permanently switched to this DAW platform. We’d also like to underscore this review is written more for the user who has at least some experience with DAWs.
Features
We received our Studio One license electronically, and installation was a breeze via the PreSonus website. If subscribing to Sphere, the DAW will “phone home” monthly (or annually, plan depending) to assure the subscription remains valid (unless you own a perpetual Studio One license) so Internet access is required. We simply downloaded the program and it walked us through installation of over 90GB (and growing) of sound sets included with the DAW. Those are drag-and-drop audio loops as well as samples for some of the included virtual instruments (Vis). You’ll also find Mix engine FX (effects) as well as extensions for the Presence XT Editor and the Audio Batch converter included in this download.Studio One 5 Professional is an unlimited track count, VST/AU/AAX supported, full-featured Digital Audio Workstation (DAW). Like other DAWs, you can work in a single window, keeping both mix and edit windows simultaneously open and functioning. However, a third section can also be open: the Browser. The Browser is the place where drag-and-drop loops, audio plug-ins, MIDI files and virtual instruments live. From the browser, you can literally drag-and-drop anything that appears there into your session. Audio loops can be auditioned right from the browser, and when you drag them to the appropriate spot on your timeline, Studio One will create a track for it (with appropriate signal routing) automatically.
As easy as that is, you can also find Studio One’s collection of native effects (also available for sale as VSTs for use with other DAWs) and VIs in the browser. Studio One is quite a complete solution, and as such it provides literally everything you need to create, mix, and master your songs. Studio One’s included compressors, EQs, and time-based and modulation-based effects live here. Studio One also has a host of virtual instruments (VIs), including keyboards and synths that cover a wide range of sounds, percussion plug-ins, and there is even a very capable guitar amp modeling plug-in called Ampire, which just received a major overhaul as of this writing. Studio One’s mix and edit windows can be completely separated for split or dual screen usability. When using PreSonus StudioLive Series III or select PreSonus interfaces, Fat Channel controls appear at the top of Studio One’s audio tracks in the mix view. Talk about slick! There are also add-on Fat Channel plug-ins for classic modeled EQs and compressors (and they sound really good).
Tools of the Trade
Editing audio or MIDI in Studio One is intelligently designed. For audio, the list of tools is expansive and includes Arrow, Range, Split, Eraser, Paint and more. You can keep a secondary tool on hand and recall it with a simple shortcut keystroke. You can recall each tool via clicking on its icon in the GUI or assign shortcuts to switch between them. Studio One allows assignable shortcuts for more than the average user would ever think of. This DAW anticipates what you may be trying to do with your edit, and at times will give you certain tools automatically. For instance, the trim tool will appear when passing the cursor near the beginning or end of an event. New to Studio One 5 is a clip gain envelope adjustment that can be made directly within an event (a block of audio or MIDI data).
Studio One’s included plug-in list is quite thorough, and a few of them solve tasks in unique ways. For instance, Pipeline XT is a native effect that routes audio in and out of Studio One, allowing for use of external hardware. Within the plug-in window, it allows you to select input and output assignments from the I/O, as well as automatically pinging your external gear for latency compensation, which is made in the plug-in at sample level increments. There is also a stereo panning tool that is a handy utility, allowing for panning of the left and right channels independently on a stereo track.
Studio One also includes a suite of virtual instruments. Included in the bundle are Impact, Mojito, Mai Tai, Presence and Sample One. Presence is particularly useful, as it is a full-fledged, sample-based instrument with nearly every classical and modern instrument represented. The piano is surprisingly good. Impact is most closely related to an old pad-based drum machine. This is particularly useful in EDM, Dance or even modern Pop genres. Mai Tai is a very capable modern polyphonic synth, complete with a host of useful presets to spark creativity. Mojito is a synth as well, but it is more closely related to an old monophonic Moog or similar (which is still very cool). Snapping to a grid can often sound lifeless and quantizing audio to a robotic grid has singlehandedly ruined countless recordings in the last decade. What if you could define your quantization points by either a human MIDI or audio performance? Studio One allows for exactly this. Simply drag your slightly off time, behind- or ahead-of-the beat drum groove (or anything with transients, really) into the quantization bar and Studio One will establish parameters based on this groove, not subdivided note values. Studio One will quantize any subsequent audio dragged there by these groove parameters.
Are you a MIDIOT?
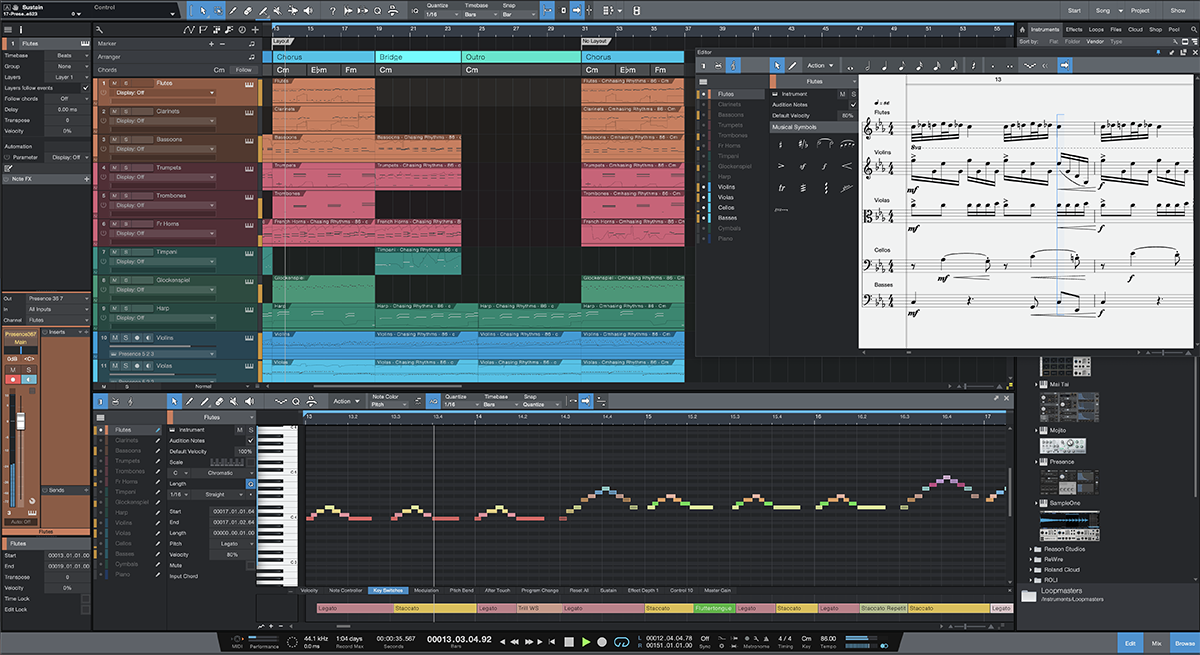
Once MIDI information is imported into Studio One, it becomes higher resolution instrument data. Editing instrument data in Studio One is straightforward. Simply double-click on any event and the editor opens, by default to a familiar piano scroll. Here, you can edit pitch, velocity, note duration and much more. Like audio, a host of quantization tools are available to ensure that your audio and MIDI performances are perfectly in sync. Studio One’s editor realizes just how important drum editing is, too, and includes a dedicated drum editor. Pitch lists allow you to easily custom label each MIDI note to its proper kit piece and articulation. You can also limit the view to only kit pieces used in the performance, shrinking the window considerably for easier editing. Exploding pitches to tracks will automatically put each drum hit on its own track. Quantizing your work is as simple as highlighting the instrument data and hitting Q on your keypad. Submenus exist for virtually every function you can imagine. New to Studio One 5 is a Score view. MIDI notes are now selectable to be displayed on a piano scroll, drum editor or on a musical staff with limited classical notation. Users who are scoring or working on any kind of orchestral pieces will greatly appreciate this.
A songwriters Paradise
A rather extensive set of compositional tools exist in Studio One. An arranger track enables you to start forming compositions and move parts around your session with ease. A chord track also exists which will not only change instrument notes and chords, but audio as well. Think your song can use a key change? It just takes a few mouse clicks in Studio One. A scratchpad feature enables you to make a separate arrangement within your session. Want to hear how the song will sound without the bridge section? Bring it into scratchpad and non-destructively edit tracks or the entire arrangement. Continue working in scratchpad if you choose and it will record all of your automation. You never have to go back to the original arrangement, even to render your final mixes. You can create numerous alternate arrangements by adding multiple scratchpads as well.
Comp takes are pretty standard these days, and Studio One offers looping and comp features in order to assure you have as many takes as you need to nail that clever part you’ll never be able to execute live. Hey, it’s show business! And of course, simply highlighting an event and pressing Q on the keyboard can achieve instant quantization of audio in Studio One. This moves audio to the closest value on the grid value you preselect. If this doesn’t achieve the desired results, not to worry. Studio One assigns slices to each transient of your audio event, and you can select the bend tool, hover over the slice and drag the transient within the event to perfectly align your audio to the grid (or not, if the song isn’t perfectly in time).
New To Studio One 5 is Mixer Scenes. You can now assign mixer scenes to create completely independent mixes, or partial mixes as you see fit. This is incredibly useful throughout the mixing process. In addition to mixer scenes is a Listen Bus where you can assign a separate output for various uses, such as checking your mix on headphones vs. your nearfields vs. your cheap computer desktop speakers.
Studio One aims to be an all-encompassing tool from the composition all the way through the mastering process and even publishing. New to Studio One 5.5 are many advancements to the Project page. PreSonus really finished what was an already adequate mastering suite. Clip gain envelopes, insert effects automation, and the all-useful listen bus are now available on the project page. Multiple output formats are also now available with target loudness for most platforms. A new dithering algorithm was needed and now included.
Personalization
Studio One allows a lot of customization for ease of use, but also for those coming from another DAW. Studio One has keyboard shortcut mapping from all of the popular host DAWs, so new users don’t have to refer to a list or hunt through drop down menus. All of our familiar Pro Tools shortcuts still worked! This is a global setting, so users only need to select this once and it will remain until it’s changed.
Macros can be created to streamline specific tasks, as well as creating customized macro toolbars.
Studio One has a profile picture option that users can upload onto their home screens. You can choose to launch this picture, along with song notes and whatever other data you want upon launching a song session. Rendering sessions can be either in real time or offline, and if you are choosing to master your mixes, you can upload finished songs directly to a linked SoundCloud account! The browser window on the home screen also takes you to the Studio One store, where you can find a variety of downloadable expansions.
If being social and networking is your thing, new to Sphere is the Community feature. Selecting the Community tab from the Sphere homepage, you can now connect with other producers, engineers, musicians or anyone you’d be interested in collaborating with on your next project. Sphere also includes 30GB of workspace (optional 100GB) so you can send and receive sessions or files all in the sphere ecosystem.
Usability
As stated earlier, the PreSonus website walks you through a simple installation, and upon launch, the DAW tells you everything it is loading including the VSTs, the interface and any connected peripherals. Shortly after, you are presented with creating a blank session, a previously saved template session or a select preset session recommended according to desired task. We selected a blank session, and this launched Studio One’s standard mix and edit windows, pretty common across DAWs these days. The beauty of Studio One’s design is in its browser. It exists within the rightmost portion of the screen and gives you access to your plug-ins, virtual instruments, MIDI, all audio in the current session, and whatever drag-and-drop loops you have installed. After recording some audio, if you choose to put a compressor or an EQ on the track for further processing, all you need to do is drag it out of the browser to the desired track and its instantiated! This greatly speeds up workflow and is a very user-friendly feature.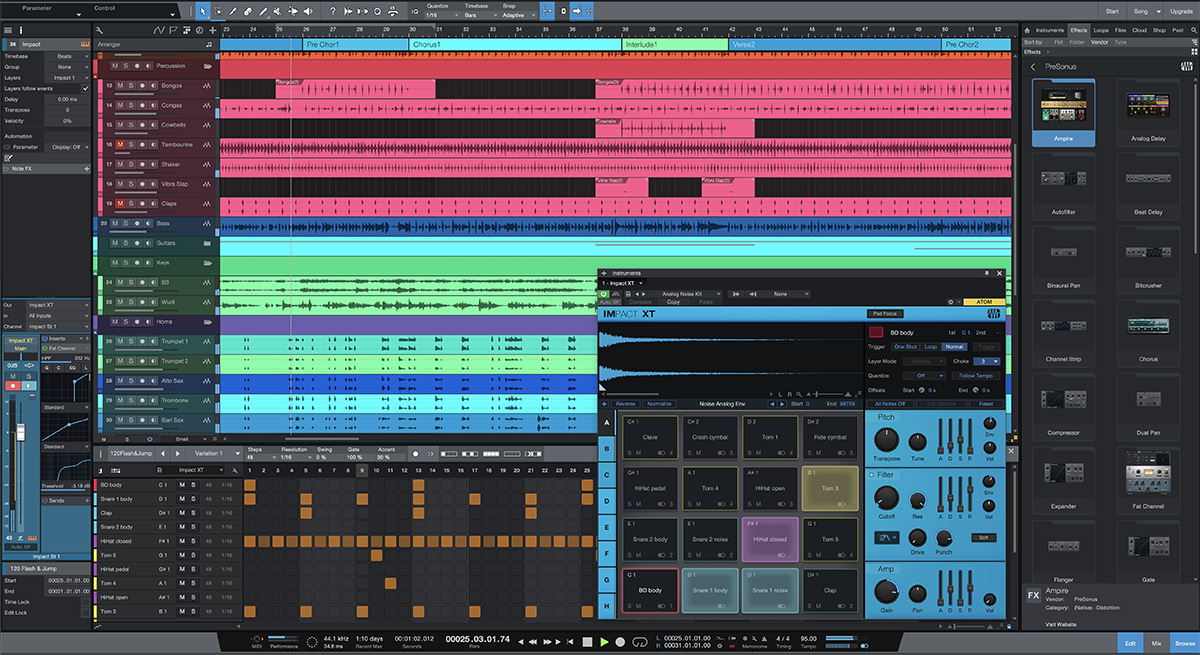
Get FAT
PreSonus audio interfaces come with what they call the Fat Channel, which is a suite of common effects mostly used for tracking. The Fat Channel contains a compressor, EQ, limiter and a noise gate. In a very forward-thinking way, PreSonus incorporates Fat Channel controls on each audio track directly so you do not have to go back and forth to your interface’s mixer app. Again, this is fantastic for workflow. PreSonus also offers upgraded Fat Channel plug-ins, modeled after familiar vintage hardware. As of this writing, those plug-ins can be loaded directly into the StudioLive series of mixing boards, but not any of the dedicated Studio One interfaces. However, those plug-ins function as high-quality native effects within Studio One and are included with a Sphere membership.
Rock Solid
We cannot speak to every configuration, but with our PreSonus Studio 192 interface and a Faderport 16 control surface, usability has been smooth and rock solid. We did not experience a single crash on either our 2012 Apple Mac Pro or our Different PC DPC1 workstation running Windows 10. Configuring the I/O was very straightforward, and even running some ADAT expansion, a Fractal Axe FXIII, and some other peripherals this system rarely got in our way. The few rare instances it did, it was usually pilot error, like not powering on an item before launching the DAW. So, from a Studio One point of view, the DAW definitely plays nicely in the sandbox, even if you bring a lot of friends.
Follow the Bouncing Audio
Offline bounce is nothing new, but Studio One does both real time and offline as fast as your CPU can crunch the numbers. When Studio One has a Pipeline plug-in in the session (Pipeline is how you route external hardware in and out of Studio One), it automatically knows to render in real time. It’s nice not having to consciously think about whether or not you need to do an offline bounce through your outboard hardware.
Get On The Bus
Creating busses and sends in Studio One couldn’t possibly be any easier. Simply right-click on any track in the Mix window and select create Bus or create FX (send) channel, and the track appears. For a bus, the routing is done automatically. For a Send, the send assignment is now available in the send drop-down menu. One really cool thing about send assignments is they’re draggable from track to track. One common use is setting up a master reverb for the session. Create the send from any track, then pull that channel up from the send menu on the channel you’re working on and the send with its corresponding level appears. After that, you can click and drag the send to any and every channel you like in the session, effectively sending a host of tracks to the reverb. Alternatively, you can also control-select all the channels you want this reverb send. Once those channels are selected and indicated by highlight, selecting a send on one will insert that send on all.
Get In and GET OUT!
Pipeline XT is a plug-in that can be placed on any track in our session. This plug-in’s sole function is to route audio through the DAW’s I/O to your peripherals. If you’ve never done this, setting up your I/O may require some trial and error. But once it’s configured properly, it works perfectly, and we easily routed eight channels of ADAT-directed audio to an Eventide H9000 processor. Merely select the output and input channels and anything bussed to the track Pipeline is then sent to the external hardware and back in again. Pipeline will also ping the hardware, get a latency value, and adjust affected audio with delay compensation accordingly.
The new mixer scenes were a godsend and saved us a lot of time in making alternate mixes, and they really sped up our general mixing workflow. For instance, we could have our bass and drum scene, where we had everything muted except the bass and drum tracks (and related FX channels) for precise dialing in. Then we could create an all rhythm mixer scene, where we added in rhythm guitars, pianos or virtually anything that wasn’t vocals or solos. Then we could have our full mix scene for the entire song. You can prepare a 3dB vocal up scene, as well as a 3dB solo up scene for a client to approve a final mix. All that is needed is selecting the appropriate scene and it will recall plug-ins, automation and fader positions right where you left them in that scene.
Play Nice
Studio One worked seamlessly with our PreSonus Studio 192 interface, and we enjoyed the benefit of tight integration between hardware and software. We also connected an Antelope Orion Studio and a UA Apollo X8 interface. Both interfaces worked perfectly with Studio One and we were able to route I/O with no problems whatsoever.
Also typically used on our desk are a Native Instruments Komplete Kontrol S61 MKII keyboard, an Akai MPD226, a Faderport 16, our aforementioned Eventide H9000, and a Fractal AxeFXIII. Studio One has no problems interfacing with each of our peripherals, whether they’re attached via USB, digital, or analog.
If You Can’t Find It, Macro It
Macros may be the most powerful time saver in Studio One. Macros allow you to stack any number of commands into a single button on the Macro Toolbar. For instance, we love using our Eventide H9000 for effects in our sessions. To fully utilize it, we need to create eight individual stereo FX channels, then add eight instances of Pipeline stereo, then need to assign those instances to the proper I/O for our Eventide processor one by one. Quickly you can see this takes many mouse clicks and possibly a full three to five minutes of grunt work. We were able to create a macro that does all of this with the push of one button, including adding the Emote VST Eventide controller!
We love using Native Instruments’ Kontakt and simple enough, we could just drag it onto the timeline in an empty space and Studio One does all the legwork creating the track. But with a simple Macro button, it saves you the time of pulling up the Browser and digging through an extensive plug-in list.
Our last two macros were housekeeping ones. We made macro buttons for the Save command as well as the Mixdown command. Finally, we could have different macro toolbars according to function or task at hand. We could create a MIDI editing macro toolbar with shortcuts to all of our editing functions, and we could switch easily back to our track creation toolbar when you are ready to move on. Nearly every command in Studio One is assignable in a macro. The only command sorely missing is selecting an audio track’s input. Currently you can create tracks with a macro, but the only option is the default input.
Sound
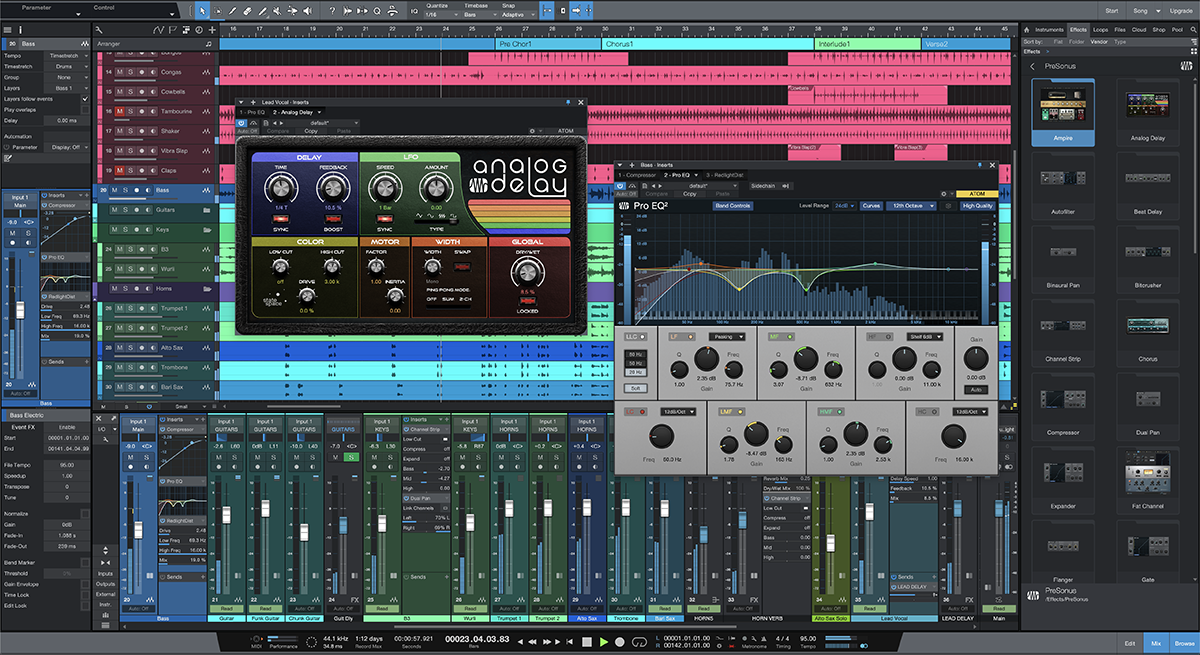
Coming from Pro Tools, we were used to a certain performance and sound standard. Sound has as much to do with a DAW’s audio engine as the hardware that’s sending it out to your ears. As we have heard from others and can now confirm: sessions in Studio One just SOUND better, and the difference is attributed to the internal audio engine. What’s going on in the audio engine is beyond the scope of this review, but we will tell you that if you’re using Studio One and things don’t sound good, it’s not the DAW. With nothing else in our system changing but the DAW, audio truly sounded better to our ears.The plug-in suite included in Studio One is extremely useful and is sufficient for any mix you want to throw at it. As a delay junkie, we particularly liked the Beat Delay and Analog Delay plug-ins. On the Analog Delay, the Mod and Beat knobs made inspirational sounds and livened up tracks, which may have been heading for the trash bin. Several EQs, compressor, limiters and gates live in the plug-ins folder.
The FAT channel collection plug-ins, available at an extra cost or included with a Sphere membership, were of premium quality and definitely got us in the sonic ballpark of the emulated hardware. These compressors and EQs gave our comparative Waves plug-ins a run for their money. We discerned literally no difference at all between Waves CLA-2A and the FAT Channel Vintage Comp, for example. We also had the same results comparing the Waves Puig Tec EQ and the FAT Channel Vintage EQ.
The included audio loops were geared mostly towards EDM/Club style music, but a few rises and hits can really fit in most genres. We even found a few guitar phrases we liked and ended up using in a session!
Studio one includes a console plug-in that is meant to be placed as a Mix effect on the master fader. Mix effects affect every track in the session at the audio engine level, before any inserts. We’d really love to see more third-party offerings in the future taking advantage of this architecture. Softube makes an affordable tape saturation plug-in for this format, and it’s divine in both sound and function. The included PreSonus Console plug-in sounds great as well, although the crosstalk gets out of hand relatively early on the dial. A little bit definitely goes a long way and adds some dimension to a mix when set conservatively.
Documentation and Product Support
As expected, product manuals for this DAW are quite extensive and thorough. The reference manual is over 300 pages. We did have to go to it a few times, but the DAW is laid out so well it was rare for us to experience any type of problem. PreSonus has quite a social media presence with thousands of subscribers on various mediums. We received nearly instantaneous help via the Studio One Facebook page more than once.We’ve needed no product support for Studio One, but PreSonus in general has been stellar in the past. A very hard-to-diagnose Faderport issue went on for weeks, and tech support was right there with us. PreSonus has proven to be a company that cares about its user base and has a wish list in its user forums to develop feature requests.
People are making YouTube channels based on this DAW and posting daily tutorials on its use, and there is a staggering amount of information available. We have become friendly with and subscribe to both Home Studio Trainer run by Johnny Geib as well as Johnny Lipsham Studios. Both YouTube channels offer hands-on advice and training in Studio One, and offer a mountain of training for free. PreSonus also maintains a YouTube channel where it offers several videos to get new users up and running quickly.
Price
Studio One 5 Professional (MSRP $449.95) sells for $399.95. If you own a PreSonus interface or a Faderport, you can upgrade from your included Artist version at a fraction of that. Considering this would have only covered a year and a third of our Avid Pro Tools subscription, this presents a tremendous value.Sphere memberships are $164.95 a year. For $14.95 a month, you get Studio One Professional with every update as well as the vast list of Sphere features, including its robust online community and workspace. If you prefer to own your DAW, perhaps this deal isn’t for you. However, consider for this subscription price, you get the Studio One DAW, Notion, which is a fully functional and robust Scoring app, 30GB of cloud storage, access to Sphere workspace (a cloud collaboration platform), exclusive webcast content and every single plug-in, loop and virtual instrument that PreSonus makes.
Studio One has proven to be a serious contender in the DAW market and should fill most users’ needs at any level of use whether a professional audio engineer or just a serious hobbyist. If you’re ready for a worthy alternative to Pro Tools, Studio One is what you should be working with.