For many serious guitar players, stomp boxes running into the front end of an amplifier do not provide the audio quality or effects-programming flexibility that rack-mounted effects offer. For others, a combination of rack-mounted effects and stomp boxes are often utilized to create their sounds, and some players take it one step further and include multiple amplifiers and speakers in their guitar rigs, employing a switching system that enables them to access all of their equipment as needed on-the-fly.
We’ll be exploring all of these scenarios in detail at MusicPlayers.com, but for the first article in this series, we’re going to focus on utilizing MIDI foot controllers to manage your rack-mounted effects in conjunction with a single guitar amp or rack-mounted MIDI-controlled preamp.
MIDI Foot Controllers Features Comparison Chart
MIDI – Must I Do It? Technology That Even a Guitar Player Can Understand
Musical Instrument Digital Interface (MIDI) technology has been used by keyboard players and recording pros since the mid-80s, but guitar players can still get by without knowing a thing about it. These low-tech guitarists (dare we call them rock-n-roll purists) won’t lose much sleep nor go insane trying to figure out the technical stuff, but they also won’t be able to create the kinds of sounds you’re after for your guitar rig. This article isn’t for the pedal stompers.
The MIDI interface on an effects processor enables you to remotely change its programs/patches as well as manipulate many of its settings in real time: turning effect blocks on and off like a stomp box, adjust parameters such as tremolo speed, reverb depth, tap tempo, and more. The MIDI interface on a guitar amp or preamp enables you to switch amp channels (though this can typically be done with standard analog switching pedals), and on some of the more advanced guitar preamps, MIDI control can enable you to modify amp settings such as your gain level, in real time while playing. Whoa!
There are two basic types of MIDI instructions of which you’ll need to be aware of rack gear and foot controllers: Program Change instructions and Continuous Controller (CC) messages.
Program Change instructions are just that – you select a patch number on the foot controller and it sends a program change instruction to select a specific patch/program on your rack gear.
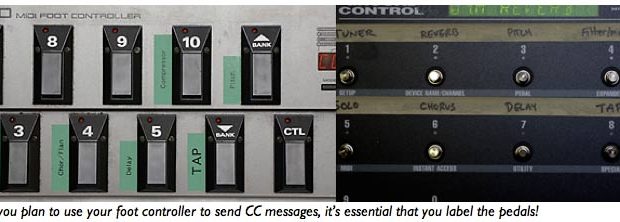
A Continuous Controller message, or CC message, sends a specific command, typically to turn an effect block On/Off, set tap tempo, select a tuner mute/output, and more (a CC value of 0 or 127 is transmitted). With an expression pedal (looks like a volume or wah pedal, and is described in detail later in this article), a range of CC values are sent from 0 to 127 based on the position of the pedal as you step on it.
Typically, each MIDI-equipped device listens for instructions on a single MIDI channel (of which there are 16 available), unless configured to listen in OMNI mode, whereby it will respond to a command it receives on any of the 16 channels. Many MIDI controllers, such as foot controllers (the subject of this article) or keyboard controllers, can transmit information on multiple MIDI channels concurrently in order to control multiple MIDI devices independently.
By default, all of the MIDI devices you purchase are set to MIDI Channel #1, which is why immediately connecting a few pieces of MIDI gear may seem to work sometimes for some basic tasks.
Amplifier Considerations
While many guitar players use rack-mounted signal processors with rack-mounted MIDI controllable preamps from the likes of Marshall, Mesa Boogie, Engl and more, other players are happy to stick with their combos and heads, using the MIDI stuff just for their effects. This is absolutely fine. Really. You don’t need our permission to do it.
Many effects processors provide analog switching relays so that you can eliminate the amp’s foot controller and change amp channels via your signal processor (connecting an appropriately-wired cable from the effect processor to the pedal input jack on the amp/head). With this configuration, you can simultaneously use your MIDI foot controller to switch amp channels and call up new effect programs in your MIDI gear.
Making the Connections
To utilize a MIDI foot controller to change settings on a piece of MIDI equipment, you connect the MIDI OUT from the foot controller to the MIDI IN of the receiving device such as the effects processor or preamp.
If you have two pieces of MIDI gear to be controlled, you can connect the MIDI THRU on the first device being controlled to the MIDI IN on the second device so that MIDI instructions from your foot controller reach both MIDI devices. Some devices use one combined port labeled OUT/THRU.

A MIDI THRU port simply “passes through” all MIDI information that the device receives via its MIDI IN port to its MIDI THRU port, sending the original incoming MIDI commands through to the next device’s MIDI IN port. It’s like connecting your foot controller directly to the other piece of MIDI equipment… almost.
Latency is the term that describes the delay of an electrical signal – not a good kind of delay like with your digital effects, but rather a delay in the time it takes for an electrical signal to travel from one place to another. If there is too much latency introduced by the first device you’ve connected to your foot controller, you may experience an audible delay when changing settings on the second device in your MIDI chain. This could prove incredibly inconvenient. For example, imagine kicking in your lead solo sound only to find your amp channel switching a few milliseconds too late… after you already started soloing while still on your clean tone!
If you plan to control your entire rig from a single MIDI foot controller, make your guitar preamp the first piece of equipment in the MIDI signal chain, followed by effect processors. It’s more important that your amp channel switch is instantaneous rather than switching your flanger effect On or Off.
Although there is no requirement to make the reverse connection from your preamp/effect processor’s MIDI OUT to your foot controller’s MIDI IN (requiring a second MIDI cable), sometimes it can be useful. We’ll look at this connection option in greater detail later in this tutorial.
Power to the Pedals
MIDI foot controllers must be connected to a power source, typically via traditional “wall warts” or via an internal power supply or battery source. If the idea behind your MIDI controller was to minimize cables on the floor, you’ll be excited to learn about a popular foot controller feature called phantom power that enables powering of the pedal board through your MIDI cable.
Usually, phantom power is supplied through the use of a special 7-pin DIN MIDI cable. Traditional MIDI cables have 5-pin DIN connectors, but a few clever manufacturers realized that two additional pins in a 7-pin cable could be used to supply power through the cable alongside your MIDI data.
 Just because your foot controller supports phantom power isn’t enough reason to rejoice – you need a power source at the other end of the cable to actually supply the current. Devices that supply phantom power (certain guitar preamps, for example) often have a phantom power input jack on the rear of the unit. You take the MIDI foot controller’s original power supply/wall wart and plug it into the back of your preamp, and power is passed through from the power input jack to your foot controller.
While this may seem odd, it ensures that you’re able to supply the correct voltage to the foot controller without any issues. Since we’re dealing with rack-mounted equipment, you just plug the wall wart into the back of your rack-mounted line conditioner/power strip. You have one of those, right?
If you have a preamp or effects processor that is capable of supplying phantom power, we highly recommend using foot controllers that take advantage of this great feature.
There are a few foot controllers that receive phantom power on a standard 5-pin DIN cable, but this is not the norm and can lead to other challenges:
- Because MIDI signals only use three of the five pins (two for data and one for ground), to save money on manufacturing, not all MIDI cables are wired for all five pins.
- You can’t glance at the MIDI connectors on a piece of equipment (or even the 5-pin DIN cable) and know whether or not it supports phantom power.
We encourage manufacturers to stick to the 7-pin DIN method of supplying phantom power since there’s no mistaking the connector on a piece of MIDI equipment.
If you end up with a 7-pin DIN equipped device and a 5-pin DIN enabled product that both support phantom power, there are some custom cables and adapters available that may enable you to connect the products and utilize the phantom power capability. Otherwise, you can custom-wire your own cable with a 5-pin DIN at one end and a 7-pin DIN at the other.
Alternate Hook-up Considerations
Using a single MIDI controller to change settings on your preamp and one or two (or more) signal processors can make the programming of your MIDI setup quite complex. Depending on your playing style, you might be better suited to utilize two separate foot controllers – one for your preamp and another for your effects. If you have a guitar amp head/combo with its own foot switch for channel switching, don’t feel like you have to give that up and surrender control of your amp to your MIDI setup.
Having used various MIDI setups over the years, I usually prefer to use two separate foot controllers for my amp and my effects. Although my guitar preamp could be controlled by the same foot controller that is attached to my effects processor, this approach requires careful planning of program changes as they relate to settings on my preamp.
With my preamp controlled independently from its own foot controller, I can leave one particular effects setup in place and change between clean and distorted channels in my amp. This is particularly convenient when composing new music or just jamming for fun – I can randomly dial up programs in my effect processor and easily switch individual effects On/Off from one foot controller and, with my other controller, I can select various clean or overdriven sounds in my guitar preamp.
Finding the Best Approach Before You Start
Before setting up your MIDI rig, you should decide on which approach to device control best suits your needs. Depending on the approach you take, it will require more or less programming either in your effects processors or in your foot controller(s). You can’t figure this out half-way through hooking up your devices.
Your very first priority is to decide whether or not you intend to control your amp/preamp settings from the same foot controller as your effects. As I mentioned earlier, you may prefer to change your amp settings with a dedicated analog-relay switching pedal (usually provided by the manufacturer of your amp) or you may purchase a second dedicated MIDI foot controller for changing settings on your more-advanced MIDI-controllable guitar amp/preamp.
Programming Logic – In Your Foot Controller or In Your Effects?
Let’s assume that you have two MIDI-controllable effect processors – perhaps a dedicated reverb/delay unit and a general-purpose multi-fx processor. When you step on a specific pedal, you would like Processor A to switch to patch #36 and Processor B to select patch #27. This event can be processed by your equipment in numerous ways.
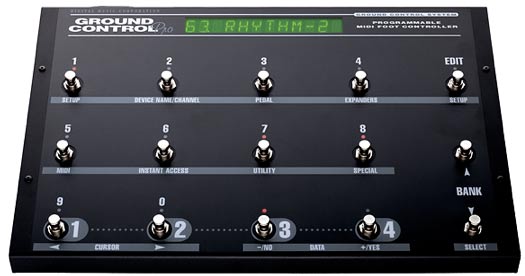
By default, your foot controller sends a single program change value on a single MIDI channel. There is a one-to-one mapping of these numbers, so if your foot controller was in its first bank of presets and you stepped on button #3, your controller would typically send a program change message on MIDI channel 1 to your effects processors telling them to call up program/patch/preset #3. We say typically because sometimes the numbers don’t line up.
With computer-controlled devices, sometimes program/patch numbering begins with the #1 but, in some devices, the first program is #0. Stepping on button #1 will call up program #0, button #2 will call up program #1, and so on, until you reprogram either the foot controller or the preamp/processor. (Some foot controllers have a feature built-in to select whether or not program changes begin at #0 or #1 – very useful.)
You have some decisions to make for processing patch changes within your effects processors:
- You could just save a copy of patches #36 and #27 in your effects processors to program location #3 in each (the example above), or any number that you’ll call up from the foot controller. This is the simplest approach that requires no programming work in your foot controller, but you’ll end up replacing tons of great sounding effect patches in your equipment with duplicates. We do not recommend this approach. If you choose this option, we’re going to take your rack away and trade you a set of second-hand stompboxes.
- By utilizing the MIDI Mapping function in your equipment, you can change how it responds to a program change command. For example, when Processor A receives a program change command, you can set it so that incoming program change #3 (from our example) changes the processor to patch #36. You can save customized MIDI maps for all of the program locations in your processors. You can even utilize the mapping feature to shift your program changes by one if you’re experiencing the zero/one numbering issue mentioned earlier.
- We don’t know of any popular MIDI-controlled preamp or effects processor that lacks this simple capability. Learn to use the MIDI mapping feature of your effects processor(s) because it is one of the simplest ways to select your patches.
- Many foot controllers can be programmed to send one or more program changes on multiple MIDI channels concurrently. Some can also be programmed to handle your MIDI mapping simultaneously. Stepping on pedal #3 could be set to send program change value #36 on MIDI channel #1 and value #27 on MIDI channel #2.
- Sending program changes on multiple MIDI channels is very convenient if you have two or three devices under the control of your pedal board, but it introduces the requirement of learning to program your foot controller. You will also need to spend some time thinking about which patches you want to call up in your effects processor(s) on a song-by-song basis, and then map them out on paper in order to facilitate programming the foot controller with minimal frustration. It is much easier to program and review MIDI mappings in your individual MIDI-controlled devices than it is to program or review these settings in most foot controllers.
Adding Pedals to Your Pedals
Just because the MIDI foot controller you’re interested in purchasing doesn’t have a built-in continuous controller doesn’t mean you can’t add one (or more) to it.
Many foot controllers have input jacks for connecting one or more pedals of various types – continuous controllers for adjusting everything from volume to wah effects to tremolo speed to delay repeats and more, plus additional switch pedals for single-function On/Off tasks such as dedicated Tap Tempo control, switching to your tuner output, and gain boosts for soloing, to name a few. The more versatile the MIDI capabilities of your foot controller, the more options you’ll have available for controlling your rack gear.
You’ll want at least one continuous controller in your setup, and with pedal input jacks on your foot controller, you’ll have the opportunity to select specific pedals with just the right feel, instead of settling for whatever continuous controller is built into your foot controller. Some players prefer a wah pedal that is spring-loaded, while others prefer the feel of a traditional volume pedal, for example.
Whatever your preference, you’ll usually have the option to add either a dedicated continuous controller pedal (like the popular Roland EV-5 Expression Pedal) or, in many cases, you can use a volume pedal for MIDI control. Connections are made either with ¼” stereo cables or with insert cables that have a ¼” stereo connection at one end and separate ¼” mono cables at the other. These “Y” cables are frequently used for connecting rack-mounted processors like compressors and noise gates to mixing consoles. No audio signal is ever passed into or through a volume pedal used for expression pedal purposes – only the output jack is connected to your foot controller, and this is only used to generate changes in electrical current that are translated by the foot controller into MIDI CC values in the range 0-127 for controlling a specified effect in your rack gear.
Are You Latching On to All of This? Take a Moment to Read This.
Bad puns aside, the pedals in MIDI foot controllers are either Momentary, Latching, or adjustable through programming.
Momentary pedals send one MIDI value when stepped on (typically CC value 127) and another value (typically CC value 0) when released. Latching pedals are pure On/Off transmitters… the first time you hit them, they send a value of 127 (On), and the next time they send a value of 0 (Off).
Your effects processor(s) may react in unexpected ways if it receives an invalid CC message created by using an inappropriate type of pedal. Adjusting Tap Tempo usually works best with a Latching pedal because the effects processor waits for two full press/release actions with the pedal to establish a tempo. If you hit a Momentary pedal once for setting Tap Tempo, it will register your tempo as being the difference in time from when you first depressed the pedal to the time you released the pedal, which is not going to generate tempos that you had in mind for your delay repeats or other synchronized sound effects.
When setting up your MIDI foot controller, it’s important to figure out what kind of pedal response your effects processor(s) is configured to work with, and then make sure that your floor controller is configured to match.
The Lights Are On (or Off), But Is Anyone Home?
With all-in-one floor-based effects such as a Boss GT-8 or Line 6 PODxt Live, when you select a patch, you can see lights identifying which effect blocks are active. Unfortunately, with MIDI foot controllers, it’s not as simple as making the reverse connection of a MIDI OUT from your processor to the MIDI IN of your foot controller. Often times, the result of this connection is… absolutely nothing.
For example, in order for most foot controllers to display the On/Off status of effect blocks when a new preset is called up, they need to receive MIDI instructions from your rack gear, and this requires the second MIDI cable. However, not all devices transmit this information so, depending on the foot controller and rack gear that you have, this connection may be unnecessary. Also, some foot controllers store effect block status in their internal memory, which negate the need for more than a single MIDI cable. And, additionally, there are some simple MIDI foot controllers that don’t even have a MIDI IN jack.
Even without the second MIDI cable, you are still able to control the On/Off status of effect blocks, and they will light up on your foot controller when you step on them to change a pedal state from Off to On.
Since phantom power is only supplied on the MIDI OUT jack from a foot controller, you may have a setup requiring one 7-pin DIN cable and one 5-pin DIN cable for complete functionality.
If you plan to program different effect presets/patches for all of your effect states instead of turning effect blocks On/Off within a patch (ex. Program #41 has your chorus, delay, and reverb On, and program #42 has only the chorus and reverb, but no delay), you’ll only need a single MIDI cable.
Manufacturers haven’t come up with a standard way of providing this important visual feedback to your foot controller so, typically, it only lights up when you turn an effect block ON from within your foot controller’s CC (continuous controller) mode. Unfortunately, when you first load a program/patch/preset, your foot controller has no idea what the status of each effect block is, so all of your buttons are visually Off by default.
Some products like Lexicon’s MPX-G2 effects processor combined with Lexicon’s R1 foot controller (both discontinued but very popular items on the used market) overcame this challenge through some proprietary data exchange between the two devices. Other foot controllers have been pre-programmed to provide the correct visual information for specific effects processors, sometimes from the same manufacturer as the foot controller, and sometimes for popular processors from other manufacturers.
In some cases, you may be able to program a solution that provides visual status indicators depending on the capabilities of your foot controller, the capabilities of your effects processor, and your own capacity to tolerate mental anguish, sleepless nights, and lots of email with the technical support folks who make your equipment. If you’re technically inclined and have any kind of programming or engineering background, or if you’re the type that enjoys a good puzzle (or a good fight), reading your equipment’s MIDI Implementation should provide the building blocks from which to figure out how to implement a solution that works for you.
The simplest solution without advanced programming? Create your effect patch/program, set all of the effects blocks Off, and save the program in that default state. Then, when you call up that program from your foot controller and change it from Program Change mode to its Continous Controller mode, or just directly access its CC pedals (if available), you’ll know immediately (visually) that sending an On instruction lights up the switch on your foot controller and enables that effect block. This may not be the most elegant solution, but it works reliably without any programming hassles, and may be a good place to start if you are still getting your feet wet with this technology. (This solution only requires a single MIDI cable.)

Armed and Dangerous
The accompanying table lists many popular MIDI foot controllers and summarizes numerous features. Due to the specialized audience that these serve, you will not find many foot controllers (if any) to select from at your local guitar shop. In fact, many popular controllers are only available directly from their respective manufacturers.
While the best advice with many products is to try-before-you-buy, you rarely have that opportunity with this kind of product, so your purchasing decision will most likely be one based on the evaluation of the products from online information, product specifications, and reviews like the ones accompanying this article.
First determine your pedal needs, and then see if an available product meets or exceeds that need. If a foot controller only enables you to switch three effect blocks On and Off, but your processor features six switch-able effect blocks, that foot controller may not be right for you.
Do you prefer to control your effects stomp-box style or would you rather select pre-programmed patches on your processor? Different foot controllers use different methods of sending Program Change commands and Continuous Controller messages. Some have separate pedals for each of these functions, while others have one set of pedals and a mode-change switch that toggles between these operating modes. Does the foot controller you want enable you to make changes as rapidly as you’ll need?
There are plenty of popular MIDI foot controllers available second-hand on eBay as well. One of these may serve your needs well enough and, fortunately, there haven’t been any changes to the MIDI specifications that would render these older foot controllers any less useful than the newer products available today.
We plan to continue evaluating new MIDI foot controllers over time. We’re particularly looking forward to new capabilities such as the ability to program a foot controller from computer-based software. This would be a much simpler approach than the various methods employed for programming many of the current foot controllers – a series of commands entered by stepping on numerous foot switches.
Don’t forget, you can talk with us (and your peers) in our Rack Gear & FX forum about using these products, too!
In Review
We have in-depth product reviews of MIDI foot controllers in our Reviews section, and we'll be reviewing additional MIDI foot controllers as soon as they come into our offices and studios. Be sure to sign up for our monthly newsletter or check MusicPlayers.com regularly for recent additions.