 Auralex Acoustics Inc. products are installed in studios of all sizes from tiny bedroom studios to world-class recording facilities, and their popularity in the project studio and home studio market is unparalleled thanks to a diverse product line with solutions available to meet many different budgets. Auralex products are far more than the sum of their parts, though. The purchase of Auralex acoustic treatments includes free room analysis and design consultation, while more-detailed room analysis consulting is offered as an optional fee-based service.This review focuses on the Pro Plus Roominator kit and Auralex’s complimentary room analysis service, but it can be applied to any number of different packages offered by the company. We’re pointing this out because you shouldn’t buy one specific room correction bundle just because we said it’s fantastic. You need the right package (or individual components) for your acoustic environment.
This review is not intended to provide an in-depth tutorial on the science of room treatment, but we’ll start with a crash course on the topic. The products used for manipulating the distribution of sound through your environment fall into two primary areas: Absorption and Diffusion.
Absorption products are intended to reduce volume levels both inside and out of your studio by absorbing sound waves and preventing them from being reflected back into your acoustic environment. Acoustic foam is the most widely-used product to accomplish this goal in studio spaces, and let’s make one thing clear from the start: acoustic foam bears no relationship to the foam egg crates you stick on a mattress.
We know countless young musicians who buy those cheap mattress pads and stick them on the walls of their studio space in the hopes of making things more “sound proof.” They quickly discover that traditional foam has about as much sound absorption capability as a bath towel. Trust us (and studio engineers everywhere) — actual acoustic foam responds significantly different when applied to your studio walls. We were eighteen years old once, too, and speak from unfortunate experience.
Bass traps, often times constructed from extremely dense acoustic foam or fiberglass, are optimized for absorbing low frequency sound waves that can easily build up in room corners.
Diffusion products are engineered to scatter sound waves so that they don’t reflect audio signals in straight paths. These products can be made from a wide range of materials including wood and plastic, and you can create diffusion within your studio space by breaking up solid wall and ceiling areas with anything that creates an uneven surface. Diffusion products can help adjust the quality of sound heard in your studio environment.
If you’re hoping to make your environment silent to the outside world (garage, basement, etc.), the only way to do this successfully requires actual construction with sound absorption materials installed into the physical structure, and for true studio sound isolation, a room is typically built “floating” within the external walls and floor. Fortunately, though, you can make your room sound pleasing to the ears and neutral for mixing work without having to break out the demolition tools.
This summer, MusicPlayers.com moved into a new commercial space, and we faced a common audio challenge that project studio owners regularly deal with — Optimize the sound of a large room (over 500 square feet) that would be used for live rehearsal, product testing, recording, and mixing.
Auralex sent us a room analysis form on which we filled out details regarding our room, dimensions, height, wall and ceiling materials (dropped ceiling, drywall, etc.), and on the second page, we used the provided graph paper to draw a layout of our room including placement of our mixing desk, music equipment, etc. It was just like designing a Dungeons & Dragons module, only nobody was going to be destroyed by a demon or demigod at the end of this process.
Soon after, Auralex sent us a computer designed room layout showing the suggested placement of various sound absorption and diffusion products. The Pro Plus Roominator kit was their recommended package for our multi-use space that also fit within our budgetary constraints.
Installation was very straightforward, and within a few hours we transformed both the look and, more importantly, the sound of our studio space. And because we deviated slightly from their “optimal” version of room correction to make room for artwork and other studio fixtures, we had enough material left over to treat a smaller room in our offices for additional studio space.
Features
![]()
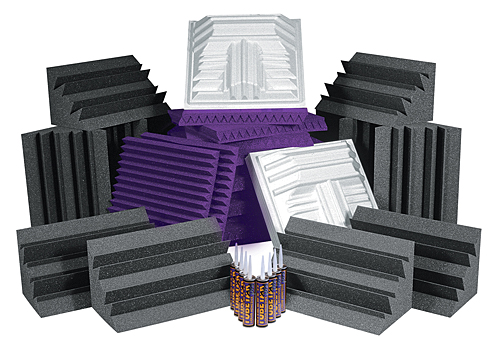
The Pro Plus Roominator kit is available in a few different color combinations. We opted for a combination of charcoal gray and purple, which blended nicely with our carpeting and off-white wall color scheme.
The kit included:
- Thirty-six two-inch Studiofoam Wedge panels. These are the primary sound absorption materials.
- Twelve LENRD (Low-End Node Reduction Device) bass traps. Their placement in corners and along the ceiling is designed to reduce the build-up of low frequencies that would otherwise generate extremely inaccurate low-end frequency response in your listening environment.
- Eight T’Fusor diffusors. These 23 ¾ inch square diffusors are perfectly sized for use with dropped ceilings. Two of them can slide right into the space of a single 2’ by 4’ ceiling panel without removing the panel above them, or you can space them creatively in order to adjust the overall sound of your space.
- Eight tubes of adhesive material for gluing the absorption materials to your walls.
The only “extra” you need for installation is a caulking gun for the tubes of adhesive and a level if you’re trying to keep things nice and neat looking.
Usability
![]()
Installation was extremely straightforward. Using the layout plan that Auralex designed for our room, we knew exactly where to install the various components.
The Tubetak adhesive material worked very well, drying within a matter of seconds after placing panels on the walls. We used half as much material on the back of the panels as was suggested and had no problems. This left us with four unused containers, which suggests to us that Auralex really doesn’t need to supply so much glue.
It’s common practice when arranging Studiofoam wedges to rotate the orientation of adjacent panels: the designs look great and further diffuses the incoming sound waves.
Once glued to the walls and allowed to fully set after a few hours, the studio foam becomes permanently affixed to your walls. Removal will require a Spackle knife and is certain to leave foam material behind on the walls. If you lease your studio space, don’t plan to take this stuff with you when you leave, and be sure that you’re complying with any fire safety codes prior to installation. You could tack the panels up on the walls with small nails if a permanent installation isn’t permissible.
Sound
![]()
Our studio sounds great! Although we didn’t use all of the traps and studio foam as suggested (subtle differences in our room layout from the initial design), our treatment of the room made a significant difference in the room acoustics.
In fact, after calibrating our studio monitors using IK Multimedia’s ARC Advanced Room Correction System, it was interesting to note that there was only minimal correction applied to our mixing environment. In our previous studio environment, which didn’t have any scientifically engineered acoustic treatments, there was significantly more correction applied to our studio monitors.

The MusicPlayers.com product testing and recording studio.
Documentation and Product Support
![]()
Besides the computer-generated room design, Auralex provides a sheet of general guidelines, tips, and illustrations to help you place their products optimally.
If you really want to get a handle on taming your room acoustics, though, go online. Auralex has an entire mini-site (www.acoustics101.com) filled with tutorials on the science of acoustic treatment.
Price
![]()
The Pro Plus Roominator Kit ($1,299 MSRP) retails for just under $1,200. For correcting a studio space as large as ours, this package provides a very good value. If your studio space is smaller, Auralex has packages that range from $150 to $1,000 that can address a variety of studio spaces… and they all include free room analysis!
Contact Information
Auralex Acoustics Inc.
www.auralex.com
Overall Rating - Product Summary