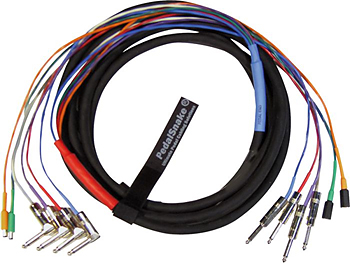
 Caught up in the world of stompbox madness, guitarists have long weathered the headaches caused by a twisted mess of cable spaghetti, never-ending duct tape, cable-ties, power-strips and extension cords – not to mention the time in assembly and disassembly every time they have a gig. Resembling your favorite superhero along comes PedalSnake – a “One Cable Solution” promising decreased setup time, clean stage presence, and the ability to change connection configurations through numerous unique pigtail, plug and play connection options.
The PedalSnake solution enables guitarists with rigs of all shapes and sizes to simplify their wiring without sacrificing tone. It’s a modular system, with a variety of different connection options to suit your individual requirements for audio, power, MIDI, foot switches, etc. If you have a pedal setup that’s more complex than your perception of the “average player’s” rig, never fear. The PedalSnake custom shop can build you a customized snake. In fact, that’s just what they did for the purposes of this review — we put a custom shop PedalSnake solution to the test.
| Category | Value | Rating |
| Features | 20% | |
| Usability | 25% | |
| Sound | 25% | |
| Documentation & Support | 10% | |
| Price | 20% | |
|
|
||
| OVERALL RATING = 3.6, which earns it a WIHO Award! 3.6 stars or better: Outstanding, WIHO Award 3 stars or better: Worth considering 2 stars or better: Suited to specific needs 1 star or less: Not recommended |
||
If you have a complex rig, the biggest challenge with PedalSnake may be simply figuring out how to order the specific parts you might need, and the website goes to great lengths to help clarify your options. But once you get past that hurdle, the solution is extremely elegant, and after a recent gig where our setup time took only a minute, the proof was in the proverbial pudding. PedalSnake made our setup a breeze, our sound wasn’t altered, and we could spend more time focused on playing without worrying about tripping over a tangle of cables.
Features
Snakes have been used for years to run multiple sends and returns from mics and instruments on stage to a PA system, or from a recording studio control room into the live tracking rooms. Essentially, the snake is just a bunch of cables wrapped up together in one large cable housing with various connectors at each end, whether it’s a metal box with multiple XLR connectors (a breakout box) or simply a collection of ¼” instrument cables dangling out the end.
PedalSnake is a modular cable system designed to simplify the numerous cable runs to and from your pedal board to your amp that is based on the concept of audio snakes but optimized for guitarists. A BaseSnake runs the distance from your amp to your pedal board, and different modular connectors (called pigtails) connect to each end to supply audio signals or power.
 PedalSnake offers multiple BaseSnake pigtail configurations to accommodate your specific setup. A BaseSnake consists of four or seven channels in either eighteen or twenty-four-foot lengths. With a hard-wired snake, you would have no choice but to cut the cable and solder new connection ends every time you had a setup change – not very convenient unless you have a full-time tech working for you. With the pigtail options, you just plug and play as your needs change.
We tested the PedalSnakeCS Custom Shop model, which provides for the most complex setups. In our case, the reason we opted for a custom snake was that we required a 7-pin DIN connection for a proprietary amp foot controller. Standard BaseSnakes are configured with the more common 5-pin DIN connector that can be connected to a pigtail or MIDI foot-controller.
As minimal as it may seem, each cable end was color coded for ease in connection. At the pedal board end of the PedalSnake, all ¼” connections were at right angles to aid in space savings and ease in the routing of the cable to the underside of our beloved Pedaltrain pedalboard (though the names are similar, these products are from different manufacturers). Once your connections are made at the pedal board end, the snake can be coiled up and placed on top of the board for easy transport without the need of disassembly.
At the back line, or amp end of the PedalsSnake, all ¼” connectors are straight plugs, making it easy to connect to the recessed input jacks found on most amps. Again, all channel ends are color-coded to aid in connecting each cable to the correct function/application. For example, you may choose to match up the red channel for your FX Loop Send Return while the black channel goes to your amp’s front end.
 What about powering your pedals? Rather than taking up space on the pedal board for power supplies, our PedalSnake was equipped with two PLine (power lines) connectors. At the pedal board end, the PLines attached to a power-chain cable that powers up to four effects per daisy chain (similar to the string of power cords you may have used with a BOSS power supply, but while those were all identical power connectors for one brand of pedal, in this case, you get multiple power plug adapters that attach to the daisy chain to match the exact specifications required by your pedal). The different options include: a reverse polarity plug connection, conversion to a right angle plug for space savings, conversion of a 2.1mm to a 3.5mm plug, and conversion of a 2.1mm to a 2.5mm plug.
On the amp side of the PedalSnake, you could attach the PLines to your existing power supplies (like a BOSS PSA adapter), or you can let PedalSnake provide power of its own. We attached our PLines to two SnakePower power supplies. The SnakePower power supplies are “true-isolated-transformers” rated at 500mA. These transformers are able to power 15–20 stompboxes each, including Line6 modelers and other stomp boxes requiring more than 9V power.
Usability
PedalSnake and Pedaltrain promote their product combination as the “Ultimate Pedal Management System” and after spending a few months with this combination of products, we are inclined to support their claim! The most labor-intensive part of getting up and running with PedalSnake is learning about the product components and how they apply to your requirements, ordering the components, and then assembling your rig. Once figured out, though, it works great, and we can look back saying that it was worth the struggle to figure out.
 The biggest benefits we found to using this system were a clean implementation, presentation of our pedal board (so nice and tidy!), and efficiency in setup. PedalSnake claims the product provides an “ultra-cool look” and “ultra-fast setup,” and we certainly agree. With that said, pulling our pedal board from its case with the PedalSnake already attached, all we had to do was uncoil the PedalSnake, run it to our amp, make a total of four connections (amp input, effects loop and power supply) and power up – simple! What a wonderful thing — no spaghetti tangle to mess with, no lines to cable-tie or tape down, no extension cords to run, and best of all, time to have a drink and relax before the show!
As our PedalSnake was a special order Custom Shop configuration, it had hard-wired GLines (Guitar Lines) and a 7-pin DIN cable to connect to our proprietary foot controller. If you expect to make changes to your set up routinely, we suggest sticking with the Standard BaseSnake, which will allow you more overall flexibility should your requirements change. In our case, a new amp might necessitate the purchase of a new custom snake since we won’t want to give up such a nice solution for our wiring.
It was easy to secure the snake underneath our PedalTrain pedal board with a few supplied Velcro strain-relief cable ties in order to avoid possible damage to the snake (or our pedals) if someone were to trip over our cable. At the amplifier end, the Velcro ties could also be used to provide some strain relief from the weight of the snake hanging down behind a half-stack.
Sound
We used the PedalSnakeCS Custom Shop snake with both an EVH 5150 III amp and a Mesa/Boogie Dual Rectifier Tremoverb amp. The PedalSnakeCS provided as clean a sound as we hear going straight into the amps with the effect chains bypassed (we run some effects to the front of the amps and others to the effects loops). Using a variety of pedals from mainstream BOSS and Line 6 fare to a few boutique products from Fulltone, all sharing the PedalSnake power supplies, we could not detect any additional hum and, equally important, no loss of tone. Even considering the twenty-four-foot length of the PedalSnake, we were able to maintain crystal clear tone without loss of sparkling highs or heavy low frequencies.
 If you run effects both in front of the amp and in the effects loop, care needs to be taken when supplying power to your pedal power chains in order to avoid creating unwanted hum [note that this is a general wiring issue and is not specific to the use of PedalSnake]. We initially made the mistake of using a single power chain cable to power all of our pedals, and because of the way our Tremoverb's tube-buffered effects loop is wired internally, this resulted in an obvious hum. Fortunately, after reading the useful help link on the PedalSnake.com website entitled "Does Your Rig Hum?" we realized that what we needed in our specific case were two power supplies and two power lines — one line for each of our two pedal chains. Once we made this simple change to our setup, we didn't have any issues with hum.
Of course, if your rig is simpler and you’ve just got one effects chain, either to the front of your amp or in its loop, you won’t have to worry about this issue.
Documentation and Product Support
PedalSnake provides one of the most in-depth websites when it comes to product information, setup requirements, and ordering instruction. You might assume that cabling is extremely straightforward and intuitive from a setup standpoint, but not so for PedalSnake. The options are endless and, most of all, interchangeable at any time.
We were fortunate to have PedalSnake developer and company owner, Jody Page, assist us in configuring a PedalSnake to meet our specific application needs. The website contains a menu of options to educate you on product construction and its application in your setup. There’s also a useful product video demonstrations and helpful documentation tips in the Rig Setup/Best Practices and Troubleshooting areas.
Now if only we could figure out where to get some of those special product attachments that Jody featured in his performance demo — we couldn’t find them listed on the order form.
Price
PedalSnake offers a variety of configurations in their BaseSnake models ranging in price, approximately $45.00 to $80.00 retail pricing, depending on the length of the cable and number of lines required.
Additionally, you will need to order pigtails to match your particular application and to include Power-Chain cables, power plug adapters and a power supply (or two). When all is said and done, a complete set up of the PedalSnake will cost an average of $150.00 to $200.00 for a complex configuration similar to ours. For simpler configurations, Stage Magic report that customers typically spend between $75 and $175 for their configurations.
If your rig requires some additional snake modifications or out-of-the-ordinary connection requirements, PedalSnakeCS Custom Shop will work with you directly to accommodate those requirements – for an additional fee, of course. We opted for a PedalSnakeCS for review purposes with plans on adapting this piece of gear to our own specific setup.
When taking into consideration the cost of individual cables, the time saving for gear setup at a gig, and the extremely tidy presence on stage, the thought of not having this elegant solution is frightening!
Contact Information
Stage Magic Inc.
www.pedalsnake.com
| Evaluation Short-List |
|

