 When we first reviewed the G-System almost four years ago, we knew that TC Electronic had introduced something special. Imagine a box that could either be a floor-based multi-effects pedalboard or a rack-mounted processor, had four bypassable audio loops for additional effects pedals, was a MIDI foot controller and an amp channel switcher… the flexibility of such a device seemed almost unimaginable.
A few years later (and a few major updates later), the G-System has proven to be an industry-leading product that fundamentally changes the way many pros build high-end guitar rigs (and subsequently it has found its way into the guitar rigs of more pros than we can keep track of). For anyone who grew up dreaming of one day owning a “Bradshaw Rig” or other custom switching solution, those dreams are now within your grasp.
| Category | Value | Rating |
| Features | 20% | |
| Usability | 25% | |
| Sound | 25% | |
| Documentation & Support | 10% | |
| Price | 20% | |
| OVERALL RATING = 3.6, which earns it a WIHO Award! 3.6 stars or better: Outstanding, WIHO Award 3 stars or better: Worth considering 2 stars or better: Suited to specific needs 1 star or less: Not recommended |
||
The G-System delivers renowned TC Electronic studio effects and facilitates complex rig control without requiring a degree in rocket science to program. Rack gear has grown up a lot over the past decade, and with this device at the center of your setup, we can’t imagine why anyone would want to spend their time struggling with the complex programming that some other gear solutions require.
There are numerous ways in which a G-System can be integrated into your rig, whether you’re just a guy with a 1x12 combo and some pedals or a player with racks of gear. But in all cases, you’ll need an effects loop to really take advantage of the G-System’s fantastic sounding effects (and a stereo rig will take things over the top).
Speaking of effects (which are the most important attribute of this gear), the G-System sounds fantastic, and it features all the expected staples including TC Electronic’s legendary chorus and delay algorithms, as well as studio-quality intelligent pitch shifting and much more. It isn’t an amp modeler, though; so don’t expect it to replace your amp.
Programming the G-System is very straightforward either from the front panel or from a fantastic (supplied) computer-based software editor, and the foot controller is hands-down the coolest looking pedal board ever built. The beauty is far more than skin deep, though, as you’ll discover when customizing its functionality to suit your specific needs.
Features
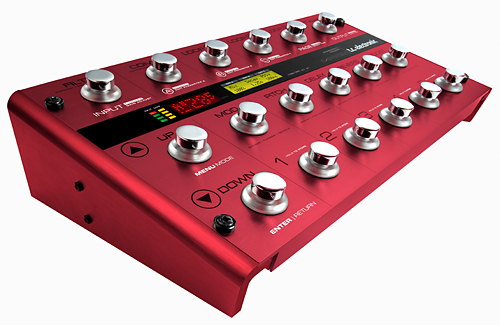
The subject of this review is the new G-System Limited. It differs from the standard model only in two ways: it ships in a cool, limited-availability red color (only 300 units) instead of the equally sharp brushed silver finish, and it features a redesigned analog circuit for the signal path.
We expect that the redesigned circuit will be rolled into all production models once existing supplies run out since it delivers a noticeable improvement in some rig setups (more on this in the Sound section).
The current software revision of the G-System is 4.02. Anyone with an older G-System (the version number shows up when you first turn the unit On) can download the update for free from TC Electronic. The update will give you the latest effects, feature updates, new factory presets, and the latest version of the software editor, Vyzor 2.0 (required for use with G-System Version 4).
The G-System truly is a system: one part multi-effects processor, one part audio loop and amp channel switching manager, and one part MIDI foot controller. In many of these areas it really excels, and it does some things that no other products on the market can even approximate.
Effects
- Filter: Resonance filters, Wah (traditional, Touch, and Auto), Formants
- Compressor
- Modulation: Chorus (Classic and Advanced), Flanger (Classic and Advanced), Vibrato, Phaser (Vintage and Smooth), Tremolo, Panner, Univibe
- Pitch: Pitch Shifter (Intelligent and standard), Octaver, Whammy, Detune
- Delay: Single, Tape, Reverse, Lo Fi, Ping Pong, Dynamic, Dual, Modulated, Doubler
- Reverb (Spring, Hall, Room, Plate)
- Parametric EQ (three bands)
- Noise Gate
- Boost
Up to nine effects can be used simultaneously, but you can only use one effect from each category (effect block) at a time, and certain effects can only be heard when the G-System is connected to a stereo rig.
The onboard tuner offers an optional Strobe mode in addition to typical arrows (for sharp and flat tuning guidance) and a Bar mode, in which a horizontal bar stretches wider on the display the further out of tune you get. It doesn’t have any advanced customization for alternate tunings.
As with the G-Major and G-Major II, TC Electronic provides a few preset routing options for the chain of effects: Serial, Semi Parallel, Parallel, and Serial 2. In all cases, the filters and compressors come first, followed by any external pedals you have in the loops. The signal then goes into the front of your amp, and the remaining effects are routed to your effects loop with a few different routing choices as seen in the following illustrations.


 Of course, this is just one signal routing scenario. We routinely use the G-System entirely in the effects loop of our amps for a simpler setup. There are numerous ways to hook up the G-System (more in the Usability section), but you can’t completely change the order of the effect blocks (like with the TC Electronic G Force). On the flip side, the partially fixed signal path ensures seamless patch changes with delay and reverb tail spillovers, which you don’t typically get from gear that allows for the full re-ordering of a signal chain.
The Serial 2 Routing option is similar to the Serial option, but it places the entire modulation effect block in a return loop of the delay block in order to create modulated delays. With this approach, you can add any type of modulation to any of the delay types, which is far more flexible than simply having a Rate and Depth chorus option tacked onto the end of a single delay line.
Output from the G-System can be either mono or stereo, and there is a S/PDIF digital output, though since this unit is completely focused on guitar players, its presence is hardly necessary. There is no digital input, however, as with the G-Major processor family, which can be patched into other studio equipment bypassing the analog interface completely.
A welcome addition to Version 4 of the G-System is one of the most sought-after user requests — a Kill Dry option, which enables you to force the G-System to pass 100% effected signals. This feature is specifically useful with parallel effects loops, and for players building wet/dry/wet multiple-amp setups.
 The G-System contains a Factory bank of 100 presets as well as two User banks that hold 100 sounds each of your own creation. The G-System Limited comes with one of the User banks loaded up with 100 additional presets (also available as part of the software update for older G-Systems).
 Audio Loops and Chanel Switching
The G-System has four true-bypass audio loops. You can plug any pedals you’d like into the loops, and three of those loops have immediate control from the foot controller. To make the loop solution complete, the G-System also provides pedal power! There are four DC outlets on the rear of the unit, each providing 9 V power (max 200mA combined), and as a fantastic finishing touch, TC Electronic supply short power cables (standard barrel connectors) so that you can get up and running with the pedal loops immediately. Our only gripe — we wish half of the power cables were longer.
There are two ¼” stereo jack switch connectors that can be used for channel selection on many guitar amplifiers. Because the wiring scheme for this function varies from one amp to another, it’s not guaranteed to work with your specific amplifier. TC Electronic provide information on compatibility with various amps on their website.
Foot Controller and MIDI Operations
The G-System is undoubtedly the coolest looking foot controller on the market with a host of original features that make it stand out from the crowd. The surface is adorned with eighteen oversized buttons that serve multiple purposes — the top six buttons double as rotary encoders for setting values!
The buttons are very clearly labeled. A pair of Up/Down buttons on the left side selects a sound bank, while the bottom row’s buttons 1 through 5 select specific presets within the bank.
Above the five preset selection buttons are On/Off buttons for commonly used effect blocks: Modulation, Pitch, Delay, Reverb, and Boost. The top row of buttons has On/Off buttons for the Filter and Compressor effects, three buttons for turning your external pedal loops On/Off, and finally an Edit button that serves multiple roles: Edit Mode selector (just hit it once), Tap Tempo (tap it a few times), and Tuner (step and hold for a few seconds).
Across the middle of the unit is where you get to see what’s going on: input meters, preset bank and number (large, bright LEDs), tuner display, an LCD display that shows full preset names as well as a duplication of the preset bank and number, and visual tempo indicator lights.
Not happy with this button arrangement? No problem. The G-System lets you customize the functionality of almost every button on the unit! Don’t need instant On/Off access to the compression effects? Reassign the button to the fourth pedal loop. Or rather than utilizing the G-System’s onboard reverb effects, how about assigning the button to trigger your amp’s analog reverb circuit? Not using any external pedals? Go ahead and reassign those Loop buttons to send MIDI Continuous Controller (CC) message to control your other MIDI equipment.
The G-System only sends CC messages on a single MIDI channel (or in Omni mode), so if you have complex MIDI requirements (sending CC messages on independent MIDI channels to different pieces of gear), you might find this aspect of the unit limited. But for most typical applications, including many complex rig setups, we can’t see this being a problem (as you’ll read about later in the review).
Another nice MIDI feature is that there is onboard MIDI Program Change (PC) mapping for external devices. For example, you can set the G-System so that pressing Bank 1, Preset 3 sends an external program change value of 37 to your other gear instead of the default value, 8 (the G-System starts numbering at bank 0 by default).
Confused by this MIDI functionality stuff? Check out our in-depth tutorial on using MIDI foot controllers here.
The G-System has MIDI In and Out connections for both controlling other gear as well as being controlled by other devices in your rig. Wouldn’t it be great to have a sequence from your keyboard player automatically change your amp channels and sound effects at the precise moments when you need them? Um… perhaps.
But Wait! There’s More!
With all those pedal loops, power cables (for the pedals and the actual G-System), and audio cables running between the G-System, your amp, and your guitar, you could easily run into a cabling nightmare.
To cut down on noise from long cable runs, the G-System is designed to take advantage of balanced audio cables if you have them, though it will still work fine with traditional instrument cables.
Tip: If you’re rack-mounting the G-System’s GFX01, balanced cables are less important since you’ll have very short cable runs. But if you’re using it on the floor, consider investing in a pair of balanced cables (or three for you stereo guys) for part of the hookup.
One incredible feature that sets the G-System apart from everything else on the market is its unique Transformer-like construction. With the removal of just a few screws, you can disconnect the GFX01 brain from the underside of the foot controller and rack-mount it! This lets you put all of your other effect pedals on a shelf in a rack and makes it simpler to wire the G-System into your amp setup. Plus, it virtually eliminates the cable mess you might otherwise be facing.
When rack-mounted, the foot controller connects to the GFX01 via a standard Cat 5 Ethernet (RJ-45) cable! That’s it – one commonly available cable, and it can be up to 15 Meters (49 Feet) in length. You can purchase a heavy-duty Ethernet cable in a music store with an XLR housing around the ends for added ruggedness, but any inexpensive Cat 5 Ethernet cable from your home network will work, too. (The G-System includes a very short Ethernet cable that attaches the GFX01 to the foot controller when self-contained).
Tip: If you rack-mount the GFX01, it is strongly recommended that you install a blank 1U rack panel underneath the foot controller to maintain structural rigidity. You can pick these up for just a few dollars at any big music store.
Further, if you want to install the G-System foot controller into a custom pedal board, the sides can be unscrewed for mounting into your own custom chassis.
What about some external control for things like your volume, wah, and random effects? The G-System allows you to assign functions to two expression pedals from virtually any manufacturer — there’s an auto-calibration feature to fine-tune pedal response.
One point of confusion is that there are four pedal connection points — two on the rear of the GFX01 and two on the underside of the foot controller. The design is clever, providing easy access to hook up your expression/volume pedals whether using the G-System as a self-contained floor unit or when you rack-mount the GFX01, you can plug your expression/volume pedals directly into the foot controller and (again) avoid unwanted, long cable runs.
As it turns out, all four pedal connections are live — just clones of each other. You can install an additional set of pedals plugged into the GFX01 and run those out to a secondary location on stage! If you want to be able to play a screaming guitar solo with a wah while standing on a platform above your drummer, go for it, as the secondary pedal connections mirror the functionality assigned to the pedals you have down on the main stage next to your G-System foot controller.
Psicraft Design’s Vyzor Editor must be considered part of the G-System’s feature set. With all this power comes a fantastic way to manage it — the comfort of your computer screen! This fully functional editor/librarian makes it simple to manage, organize, and program all of your effects, as well as to customize all of the settings in your G-System.
Finally, there’s a USB port for providing computer connectivity. This facilitates software updates to the G-System’s firmware (operating system) as well as connectivity to the Editor software on your computer. It is not a recording interface. Over the years since the G-System’s introduction, TC Electronic has continued to refine and update this product — so much so, in fact, that we had to scrap our original review of this product completely!
There’s no amp modeling in the G-System — hooray! We appreciate that the G-System doesn’t get bogged down with that kind of stuff. After all, the whole point of this product is to integrate into a pro rig, and we all know that modeling amps have no place in a pro rig, right? Yes, that’s a joke. Sort of.
Usability
Housed in a very rugged enclosure — steel chassis and an aluminum front, the G-System commands respect no matter which color yours came in. The foot controller is far larger than you might expect from product photos. It weighs over seventeen pounds and is twenty inches wide, and the buttons are each approximately one inch in diameter.
The buttons themselves are unique to the G-System, and they work great. They are soft enough to tap with only your socks on (This isn’t just for bedroom players. Porcupine Tree’s Steven Wilson performs shoe-less and G-System equipped), and they are large enough and widely enough spaced to be played with boots.
 Getting up and running with the G-System is the most complicated aspect of using the device because there are numerous ways to make your cable connections, and then you subsequently have to make appropriate adjustments to your levels. Any time you are dealing with effects loops that have send and return level controls and a multi-effects processor with input and output level controls, you face the headache of getting your levels balanced properly. We have struggled getting an optimal signal-to-noise ratio figured out with some of our guitar rigs, and other rigs just fell into place easily — that’s just something you’ll need to figure out for yourself.
Most of our readers will likely use the G-System in one of two scenarios: as a dedicated processor in an amp/pre-amp’s effects loop, or in its fullest capacity both in front of the amp as well as in the effects loop, a wiring scenario that has already coined itself a popular name. It’s referred to as the four-cable method.
This setup connects like this:
- Your guitar is connected to the G-System’s Input (or your wireless system, of course).
- The G-System’s Insert Loop Send connects to your amp/pre-amp’s instrument input.
- Your amp’s effect loop Send connects to the G-System’s Insert Loop Return.
- The G-System’s mono output connects to your amp’s effect loop Return.
Those of you who went crazy trying to program classic Lexicon rack gear may recognize this cabling arrangement from the MPX G2.
With this wiring scheme, your compressor, filters, and pedal loops get placed in front of the amp’s input while the other effects get routed to the amp’s effects loop. If you’re running rack-mounted preamps and power amps, or one of the few amp heads that feature stereo operation, you will probably add one more cable from the G-System output to your preamp’s effect loop Return for stereo effect processing. Go ahead and boast in some online forums if you’ve got the five-cable method happening!
Insert Loop? That’s just TC Electronic’s terminology for the connection points where you’re connecting a preamp (or your amp head) to the G-System. Don’t read into the words when hooking things up — it can drive you batty.
If you want to keep things simple, you can do that, too. We frequently run a G-System straight into the effects loop of our amps. This only requires two or three cables depending on the mono/stereo decision.
Tip: In either connection scheme above, if you’ve got a parallel effects loop, be sure to enable the Kill Dry option in the G-System so that the only “dry” signal sent to your amp is controlled by your amp’s wet/dry loop control.
Navigating and selecting sounds on the G-System is a piece of cake. After selecting a bank of sounds, you have instant access to five presets within that bank.
When buttons are selected/activated, they are illuminated by a red LED that circles the button, not only contributing to the cool appearance, but also making it very easy to see what’s going on, even on a dimly lit stage.
When a preset is selected, the effects that are in use within the effect block light up, and this includes any of the external loops that you’ve activated on a particular preset. Of course you can instantly turn effects or loops On/Off within a preset, too. We created one preset with a flanger, delay, and one pedal loop activated, but we saved the preset with the Mod button Off so that by default, our flanger wasn’t present in the sound.
The Tap Tempo feature worked well, and the Boost feature can be configured to provide as much or little boost as you desire for soloing (or just to raise the level of quiet passages). Boost levels can be saved either globally or individually with specific presets, a nice option.
The onboard tuner worked well… most of the time. Although it silenced our amp when activated (you can customize this behavior if you don’t want silent tuning), whatever effects and external pedal loops were active in the current preset continued to process the guitar signal. On one particular preset where an external flanger pedal was present in an active loop, along with as some digital delay, the G-System had a very hard time locking onto the pitch of our notes.
Tip: Pick a preset with limited effects for best tuning results.
Parallel vs. Serial Effects Loops
Some amps offer a choice of both parallel and serial loops, and either can work great with the G-System.
Parallel loops pass some of your guitar’s dry signal straight through to the power amp, which can help to get effects sitting nicely behind your notes. With the Kill Dry option enabled, only processed signals are outputted from the G-System, and you adjust your wet/dry mix from the amp’s loop control(s).
Serial loops receive 100% of the signal coming from your preamp, and you control the wet/dry balance from within the G-System.
If you like your amp to be totally silent during tuning, you’ll want to use a serial loop if given the choice. Since the parallel loop passes some dry signal, activating the G-System’s tuner would mute the effected sound, but your dry sound would still pass through straight to your amp. You would then need to flip your amp into standby mode if you wanted silent tuning.
It was easy to set up channel switching with our two-channel Fender Super-Sonic combo, but we couldn’t use this feature to properly channel switch our Mesa/Boogie Road King II since that amp requires isolated grounds — the G-System’s switching jacks share a common ground. With some of our other rigs, though (Mesa/Boogie Triaxis, ENGL e580 preamp, or any MIDI-controllable head) the feature isn’t actually necessary because the G-System sends MIDI Program Change (PC) instructions without any special effort on our part.
A Complex Rig
The G-System really shines once you start customizing its functionality a bit. Here’s just one example of how we integrated it into a complex rig:
We have an RJM Music Technology RG-16, which provides amp channel and function switching, plus its own set of eight pedal loops, and the device is easily MIDI controlled. When connected to our Mesa/Boogie Road King II head, the RG-16 (or the Amp Gizmo, which is the same basic device sans audio loops) can switch among most of the amp’s enormous range of switching options — four channels, two effects loops, Reverb, and Solo/Boost. This is far beyond the simpler channel switching features internal to the G-System (plus that doesn’t switch modern Boogie amps anyway).
We decided that for soloing, we prefer to use the Solo feature offered in our Mesa/Boogie head rather than a simple decibel boost within the G-System, so we easily changed the operation of the G-System’s Boost pedal to send a MIDI Continuous Controller (CC) message that corresponded to that function in our RG-16 rather than activating the G-System’s internal volume boost. With this change, stepping on the G-System’s Boost pedal activates the Solo/Boost feature in our amp instead of raising the processor’s internal signal level.
But we didn’t stop there. Rather than make use of the excellent digital reverbs offered in the G-System, we had a fondness for our amp’s analog reverb. Just as easily as before, we changed the Reverb button to send a CC message to the RG-16 rather than activating an internal effect. Stepping on the Reverb button then activated the reverb built into our amp.
In one of our other rigs, we only run the G-System in the effects loop of our preamp, and we rely on another RG-16 to provide pedal loops in front of our preamp’s input. In this wiring scenario, all of the G-System loops would end up post-input instead of pre. We assigned the buttons for Loops 1, 2, and 3 to MIDI CC values so that stepping on them sent a command to the RG-16 to activate its audio loops instead of the ones in the G-System. All of this was accomplished with simple point-and-click changes on an easy-to-read computer screen.
Thanks to the amazing software editor (more about this coming up), making these changes to the G-System was a breeze, and because the RJM Music Technology products are equally simple to configure, there was no programming involved. This complex setup work only took a matter of minutes to implement, whereas five years ago it would have required a very costly, custom engineered solution.
Editing Presets
If you’re a long-time user of TC Electronic products like the G-Major or G-Force (we are), your initial experience getting around the G-System can be a bit disorienting — the user interface has been changed to accommodate the unique layout features of the foot controller. Although it’s not as obvious at first glance compared with the TC Electronic rack processors, it’s still very straightforward to configure the G-System and its effects.
It took us a while to discover the rotary encoders, because they are hidden in the design of the top row of buttons… in the buttons themselves! The G-System demonstrates some unbelievable design aesthetics as well as brilliant mechanical engineering. In addition to using the buttons for their typical tasks, the top row of buttons actually rotate 360 degrees, with a very tiny notched gearing that provides a tactile feel while scrolling through options or dialing in your settings.
To edit sounds, simply step on the Edit button once to enter the editing mode and then select one of the effect buttons (middle row, mostly), or you can scroll through effects in the display. The display is split into multiple columns, and different encoder knobs in the top row manipulate values in the corresponding columns on the display. Sometimes it’s a bit unintuitive — we routinely grabbed an encoder, twisted it, then grabbed the correct one to the right or left of it to make the change we wanted.
Our only complaint has to do with the implementation of modulated delay effects. There is nothing visible within the G-System to suggest that such delay types exist! Instead, you have to select the new, undocumented Serial 2 Routing option, which takes the modulation effect block and places it in a return loop within the delay block. Although this provides for unprecidented flexibility — any modulation effect can be used with any delay type, it would be more logical to simply provide a few modulation options at the end of the various options for each delay type. Also, we never use the Serial Routing option and typically opt for Semi-Parallel or Parallel.
To modify global settings for the G-System, step on Edit and then hit the Menu button (the Up button) to access the various global settings. Or not…
The Editor
 Psicraft Designs developed Vyzor editing software for the G-System (and G-Major II), which comes bundled with the unit at no additional cost. However, before using it, we’d suggest visiting the TC Electronic website to download the latest version of the software (Version 2) as well as any firmware update your G-System may require before use.
The editor software is an essential component of the G-System — not an afterthought, and it makes customizing your operation of the G-System a simple affair. After you spend a little while familiarizing yourself with how to tweak settings on the fly in the G-System from the hardware, hook up the supplied USB cable (or a longer one if you need) and fire up the software.
When you install the software package on your computer (Mac and Windows versions are available), it includes the latest firmware updater for your G-System by default, but it installs the updater into a separate application directory. Run the updater first, and you’ll see a status message on your G-System change to indicate when it’s being updated.
We had no trouble updating a Version 3 G-System to the latest 4.02 operating system. This update also included a bank of 100 new presets that were easily loaded into the G-System through the editor.
The editor interface looks very similar to an actual G-System, with virtual buttons across the top of the display that light up when you press them (and of course they turn effect blocks On/Off). In the editor window, tabbed pages list all the presets in your Factory and User banks, and it was easy for us to drag-and-drop presets around in order to change their order within our G-System (as well as rename them).
On the Global page, the value of this software is made extremely clear: all of the G-System’s configuration can be manipulated without having to scroll through multiple menus while sitting on the floor.
The bottom of the window shows the eighteen buttons in their physical layout, and you can see from our screen shot how we reassigned the Boost button to send a MIDI CC value (87) to our other rack gear, and we reassigned the Reverb button to send another CC message instead of toggling the internal effect On/Off.
By default, changes made to the Global settings happen immediately, but changes to your stored presets in the library don’t happen until after you manually sync the editor with the G-System (click a sync button).
You can, however, audition the changes you make to your sounds. For example, as we edited a digital delay effect (screen shot below), we were able to hear the changes taking place in real time.
 As if all that’s not enough, the editor can also run as a VST/AU plug-in in many DAW environments. We didn’t have a chance to directly test this functionality.
Sound
If you think we’re going to tell you that the G-System Limited sounds as hot as it looks, you’re absolutely right. The G-System (either version) is one of the best sounding pieces of guitar equipment that has ever been available to guitarists.
Sonically, it rivals, and in many ways bests, the classic G-Force. That famous processor from TC Electronic has decade-old analog-to-digital and digital-to-analog converters that just can’t compete with the advances made in microprocessors and a/d/a converter technology.
The tech specs are typical stuff: 24-bit, 44.1 kHz converters with 128x oversampling (some marketing materials claim 96 kHz), but specs don’t really tell the story for guitar players. If you’ve got it wired properly into your rig, the G-System Limited is extremely transparent sounding (and if you don’t have your levels set right, things can sound a bit “off”).
There are a few sonic goodies that the G-System borrows from another legendary piece of gear — the 2290 Dynamic Digital Delay: “Golden Ratio” chorus and dynamic delays (these features are present in other products from TC Electronic, too).
Tone snobs of any order are willing to agree that TC Electronic chorus is a benchmark against which other choruses are judged. The G-System serves up both the classic pedal chorus sound (think SCF Stereo Chorus Flanger pedal) as well as an Advanced Chorus (think 2290), which includes the Golden Ratio algorithm. What this formula does is decrease the chorus depth in proportion to increases in speed to present the listener with the same amount of perceived modulation. The secret formula for this ratio is as guarded as Colonel Sanders’s fried chicken recipe or perhaps the recipes for Coke and Pepsi.
Digital delays and reverbs are other hallmarks of the TC Electronic sound, and they sparkle, shine, reverberate and repeat themselves in numerous ways within the G-System. Dynamic Delay is a cool feature for the shred audience — by setting a threshold based on your touch, the delay automatically “ducks” behind your notes during fast legato passages and comes out during the slower sustained parts. Of course you can also assign an expression pedal to control your delay level, but the dynamic delay feature works very well, leaving your foot free to mess with a wah effect.
For fans of vintage style delays, fear not. The mod delays, although not the most obvious to program, sound fantastic! And because there are low- and high-pass filters on all of the delay types, you can limit the frequency range of your repeats to make them sound more like cheap, old, err… we mean classic, vintage pedals.
There are numerous reverb types as well, each with a multitude of configurable options, and most of the old reverb algorithms have been upgraded with the latest release. While the hall reverb can sound cavernous and help to unleash your inner ‘80s metal god, we like the improved spring reverb, which has so many options that you can really create your own custom analog-sounding reverb, and the plate, which gave us classic studio-sounding reverb for our vintage sounds.
When it comes to pitch shifting, the benchmark was firmly established years ago by products from Eventide. But the G-System’s intelligent pitch shifting works so well and sounds so good that there is no longer only one sheriff in town. We love the quality of the pitch shifting — it makes us feel guilty about not sharing the spotlight with other guitar players handling dual lines with us. And using the software editor, it’s super easy to select keys and scale types.
A new addition to the pitch shifter is a doubling effect that simulates double-tracking of a guitar part by letting you slightly delay, detune, and pan a parallel signal. It sounds very good, but you’ll need a stereo rig to make use of this one. Add that ‘80s reverb and say hello to your mullet!
 The G-System is full of other great sounding classic effects like phasers and flangers and tremolos, and the palette was recently expanded in Version 4 to include a Univibe effect, which let us unleash our inner Hendrix.
The wahs and auto-wahs sound great (assuming you have the G-System connected via the four-cable method or just straight into the front of an amp), and there was plenty of control over frequencies and resonance for us to create a range of wah tones from classic to modern. However, this advanced control was only present in some of the filter effects (Touch Resonance Filter and Auto Wah, for example) but not in the traditional Wah effect, which has more limited customization. The formant filters sounded great and let us create vowel-like wah sounds (and a few words, too).
If you’ve read this far, no doubt you’re curious to know about the redesigned analog circuit found in the G-System Limited. Whether the changes are purely in the analog circuit or in the way that the circuit interacts with the A/D/A converters, the revision makes a significant improvement.
Some players were dissatisfied with using the original G-System in the four-cable method because this wiring scenario sometimes impacted the response or feel of their amps (latency is the term that comes to mind even though we’re not really dealing with a studio recording issue). We found ourselves preferring to run the original G-System straight in and out of our effects loop (and thus sacrificed use of some of the effects that would otherwise sound better in front of the amp).
Players with parallel-wired effects loops won’t experience this potential issue with any version of the G-System because in a parallel loop, a direct signal from the preamp is always passed straight through to the power amp, and Version 3 of the G-System demonstrated less of this issue than the earliest releases. With the new circuit found in the G-System Limited, though, we have no reservations about using the four-cable method, and in fact have made the switch. And just for the record… we’ve actually got the five-cable scenario running in our rigs!
Although not specifically an “effect,” the noise gate works extremely well, and the compressor delivers familiar TC Electronic excellence. Really, if you want one multi-effects processor that can put your pedal collection out of business, the G-System easily deserves a place on your short list.
But what about distortion? One of the reasons we love TC Electronic is that they don’t build distortion and overdrive effects into their flagship gear — they leave that to your preamps and your boutique pedal collection, which of course might include the very nice TC Electronic NDR-1 Nova Drive. In fact, if you connect an NDR-1 to your G-System in one of the pedal loops and then connect its MIDI interface (unique for a distortion/overdrive pedal), the G-System automatically recognizes the pedal and provides programmable control over it — even from within the Editor!
Documentation and Product Support
TC Electronic has done a very good job documenting the G-System. The Users Manual is filled with numerous examples of connection scenarios, and it does a good job of explaining the basic functionality of the G-System. And, you don’t need a degree in engineering to understand it.
They go much further online, though, as the TC Electronic website has video tutorials, a variety of help documents in the online infobase, a user-to-user forum, and an area where users can share customized presets with each other electronically.
The TC Electronic documentation doesn’t talk about the Vyzor software editor. Once you install it and fire it up, immediately go to the dedicated Manuals menu, where you’ll find six very useful PDF files that document the editor. Print those out! You can also find support for the editor directly at Psicraft Design’s website in their support area.
Price
The G-System (MSRP $2,245) sells for just under $1,500, whether you get your hands on the hot, red Limited or standard edition silver model. Given the pro-quality sound, fantastic functionality and ease of use, and rock solid construction, this is a very well priced piece of gear.
Nothing on the market is directly comparable since any pro-level multi-effects processor is going to require an additional investment in a MIDI foot controller, and you will have to purchase a pedal looper separately if you have a need for that feature. Additionally, you will have to get your head wrapped around programming to get a comparable solution working. And even then, it probably won’t work as efficiently as the G-System.
Contact Information
TC Electronic
www.tcelectronic.com
| Evaluation Short-List |
|