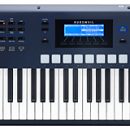

Native Instruments Maschine
Native Instruments’ Maschine received accolades when it was first introduced due to its faithful reproduction of MPC-style music and beat production, and now NI has released a scaled-down version to appeal to artists who either don’t need or can’t afford all the bells and whistles of the original.
For those of you new to the Maschine family, this is essentially a production workstation for your computer that features an exciting integration of hardware and software. For those of you familiar with the MPC production workstations from Akai, the Maschine will be immediately recognizable as an evolutionary step towards the future. It builds on the ease of use that the MPC delivers — for sampling, programming beats, and sequencing audio or MIDI tracks, while at the same time introducing the convenience and flexibility of computer software, meaning that as technology progresses, so will your workflow and studio.
| Category | Value | Rating | ||||
| Features | 20% |
|
||||
| Usability | 25% |
|
||||
| Sound | 25% |
|
||||
| Documentation & Support |
10% |
|
||||
| Price | 20% |
|
||||
| OVERALL RATINGS: Maschine = 3.7, which earns it a WIHO Award! Maschine Mikro = 3.3 3.6 stars or better: Outstanding, WIHO Award 3 stars or better: Worth considering 2 stars or better: Suited to specific needs 1 star or less: Not recommended |
||||||
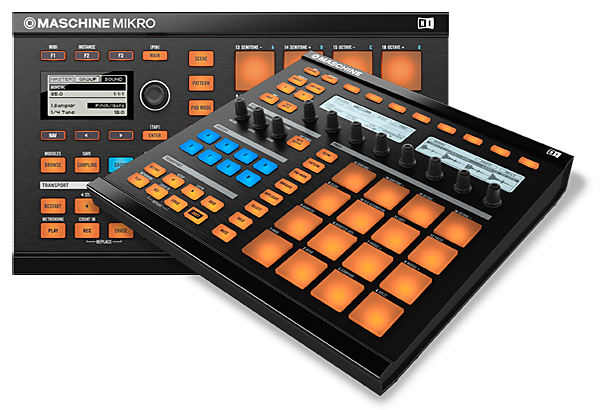
Both Maschine and Maschine Mikro share the same software, differing only in what the hardware has to offer. This is essentially where you’ll be making your purchasing decision, based on a couple of factors: cost, ease of use, and portability. The larger Maschine is more difficult to transport and set up in tight quarters, but it also has larger screens, which makes it easier to use without referring to your computer monitor. The Maschine Mikro is cheaper and smaller, so it may be the better solution for a traveling musician, or someone on a tight budget who still wants access to the killer Maschine software and the physical pads, which are the same on both units.
Features
Maschine
The main drawing points of this unit are three: sixteen responsive, velocity-sensitive pads, dedicated control knobs, and large displays that enable control of every part of the software from the hardware.
The pads themselves can be used for multiple purposes: of course, they are drum pads that enable beats to be programmed. But they can also be used, when holding down a key to the left, to control different aspects of the software. For example, you can switch Scenes and Patterns with them, and also copy and paste, quantize, and undo and redo.
There are two primary groups of knobs. One is the Master group, and these control things like volume, tempo and swing. The other is an Edit group, and what the knobs control here changes depending on what you are currently involved in on the device. For example, if you’re editing a sample, these will control the sample start and end points, as well as loop points.
The displays are great because they not only show lists of things such as sounds, effects, BPMs, and more, but they can also display a view of the sample that’s being edited. This is a big step in disconnecting you from having to stare at a computer screen while you’re making music.
Other bonuses include a sturdy, black, brushed metal body that feels very solid and MIDI In/Out ports on the back for connecting other gear into your computer.

Maschine Mikro
Maschine Mikro has the same feature set as above, with the omission of the knobs and screens across the top of the unit. This is both bad and good (but mostly bad). Without the knobs and screens, it is much more difficult to create beats replying solely on the hardware, which forces the software to take more of a front-row seat than with the larger Maschine. While this isn’t all bad (the software is very good, in fact), it’s contrary to what the idea of the Maschine is all about, and why the original appealed so much to the masses. On the plus side, the lack of the knobs and screens across the top means the Mikro has a much smaller footprint than its older brother. This is obviously why Native Instruments created it, and in that respect, they hit the nail full on.
Maschine Mikro is not completely without knobs, though — there is one. It sits by itself near the screen, and it must cover a lot of territory. In fact, everything gets used a bit more in the Mikro version of the hardware, as NI tried to make the software completely controllable from the limited hardware interfaces. In this they succeeded, but at the expense of ease-of-use. More on that in Usability.

Like its sibling, the Mikro is black, brushed metal, and it’s very sturdy. We would feel very comfortable taking it out to a gig. Just throw it under your arm and go. No worries! Unlike its sibling, alas, there is no MIDI In/Out. On the plus side, though, the pads are straight out of the Maschine, which means they are great. More on that below.
Software
The Maschine software has certainly come a long way since its introduction. Because Native Instruments has such a diverse history, creating everything from synths to effects to DJ software and gear, they are able to draw from this vast knowledge store to include many features that you know you want as well as a few that you didn’t know you wanted until you discovered them waiting for you.
Some of these features work flawlessly, and others need some improvement, but overall, Native Instruments has done a very good job of putting what is needed into the experience.

Our favorite features include:
- A stellar sound library: Plenty to get you up and going, even if you don’t have any other plug-ins or sample libraries!
- Virtually seamless integration between the hardware and software.
- Easily add and edit your own sample libraries straight from your computer, and slice those loops up using the Sample Slice menu.
- A diverse built-in library of audio effects.
- The ability to add your own third-party AU or VST effects and instrument plug-ins.
- Easily automate parameters on those effects and instruments.
- Lots of great editing functions for samples.
- MIDI In/Out.
- The ability to drag and drop loops into your host sequencer.
This is a nice feature set, but is it missing anything? Well, yes, although nothing we’d consider a deal breaker. The biggest omission is the lack of a Song Mode. This is the one thing that is holding the Maschine back from being truly self-contained. What would a Song Mode entail, and why is it so special? Imagine this: You’ve created a bunch of patterns or loops, and you want to put them together into a song (as opposed to triggering them live). With Song Mode you would be able to create the layout of your track. But the fun wouldn’t stop there. Let’s say you have a synth lead that you want to jam with over the top of a section of music. With Song Mode, you could potentially put the selected track into a kind of free record mode and them jam over the top of several different scenes.
Sounds fun, right? Well, it is. It’s also sort-of possible now, but the solution is a bit of a hack. Since scenes can be comprised of patterns that are different lengths, it would be possible to have some four-bar loops going, and then jam over the top with an eight or sixteen-bar loop. The downside of this approach, though, is that you can’t change the other patterns that accompanying your lead line with this solution, hence, it’s just a hack.
Usability
 Maschine
The backlighting on the Maschine is both cool looking and functional.Maschine is pretty easy to use. There is a learning curve, but with a little use, you should be creating beats pretty quickly. If you’re familiar with Akai’s MPC-series or Roland’s MV-series, then you’ll be right at home with Maschine. If you’re coming from a more computer-centric song making background, then it will take you a little more time to get into using it. The biggest trouble is just getting used to the Maschine’s control layout. Using pads and knobs again after so many years of focusing on a computer screen was a bit tough to get re-acclimated to, kind of like living underground for a long time and then finally coming up and seeing the Sun. After a bit of blinking and rubbing our eyes, we got used to what’s going on, though it took a bit of thinking adjustment to get there.
One of the obvious highlights of the unit are the pads, and they don’t disappoint. These are incredibly responsive pads — probably the most responsive pads we’ve ever tried, and they pretty much beat everything else on the market hands down.
The knobs are also good and feel very nice and sturdy. We wouldn’t have any issue gigging with the Maschine.
The screens were nice and clear and did a good job of showing everything that was going on inside. They were superb for things like finding sounds and effects, scrolling around, setting tempos and anything else that had to do with text, but where they lacked a bit was in their usefulness for sample editing. It is nice to be able to do everything from the hardware, but sample editing was one place where we felt things were best done on the computer, especially given that the Maschine isn’t stand-alone hardware. Remembering our days of having no choice but to use a cramped (or non-existent) screen for sample editing, we were not ready to go back there. But, it’s a nice choice to have, and using only your ears to edit — as opposed to pressing your nose against a computer monitor, definitely shifts your perception of the sound and puts your head in a different creative world. So, while the screen on Maschine is not as good as a computer monitor (of course it wouldn’t be), it’s still a definite upgrade from the days of yore.
Maschine Mikro
Where do we begin here? We love it and we don’t love it. It’s exactly what we want and what we don’t want. We’re excited to use it, and we aren’t. On the one hand, the pads are just about the best out there. And it uses the software, which rocks. But it’s missing something. Those knobs and all the real estate on the bigger version really do make a difference, and if what you want to do is make music with your computer like you did with your MPC, then this is not for you. Get the Maschine instead.
The Mikro is very frustrating to use if you make it a point not to touch the software. We found ourselves getting hands-on with the software far more than we had wanted to, which was a bit of a letdown. But we have to give NI credit, as they did a good job of squeezing the most possible out of this limited hardware setup. It is possible to control the software with the Maschine Mikro hardware, it’s just not as intuitive as with the Maschine
Where the Maschine Mikro shines is really as a performance piece on stage. If you want something that will trigger beats and clips on stage, this may very well be what you’re looking for. Coupled with the software, Maschine Mikro is great in a live situation where things need to happen quickly and you simply need to fire off samples and drum patterns.
Software
We tested Maschine with Ableton Live 8 Suite, and it worked very well, although it was a bit of a CPU hog. This is understandable because running one instance of Maschine is basically like running another full sequencer Rewired into your host. But because Maschine is running as a plug-in, it’s easy to forget this point. The first time we looked up and saw our CPU cranking up to 50% with only just a beat playing, we were, like, “WHAT?!” But then we realized that that beat comprised of seven different instruments running inside Maschine. Oh, yeah, that makes sense now.
It can also run in standalone mode, and you can create full tracks right inside it, but there is no Song mode where multiple scenes can be strung together to make an entire track. Instead, each scene would have to be triggered in real time, while Maschine plays.
Using the software is definitely easier with the accompanying hardware, but it can be used by itself for those times when you’re sitting in a hotel room at the end of an unrelated business trip. Once you try to do this, though, it becomes apparent that Maschine wasn’t really designed to be used on its own. Not impossible, but not nearly as much fun as using it as intended with the tightly coupled hardware. This becomes clear in little details, like Zoom, which is much easier to do with the hardware, as the software zoom tool can get a bit tricky to use at really close-up degrees.
Sample editing was also much easier with the hardware and software connected together. Our favorite way to use it was to use the hardware to set our sample start and end points but watch the computer screen to see how we were actually doing. Of course, you can also just listen to the sample to hear it, but if you’re at all used to using a computer to edit samples, listening alone will be a bit more time consuming than just editing to the waveform.
Using Maschine is actually not too difficult, and a lot can be done with just minimal studying of the manual. There are a couple of things to keep in mind, though. First is the hierarchy of the setup. There are several levels: Project/Group/Sound. Each of these sections has four modules where you can input effects and sounds:
- Sound: There are sixteen sounds per Group, and each sound can get its start from a couple of sources: Sampler, Input, MIDI Out, Plug-ins, and FX. Sampler is the most common, as this is what is used to create drum kits and loops. The next most common is probably Plug-ins, which will let you use any of your third-party synths that are Audio Unit or VST formats. Each Sound has four modules, with the first being used as an oscillator to trigger the sound itself, and the other three being used for effects. Sound selection was done by browsing through banks on the left side of the display.
- Group: This is a group of sixteen sounds or instruments, like a drum kit with all the samples that entails. Like Sounds, Groups can be loaded via the browser on the left side of the screen, and they can be loaded with or without patterns that have beats already set to play. The most common thing to load is probably Groups, and you can make your own groups with samples that you love to use altogether. Like importing samples, it takes time to do this, but once you’re done, you will have a great arsenal of sounds at your fingertips with which to wage audio warfare.
- Project: This is like loading a song into a normal sequencer. It loads all the Groups and Sounds with their respective patterns, samples, synths, and effects. You can set up Projects that have the sounds you like to use already loaded into them for a kind of template to start from.
Once you’ve got the hang of using this hierarchy, you can start making beats quickly. The hardware works seamlessly with the software, which offers multiple ways to do many things. For example, erasing notes from a pattern can be done by holding down the Erase button and pushing the pad you want to erase at the time you want to erase it from the pattern, or you can click the note in the sequencer and hit the Delete key on your computer keyboard. Things like this are all over Maschine, which is why it is such a revolutionary thing. If you want to use the hardware, you can. If you want to do most of your editing with the software, that is also an option. The integration works remarkably well.
Now that Maschine has reached version 1.7 of the software, it has matured a lot. Most of what you need is included, which vastly improves the overall experience, and brings it closer to what you would expect from a dedicated beat production workstation. Even better is that most processes are easy to execute. For example, truncating samples is just a matter of setting your start and end points and pulling down the Truncate command from the Sample Menu.
There are even some new features included in Maschine that borrow from some of the other NI instruments and effects, such as automation. Each parameter has the ability to be automated, either via the hardware (recommended), or the software (will suffice in a pinch). To automate something with the hardware, just hold down the Autowrite button and turn the knob assigned to that parameter. To do it in the software, just mouse over the outer ring of the parameter’s knob and then click and drag. The automation is recorded into a separate lane beneath the sequencer window and can be further edited there. This function works seamlessly, and can easily be undone if you don’t like what you recorded.
Once you’ve created a pattern that you like, you may want to drag it into your host sequencer (if you’re using Maschine in plug-in mode) for more editing capabilities, or to have it integrate even more seamlessly with your sequence. This is extremely easy to do if you’re using the VST plug-in (as opposed to the Audio Units version). Next, to the name of the Group in the Sequencer window, there is a little group of arrows that you can grab and drag the group into your sequencer window. After that, just make sure that your MIDI routing is set up in the DAW and you’re ready to go.
Another way to trigger Maschine from your sequencer is to set up your Scenes like you would a normal song within Maschine. By clicking the triangle next to the Project Name, the Scene MIDI Settings options can be accessed and set up to trigger specific Scenes with MIDI notes. In our case, we used Live Clips to trigger various Scenes at different points in the song. This enabled us to create all the parts for a track in Maschine standalone mode, then bring them into Live and set up a song around those parts with minimal fuss. If you are a fan of the MPC, this will probably be your best bet for Maschine integration into your DAW setup.
Last but certainly not least is the Slice feature. This allows you to import a loop or other sound and slice it up to keys on the keyboard (or pads in Keyboard mode). It works very well on things like drum loops, but less well on musical lines with little to no transients (unless those lines are set to a very metronomic tempo). Slicing, like other aspects of the software, is pretty easy to use with a little experimentation, but if you get stuck, the manual does a good job of explaining the procedure.
Sound
Maschine sounds great. Native Instruments have spent a lot of time making new samples for this, and their hard work shows. The drums have a good punch, and the samples are varied and interesting. To get up and running, Maschine’s sounds cover all the bases and are plentiful if you don’t have your own. If you do have your own sample libraries, inputting them into Maschine’s sound banks takes a little time, but the process isn’t difficult.
The software also comes loaded with lots of effects taken from the extensive library of effects they’ve produced for their other software, such as Kore, Traktor, and Guitar Rig. These effects range from the basics (EQs, filters, compressors, reverbs, etc.) to the weird (Grain Delay, Grain Stretch, and Resochord). Let’s talk about the last three.
Grain Delay: This effect is kind of like taking your sound, splitting it apart and delaying the pieces. You can adjust the pitch, the speed, and how dense the sound is. How useful all this depends on what kind of music you make, or what effects you’re looking for. People making rock or hip-hop will probably want less of this, while people who are into more experimental forms of music will embrace it.
Grain Stretch: This is another cool effect that is not for the faint of heart. What it does is pitch shift and time stretch parts of the audio on the track in real time. There are two sections, one for the pitch, and one for the time, and you can also adjust the loop time of what you’re affecting. Again, something like this may not sound useful in more traditional styles of music, but interesting outcomes can be had when applied in just the right places.
Resochord: This may be one of the more useful special effects for traditional music producers. There are two modes: String and Chord. Each use harmonics to create pitched sound around whatever you’re feeding through it. Chord creates several notes (hence the name), and String makes just one note. You can control the pitch, brightness, feedback, and decay of the tones being produced. The result is kind of like a vocoder built right into the effects section.
Documentation and Product Support
The documentation for both the Maschine and the Maschine Mikro was very easy to use and well written. Plus, Native Instruments has put numerous tutorial videos online to help you get started.
Price
The Native Instruments Maschine (MSRP $669) sells for just under $600, and the Maschine Mikro (MSRP $399) sells for just under $350. There are two places where you need to make a decision about which one to buy: Price and Usability. Both units are very well priced for what they each do, and Maschine is a steal compared with related MPC devices.
In our opinion, the extra money for NI’s Maschine is well worth it because of the vastly superior usability thanks to the knobs and screen space you get. If you’re on a tight budget, then you can get by with the Maschine Mikro, which features the same great software, but really, just save up a bit longer to get the big one.
Contact Information
Native Instruments
www.native-instruments.com
| Evaluation Short-List |
|