
While we all love our synths, virtual instrument plug-ins, and these days, even guitar-related MIDI gear, they are of limited value to us if they can’t communicate with other gear. As live and studio setups have become more complex, often mixing old and new technology, the need to have everything work together harmoniously becomes even more crucial. While perhaps not as glamorous as a shiny, new synth or sound module, MIDI interfaces are an essential component in any pro studio or live rig—especially if you need multiple MIDI connections between multiple devices.
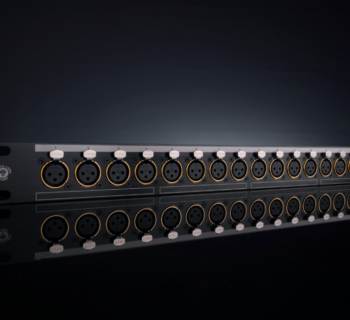
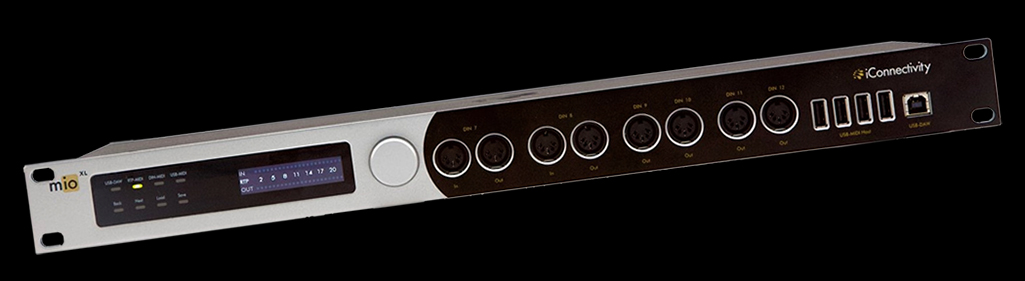
iConnectivity has introduced the Mio XL, their flagship rack-mounted MIDI interface and arguably the best such product available. Sporting USB MIDI, 5-pin DIN MIDI, and Ethernet RTP-MIDI connectivity, this is an incredibly versatile interface! It also includes Auracle 2.0, a new version of iConnectivity’s control software. Perhaps most importantly, we found the Mio XL easy to get up and running with, which is not something we can say about other MIDI interfaces we have used over the past few decades! While options in the market are somewhat limited these days, thankfully iConnectivity’s MIDI patch bays (interfaces) are truly outstanding and worthy of placement in any keyboard rig on stage or in the studio.
| Category | Value | Rating |
| Features | 35% | |
| Usability | 35% | |
| Sound | na | - |
| Documentation & Support | 10% | |
| Price | 20% | |
| OVERALL RATING = 3.7 stars, which earns it a WIHO Award! 3.6 stars or better: Outstanding, WIHO Award 3 stars or better: Worth considering 2 stars or better: Suited to specific needs 1 star or less: Not recommended |
||
Features
So, what the heck is this thing? Let’s start with the basics. The Mio XL is a 1U rack MIDI interface/patch bay, with the below specs:
- 8 in x 12 out 5-pin DIN MIDI ports
- 10x USB-MIDI host ports support multiple USB-MIDI CLASS COMPLIANT MIDI peripherals
- Ethernet RTP-MIDI Network port: 22 virtual network ports can be assigned to onboard DIN and USB ports as well as any other connected computing devices. These make all MIDI devices accessible to Mac, PC, iOS and other mobile computing devices via a single Ethernet cable
- Connect multiple computers via assignable virtual network ports
- USB computer port supporting Mac, Windows, and iOS connectivity (iOS via Camera Connection Kit)
- Plug and Play: no drivers required due to class compliant connectivity
- OLED display with rotary encoder for navigating presets and real-time monitoring of MIDI traffic
- iConnectivity’s Auracle 2.0 configuration software (downloadable for Mac & Windows) to create and save filtering/routing/merging presets
- Connect iOS devices via CCK, WiFi (using 3rd party Wi-Fi Ethernet hub), or wired Ethernet connections
Besides the interface, the Mio XL includes a USB cable (five feet in length, more on USB specs later), an Ethernet cable, and a 12V/36W power supply with interchangeable blades, allowing for use in multiple countries without having to purchase a whole new adapter. Of note, it is not an IEC connector, and it is a little bit of a wall-wart, though we were able to get it to fit on the back of our Furman rack-mounted power supply without need for an additional extender cable.
Interestingly, Mac users don’t require specific drivers, but Windows users are required to download additional drivers. Both users, of course, will need to download the Auracle software for maximum usability.

The front panel of the Mio XL has a small touch panel on the left side of the interface from which you can switch incrementally through preset routings. There are two rows of indicator lights in this section to show what ports are currently active. Right next to this is an OLED display that displays additional information. Given this is only a 1U rack unit, the display is fairly small, but effective in conveying information. It was towards the bottom of our synth module rack and we did not have any issues reading the OLED screen, though we did find we needed to get a bit closer to the unit to see/use the touch panel!
There are two pairs of DIN-5 MIDI in/out connectors on the front of the unit (labelled DIN 7 and DIN 8 respectively, as the first six pairs are on the back). The inclusion of front-panel MIDI ports is great when you have a temporary need to grab a controller or additional synth that someone has brought into the studio and plug it into your existing setup without having to mess with connections in the back of a rack.
On the right side is the USB section. Here there are four USB Type A Host ports, allowing you, for example, to connect a USB keyboard. Also provided is a USB-DAW port, a Type B USB port to connect to your computer.
Moving to the back, you’ll find the RTP-Network MIDI port (an Ethernet jack, basically), six more USB Host ports, six pairs of DIN-5 MIDI ports, and the small round power connector. Interestingly, the chassis is grounded by a Philips-head screw at the right end of the rear panel.

Usability
Once up and running, we had a great experience, but incompatibilities with one of our newer USB MIDI keyboard controllers gave us a few gray hairs during the initial setup. (The issues we encountered were not with the Mio interface, to be clear.)
We installed the Mio XL in our rack, hooked up several vintage MIDI synth modules, downloaded the software (for our Different PC DPC-1 workstation running Windows 10), installed the software and connected the Mio XL to our computer, originally by the USB port in the front of the unit. It worked on the first try! Having had less than reliable experiences with, shall we say, a competitor’s “classic” MIDI patch bay, we were thrilled we could finally control our modules from a central keyboard controller at our desk.
So, how did we do it? Well, we admit we weren’t experts at first, but the video illustrating how to route all the MIDI connections was quite helpful.
https://www.iconnectivity.com/auracle-x-midi-routing
Basically, click on the port for your source (MIDI input) and then click on the destination port (MIDI Out) to receive and you’re done! It’s pretty instantaneous too. So at this point, we were thrilled.
The software alerted us that we were using older firmware, along with an older version of the Auracle application. We initially had some issues updating the firmware and having the Mio interface recognized properly, but once we got rid of our troublesome USB controller keyboard (and with some expert troubleshooting from the support team at iConnectivity) everything worked fine. Bottom line: before you dig too deeply into using a new Mio, be sure to install both the latest firmware and software updates.
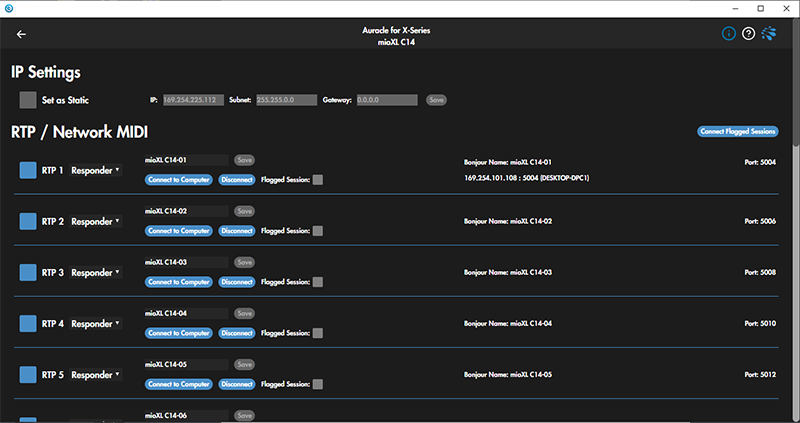
Once Auracle and the firmware were up to date, we decided to try the RTP/Ethernet connection to our host PC instead of a USB cable. Partially for purposes of this review, but mainly because we hated how the USB port for the computer interface was located on the front panel of the unit instead of the back, we thought this might be an interesting and effective way to hook things up (In our studio setup, is very impractical for the routing of the USB cord to go to the front of the rack). The Ethernet port is in the back, which is more tidy and out of the way, with almost no chance of it getting accidentally broken off or pulled out. Connecting to our PC via Ethernet worked great. Routing was just as easy, simply selecting RTP ports as our source, and clicking on the button to “connect to computer.” This is shown here:
RTP/Network MIDI on Auracle for X-Series — iConnectivity
We admit, prior to this we hadn’t made any practical use of MIDI over Ethernet, but it worked very well! While iConnectivity recommends no more than 15 feet length for a USB connection to the computer (or other keyboards with USB MIDI), you can run your computer connection up to 328 Feet (100 Meters) over Ethernet! We made use of a 25-foot Ethernet cable and there was no lag whatsoever. The hardware performs rock solid and easy to manage.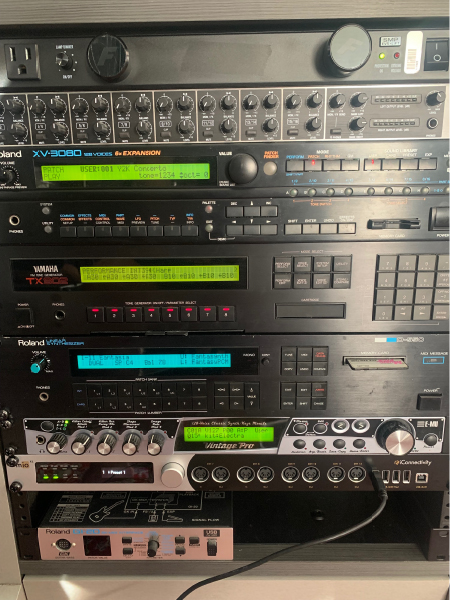
Our studio setup:
We connected our MIDI sound modules via DIN-5 MIDI pairs on the back, connected the Mio to our computer via an Ethernet cable (RTP connection), and after muddling through some odd connection glitches (more later), connected our NI controller keyboard at our studio desk via one of the USB Host ports on the Mio. We then went to the RTP screen using the Auracle software, and you can see the RTP connections available. There was no need for a switch or router in our scenario—we just connected the computer directly the Mio via an Ethernet cable using RTP 1.
We needed to activate the port, so we clicked on “Connect to Computer,” and afterwards, the successful connection looked like so:
Next, we set up our MIDI connections. We wanted our keyboard to control all of our modules! So first, we went to the MIDI Connections page in Auracle. All of the sources were on the left (via RTP, DIN, of USB connections) and destinations were on the right. When you first use the software, nothing is labelled specifically to your particular setup.
We wanted to label the ports specifically to our setup, so all we needed to do was click on the pencil icon nest to each connection and type in the names of the corresponding hardware. In our case, we added the NI keyboard and the names of four keyboard modules. It looked like so:
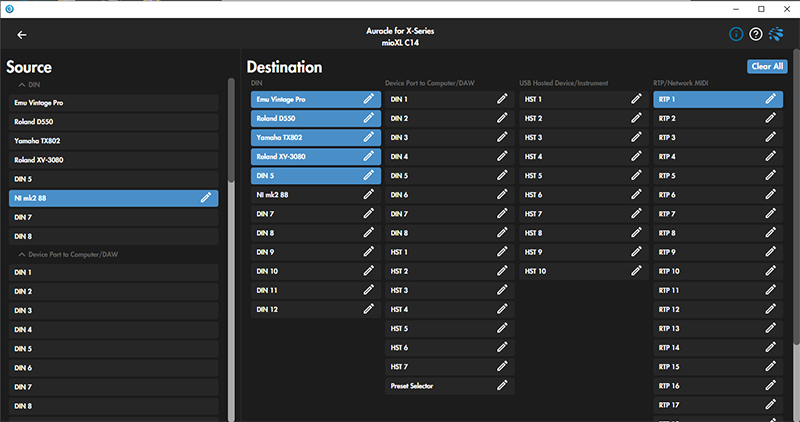
Keep in mind that adding/changing names does not mean there’s an automatic connection. To make a connection, you need to highlight to source and destination (which appear blue). So, in our case, we wanted our MIDI keyboard to control our modules. In the below example, we highlighted HST 1 (our MIDI keyboard connected to the Mio via USB) and in this case, all four modules, so playing the keyboard would trigger all four modules at the same time (talk about layering!) assuming they were all set to the same MIDI channels. This looked like so:
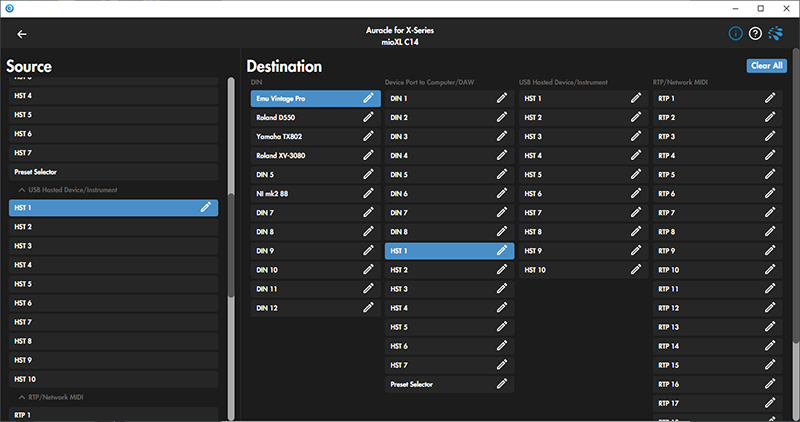
We saved this under Preset 1 as we could have multiple different configurations instantly recallable. In our case, we made our first preset name “DAW MASTER,” as that the keyboard would control all modules at the same time.
Now, what if we wanted the keyboard to control only one module? This proved to be very easy. Going back to out MIDI connections page in Auracle, we only selected one module (connections are toggled by clicking on them) and then saved this preset, making it as simple as a mouse click to completely change our studio MIDI routing.
Documentation and Product Support
Although the Mio XL does not come with a printed manual, it is readily available online. It is concise, easy to follow, and should quickly get you up and running with the basics. Additionally, the manual has active links to videos and other sources of info, which definitely proved useful!
Additionally, our experience with support staff was stellar. When we ran into snags we couldn’t figure out, we received emails answered in a timely fashion, and support even arranged times to have Zoom conferences with us, where they could log in to our computer and address our issues. Can’t ask for more than that!
Price
The Mio XL (MSRP $499.99) sells for approximately $400 street. While there are certainly 1x1 or 2x2 MIDI interfaces for much cheaper, none of them can do what the Mio XL can. This is a professional product, with numerous options and ways to connect. Additionally, the ability to network over Ethernet is not commonly seen in a MIDI interface, and on the Mio XL, it works incredibly well.
MIDI patch bays simply do not get any better than this. If you have a lot of MIDI gear to patch together with multiple different controller keyboards (or just one), iConnectivity’s range of interfaces should be at the top of your list. The Mio XL has found a permanent home in our studio, and one of our other studios has been using its predecessor (the MIO 10) for two years without any issues as well.
Contact Information
iConnectivity
https://www.iconnectivity.com