Getting the best sound on stage in a variety of situations.

Setting Up
In chapter 1, we looked at individual instruments and how to get each one to sound its best. The trick now is to get all of your instruments to sound good together as a band. Since there are so many instrument combinations to consider, we’ll have to look at a few different approaches to setting them up. In this chapter you’ll learn different ways to make your equipment more effective without actually having to use more equipment. For those who prefer more equipment, there are a few techniques for that as well. In fact, you should often examine both the simple and the advanced methods for handling most situations you encounter so you can figure out what’s best for you. You’ll also find several different ways to adjust your setups, but feel free to combine these approaches to get what you need. This chapter contains both unconventional setups and some unusual approaches to conventional ones, but the real point here is to “think outside the box.”
The logic here is simple, but the applications aren’t: You need to be able to hear yourself properly and you need to be heard properly. You have already worked on your individual sound and made it as good as it can be, now you have to blend your great tone with the rest of the band’s great tones. The first thing to consider is that if you can’t hear yourself properly, you can’t play properly. The second thing to consider is that if you can’t be heard properly onstage, it will be difficult for everyone else to play in time with you. There are a lot of cues to the feel and dynamics that come from your playing; without these, something will always be amiss in your show. The solution will come from a proper balance onstage, where everyone can hear both themselves and each other as they need to. The key to this solution is using Location, Focus, and Balance to make adjustments that will allow you to hear yourself better without simply using sheer volume. Having your equipment set up in the right location is absolutely essential! It must also be focused in the right direction to make the best use of the level. These two aspects are often the root of the problem for most bands. It is these two first principles that determine the proper balance. These three elements are combined to form a zone. You will see how these three principles work together as you go through this chapter.
The 5.1 Surround Sound Theory
No matter where you are, you are always listening in 5.1 surround sound. No, the world hasn’t changed over to surround sound just because it’s popular—it’s been a part of your perception since before you were born. When you hear a sound in a room, you can almost instinctively look in the direction of its source; your mind is finely tuned to Location, Focus, and Balance. You can easily tell which direction a sound is coming from as well as its proximity and intensity; if you don’t believe me, just close your eyes and listen in a noisy room.
Unfortunately, this 5.1 concept has been overlooked by many, and the common misconception is to attempt to solve problems onstage with a one-dimensional approach: volume up/volume down. It’s either too loud or not loud enough. I personally feel that this is just one of the three dimensions of sound, but let’s take a look at why I believe this to be true. I’ll use the differences between recordings as an example. It’s really quite simple.
Monophonic Sound
In the beginning of recorded sound there was only one format: mono. There was only one location and one focus for all the different balances a mono mix would have. Results? One dimension. Mixes had to be carefully balanced to distinguish a number of different sounds, but it just never sounded real. This is what you get from a stage monitor.
Stereophonic Sound
Over 50 years ago, someone was brilliant enough to link a pair of mono mixes together to bring us stereo. And while it was much better than mono, it still lacked that something extra that made it real. Having a stereo pair of speakers gives you an additional dimension with the sound’s left-to-right placement within the mix. Results? Two dimensions. Even with all the left-to-right placement, it still lacked depth. This is what you get from headphones.
Surround Sound
This is where recordings took on a whole new dimension. The extra speakers placed behind the listener added the depth of a real acoustic area, which was the missing dimension in the equation. And while surround sound is the standard for film, it still has yet to catch on within the musical community. Maybe this is the reason why most musicians think in “stereo” rather than 3-D surround sound, but I would like to see this book change that mentality. The ability to feel and hear the depth of sound onstage is what makes it so unique . . . and confusing for many! These three examples should illustrate the differences in your perception of sound, regardless of where you are listening from. The rules don’t change just because you set up and play!
OK, so now what? It’s right here where you can break free from the ordinary and grasp the concept that will allow you to make the right choices for setting up your equipment onstage: the 5.1 Surround-Sound Theory! You need to think of your stage as a big mixing console, but instead of having to twiddle a bunch of knobs, you will physically place your gear where it works best for you. Just set up your gear as you would like to hear it. Think of the amps and drums behind you as the surround speakers and the stage monitors and sidefills as the front speakers. And let me introduce you to a new set of tools:
• Location. This would be the equivalent of the “gain” control on a channel strip.What this means to you is, the closer you place your amp or monitor to you, the better you will hear it, period. You can turn your amp down, but if you place it correctly, you can still hear it just as well.
• Focus. This would be the equivalent of the “pan” control on a channel strip. What it means to you is, the more you turn your amp toward you, the better you will hear it, period. Now you can turn your amp down even more, but still hear it just as well if you point it in the right direction.
• Balance. This would be the equivalent of the “fader” control on a channel strip; your volume control. What this means to you is, the better your location and focus, the less volume you’ll need. Truthfully, the volume control should be the last thing you adjust to get the level you need. If the first two principles are properly adjusted, you will need less volume level to get the exact same perception of your sound.
Unfortunately, many bands use the same old setup, with their amps pointed out into the audience, not necessarily at each band member. A lot of wasted volume goes out into the audience because of inefficient placement and projection. You can barely hear yourself onstage, but the front row of the audience is in pain! Since most amp’s speakers are below your waist, you’re not getting the real volume—the audience is! Take a good look at the setups in this chapter and find out how each of them can change your perception of the sound onstage.
These are simple little tricks you can use to make things sound just a little better onstage, but there are many more options that aren’t quite as simple. While they aren’t too complicated, they do require more than a few words to be understood. This chapter will examine several setup techniques that aren’t conventional, as well as some that are. I ask you to be open-minded and encourage you to try some of them before you jump to any conclusions. Each setup will sound quite different, even those that seem to be similar, so experience the differences yourself. Don’t just be like everyone else, unless you want the same results. Going through the various setups in this book will reveal the true nature of the 5.1 Surround-Sound Theory. It might even cause you to think outside the box! Your stage setup is the second most important aspect of your stage sound; we’ve already covered the first—your tone!
Stage Locations
The stage has been around for centuries, and there are some very specific terms for its locations that are used by the pros. All of these location references are from the stage’s perspective. “Stage right” means that if you are onstage facing the audience, you would be to the right of the stage. From the audience’s perspective, you would actually be toward the left of the stage. It is here where much confusion often happens; when discussing stage locations offstage, many people forget to reverse their thinking, and their mind automatically wants to think literally. If you aren’t very familiar with these terms, you may get confused and in turn confuse those around you. So let’s get this straight before we move on to setting up.
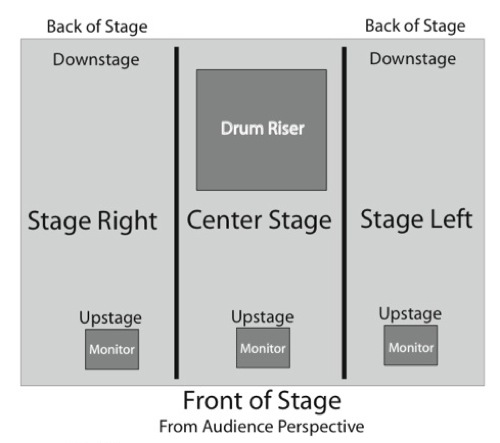
Fig. 2.1
Fig. 2.1 shows the stage and its stage location names from the audience’s perspective. I have chosen this perspective since it is used in most of the illustrations that will follow in this book. What you are looking at is an overhead view, with the front of the stage at the bottom of the illustration, and the back of the stage at the top. The large gray rectangle represents the drum riser, and the small gray rectangles represent stage monitors. This is the basic layout you will see onstage most of the time. There is usually a stage monitor on the drum riser itself, but for simplicity’s sake we will leave that off for now. It will appear when we are actually discussing the drum wedge. It would be a good idea to get used to seeing the stage this way, as you will see it in most of the illustrations and stage plots you encounter. This is the most common representation of a stage layout, and is used by most national acts.
As you can see, there are three different lateral locations (left, center, right) and three different longitudinal locations (up, center, down) that can be combined to describe any relative location onstage. You can use any combination of these terms to get your point across, but always remember that when you are onstage, right is right.
When you are in the audience, left is right. These terms are far less confusing when you are backstage: left is left and right is right.
These terms are universal and are used on every professional stage in the world—for music, theater, and television. Take the time to get used to these terms and try to use them as much as you can. I would advise this for anyone who wants to make the stage their home. Every time you see a stage, go through these locations in your mind until they become second nature. The pros who work on them every day have an advantage over those who don’t, and they have no idea that you actually mean “the other left.” By then, it’s usually too late.
Stage Terminology
Upstage means toward the front of the stage, closest to the audience.
Downstage means toward the back of the stage, away from the audience.
Stage Right means to the right of the stage when facing the audience and to the audience’s left.
Stage Left means to the left of the stage when facing the audience, and to the audience’s right.
Center Stage means exactly what its name suggests—the very center of the stage.
Downstage Right means the back of the stage to the audience’s left.
Downstage Left means the back of the stage to the audience’s right.
Upstage Center means the front of the stage in the very center.
Upstage Right means the front of the stage to the audience’s left.
Upstage Left means the front of the stage to the audience’s right.
Stage Right Center means to the right of center stage when facing the audience, and to the
audience’s left.
Stage Left Center means to the left of center stage when facing the audience, and to the
audience’s right.
Introduction to Stage Zones
It was important to take a look at stage locations before introducing you to stage zones. While this may seem to be the most common sense issue discussed in this book, I often see examples of it not being so, so let’s set the record straight and define the term. You will see lots of references to zones in here.
A stage zone is an area dominated by a particular instrument and its performer. It is important for this area to have a good level of this instrument so that the performer canhear himself properly. If it is an electric instrument, this is generally not a problem.
If it’s a drum set, once again this should not be a problem. Other instruments like acoustic guitar, violin, and others with lower stage levels may require a personal monitor to help create a zone. In chapter 1, we looked at the importance of having personal monitors; now it’s time to show you just how important they are to controlling your stage sound. You absolutely need to have a zone for each player. Even when you don’t use a personal amplifier, you will need a stage monitor, which will create a zone for you that you have little control over. Wouldn’t you rather have that control at your fingertips? Use a personal stage amp when you can.
Stage zones can be rather large, in the case of three-piece bands where the guitarist and bass player dominate an entire side of the stage, or smaller, where there are five, six, or even seven players onstage. The more players onstage, the smaller the zones need to be, which means lower stage levels for each zone, especially when the stage itself is small. The trick is to set your volume loud enough to hear yourself without overpowering the next performer’s zone. That means being within a reasonable distance of your source. Most stage problems are a direct result of zone violations: Someone is too loud! When everyone is balanced, the stage seems to blend nicely and the monitors work.
“Out of bounds” is a familiar sports term that can be used to describe leaving the area in which you can hear yourself; i.e., your zone. Don’t expect to walk completely across the stage and hear your amp really well in someone else’s zone; you would have to be too loud, simple as that. While stage monitors can help get your levels to that location, don’t try to do that from your stage zone. If you are in your zone, you should never have a problem hearing yourself.
Now we have arrived at the main point: Use the setup options in this chapter to create a zone for each player. There are many different ways to do this, and they can be tweakedto suit just about any situation that your band comes across, but you will have to try some of them. The equipment you choose and the way you set it up is how you take control of your stage sound. This is something even a sound engineer can’t mess up! If you can’t hear yourself onstage, it’s because you are not doing something right.
Location, Focus, and Balance are the key principles to creating zones. A zone is where you and your equipment are located, and how you focus your equipment will always determine your balance (levels). These principles will show up in almost every aspect of your sound onstage: amps, monitors, and input sources! It’s more important to hear yourself onstage than it is to have the audience hear you from the stage, so don’t concern yourself with trying to mix—that’s the engineer’s job. Your job is to sound great onstage!
Stage monitors will be part of the final equation, but the less you depend on them for things that you can control, the more consistent your show will be. Since every venue will have its own quirks and every night will be different in some way, you want to be able to control your zone! Creating your zones onstage and properly controlling them will eliminate many unnecessary monitor requests. This in turn will allow you to make the best use of them for things you don’t have control over, which is why they are there. Monitors also have their zones, and setting up a good stage zone for yourself will include this monitor zone as well, but it all begins with having your equipment in the right place. The more effective your stage zones are, the more useful the monitors will become!
So go through these setups and learn how to adjust them. Simply looking at the illustrations will not reveal all the subtleties that are involved; you must read the text to get an idea of how they work. The bottom line is that you’ll have to set up your gear and see how it sounds before you’ll know if it’s the right setup for you. Each one has a differentfeel to it, even when they look very similar on the page. Each example will usually have two different versions or adjustments, but it is more of an exercise in creativity than a hard and fast rule. Sometimes, two or even three of these techniques can be combined to form something that is uncommonly effective for unusual situations, but don’t overcomplicate matters; try to keep things simple. Try setups individually before you start blending techniques. Sometimes the differences won’t be revealed until you try back-to-back examples, but keep track of something when it puts you in the ballpark. Keep improving it until it’s right. Only you can be the judge of what is truly working, but you’ll never know unless you give it an honest try. So keep an open mind as you go through these examples and don’t be the person who is looking for the problems; be the person who is looking for solutions. You will find many in this book
Small-Format Setups
1. Put the right sound in the right place
When a band isn’t set up properly and one person can’t hear herself, she will turn her volume up until she can. Now someone else can’t hear themselves, so they turn up as well. At some point, the singer can no longer hear the floor monitor! Sound familiar? This is one of the most common mistakes I see onstage, and one of the most avoidable. As human beings, we can be creatures of habit even when there’s no real justification for it. It is right here where creating stage zones becomes an obvious solution to most stage level problems. If you are a lead singer/rhythm guitarist and you are center stage, don’t put your amp on the far side of the stage! Locate the amp directly behind you just in front of the drum riser, if you can. If you set up on the far side, then your volume level has to be much louder than the amp that is actually closer to you; now that player can’t hear themselves, and it’s off to the races. Let the volume wars begin! You have violated his zone. Don’t be fooled by the old misconception that the bass has to be next to the drummer; the drummer can’t hear the timing of the bass notes from behind the amp anyway. Crossing zones never works. You’d be much better off putting some of his bass in the monitors; it’s a much more effective use of volume. Once again, this example should illustrate the importance of putting the right sound in the right place.
2. Find the right spot for your backline
Staging. Let’s take a look at what the “right spot” could actually be. Fig. 2.2 shows a standard four piece rock band setup. Note that the gtr/bs amps are pushed back even with the drummer. This is the best choice for smaller stages. There will be some bleed from the cabinets into the drum mics, but usually not enough to cause a problem unless you are really loud. Oftentimes the drummer will be able to hear enough of the amps to not require much of them in the monitors.
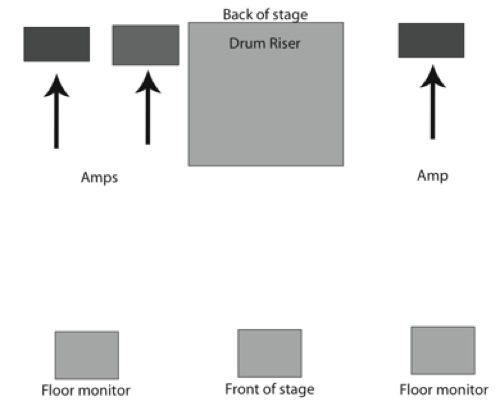
Fig. 2.2
In Fig. 2.3, you will see a similar setup, but with the guitar and bass cabinets pushed up even with the front of the drum riser. This is the best choice for larger stages because you have more space to work with. While you’ll get less bleed in the drum mics, your drummer will probably need more of these instruments in his monitors than in the setup in Fig. 2.1. The players will get more of their amp’s sound without having to raise their volume, and in some cases, they may actually turn them down. Imagine that!
The secondary effect of this up/down stage technique is that your drummer will hear more backline volume, as the frontline players hear less stage volume when the amps are pushed back. The players up front will hear more level, as your drummer will hear less level when the amps are pushed forward. It doesn’t have to be “fully forward” or “fully back”; you can move your amp to just the right spot that will allow the player to hear his amp, and allow the drummer to get some of that sound as well. This is just another form of Location. Find the right spot for your backline that works with your volume and the right volume for that spot. You have to work them both. And everyone doesn’t have to play on the same even line, either; it may be wise to push the loudest player forward some so he doesn’t dominate the backline and can bring his levels down a bit. Two birds with one stone!
For other instruments like acoustic guitar, violin, and keys, this is where it becomes really important to have a personal stage amp as a monitor; otherwise you won’t be able to do this with your setups. Having them gives you options; not having them leaves you depending on a different engineer every night, so you’re gonna get some really good nights, some average nights, and the occasional disaster. Wouldn’t you want to have a great night every night? Allow yourself the opportunity!
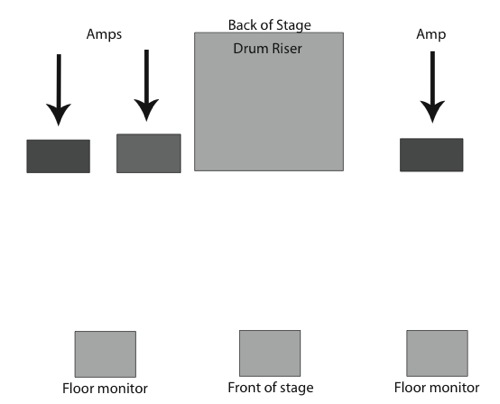
Fig. 2.3
There will be times when staging may not be an option or has a reduced area of adjustment. Some clubs “layer” the backlines from front to back with the band order; if you are in an early band, you may get pushed up toward the front as the later bands occupy the back. In other cases, the headliner may not strike their drum kit, leaving you with a compromised stage. This may put your drum kit further upstage than you’d like and with little room to use any staging techniques for your backline. It may also put an excessive amount of drums in the frontline and make things really difficult to hear. Since the gear is pulled from the stage as the show moves along, you will get more room to work with if you are scheduled for a later time slot, but a nonstriking headliner may create other onstage disadvantages that make things difficult to work with. See the extra chapter “Unusual Stages” at www.rockinyourstagesound.com.
3. Use doubling to get more stage level
Doubling. Using the same four-piece setup we just looked at, let’s add a cabinet from each player to both sides of the stage. Fig. 2.4 shows an example. This gives you all instruments on both sides of the stage. Now, it’s very critical that your volumes are properly balanced with each other so no one is much louder than anyone else; however, this greatly reduces the need for anything in the stage monitors but the vocals. Each player has more possibilities for setting up their own 5.1 surround sound by placing the cabinets in any configuration on each side of the stage. Luckily for the bass player, he will be able to hear himself no matter where his amps are placed; low frequencies are omnidirectional and can be heard everywhere.
Doubling has an advantage because it creates a “wall of sound” onstage and feels like more of a “mix.” The presence is felt everywhere and it sounds powerful. The problem with doubling is actually created by its “advantage”: louder stage levels. By staging your amps toward the back of the stage, you’ll be able to reduce some of this effect, but this setup is better suited for larger stages. While it’s conceivable to combine both staging and doubling in larger venues, the “up-staging” technique will have problems with smaller stages, and “doubling” them makes this problem twice as noticeable. For narrow stages,
doubling may not be an option.
One thing to consider before you overcommit to this setup is the fact that it will take some additional time to get everything in place and dialed in. You really need a wide stage and more than the 15-minute set change that you will find in most clubs, so keep this in mind before you lug all your gear out to a show. If your band is getting a soundcheck and your gear can stay onstage, then you’re good to go. However, when “doubling” your cabinets, check your volumes carefully; your offstage volumes will be fairly high. If you have a lot of vocals to balance out front, it’s even more important to keep your stage levels reasonable.
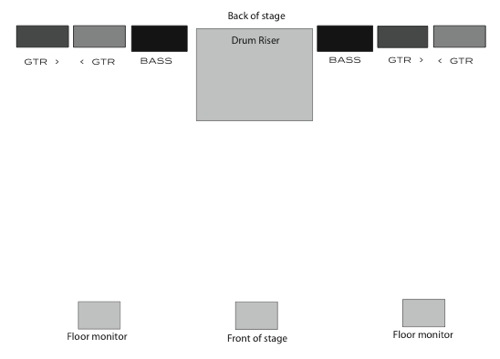
Fig. 2.4
When you use doubling there will be times when balancing each side of the stage is difficult. What is working on one side is actually not working on the other side. Stage left’s guitarist may have a level that is perfect for him, but is too loud for stage right’s guitarist, who is comfortable with her level. There is a very easy way to deal with this problem: simply change the Focus of the opposing guitarist’s cabinet.
Note that the cabinets from the player on the other side of the stage are placed to the outside. This will allow you to turn them outward if the other player is too loud. Fig. 2.5 shows this method of controlling the problem. Another idea would be to put a speaker attenuator on that cabinet alone, and then you could turn the volume down on your side without affecting the player’s volume on the other side. Attenuators are discussed in Chapter 8: Technical Aspects.
When using this doubling technique (I want mine in doubly!) try to downstage your backline to get a better blend of all three cabinets per side. Upstaging may put them too close and overemphasize a particular one. When you find a spot you like, measure it to see what works.
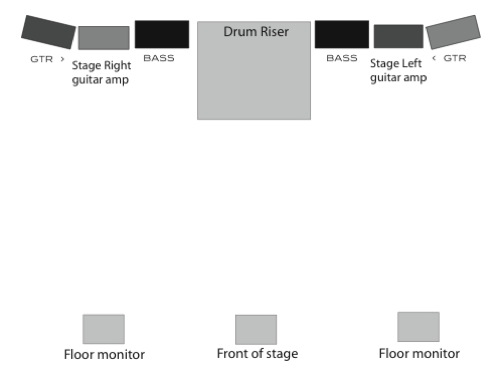
Fig. 2.5
4. Use crossfiring to use less offstage level
Crossfiring. This method involves placing the guitar amps on the edges of the stage pointed inward. Fig. 2.6 shows an example. Crossfiring works well on smaller stages with smaller PA systems. It allows you to put more of your levels “onstage” without them being directed toward the audience as much. In the previous demonstrations, the amps were facing the audience, and will produce a fair amount of offstage level. Most engineers will run your instrument levels lower in the PA when you have a generous
amount coming from the stage. Crossfiring will give you the same onstage levels with less offstage level. Most engineers will run your instrument levels higher in the PA when you have a moderate amount coming from the stage. A moderate offstage level will give your soundperson more control out front, which will be very helpful if you have lots of vocals or acoustic instruments onstage.
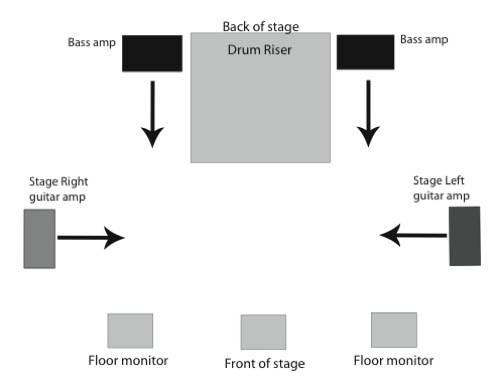
Fig. 2.6
5. Use cornering to get more stage coverage
Cornering. This technique uses two cabinets per amp, and each guitar amp has one cabinet in the “crossfired” position and the other cabinet in the “staged” position. Fig. 2.7 shows an example of this. The bass amp is usually staged on each side of the drums. By properly staging the backline, you should find a good balance with the crossfired cabinets. This method will give you a good stage level, and allow you to run less volume because you have better coverage. The audience will get some too, so be reasonable with your volume. With both crossfiring and cornering, you may want to push the cabinets as far back as possible when they’re on the sides of the stage. This will allow you to hear them as you’re used to—from a slight distance; however, when you’re on a tight stage and this isn’t practical, find a way to elevate them. Milk crates, chairs, or even concrete blocks will help, but the higher up you can get them, the better.
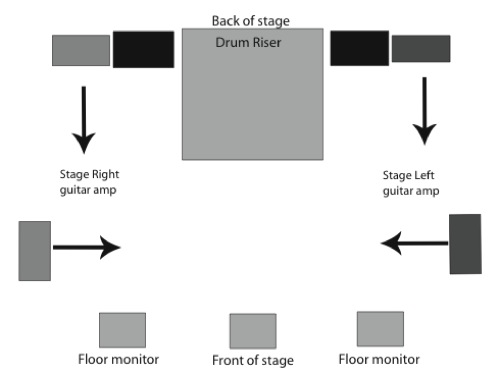
Fig. 2.7
6. Use a hotshot for tight spots
Hotshot. This technique is a bit more involved. It requires converting a medium-size floor wedge into a guitar or bass cabinet. Take an old floor wedge, put in a full-range speaker rated for the amp’s wattage and ohmage, and bypass the crossover by wiring the speaker directly to the input jacks. Ten-inch and 12-inch floor monitors work best for guitars, and 15-inch floor monitors work best for bass. I can’t recall ever seeing a floor wedge with 18-inch speakers in it, but if you can find one it would probably be too big for a small stage. You can use any cheap used floor wedge with the right size speaker, but you are going to have to put in some work. Bypassing the crossover is important; if not, your amp will probably blow either the crossover or the tweeter, leaving you with a honky, muddy, unusable sound. You don’t have crossovers in your Marshall cabinet, so you don’t need one in your hotshot. It is fine to leave the horn/tweeter assembly in the cabinet as it keeps the cabinet closed and correctly ported, it just doesn’t need to be hooked up. This is detailed in Chapter 9: Technical Aspects.
Fig. 2.8 shows examples of hotshot placements. You could crossfire the hotshot from the side, you could place it next to a vocal wedge pointed back at you, or you could use it for level on the other side of the stage. The two examples on the bottom are when the hotshot is being used for yourself, and the example on the top is when the hotshot is being used for other players.
Hotshots also come in real handy for keyboards and acoustic guitars. They can be set in places that would not be acceptable for a combo amp or a full-size cabinet. The same principles that make a wedge monitor useful for a PA also apply to its use as an instrument cabinet; better location and focus means less balance (level) is needed. A hotshot allows you to make the best use of this technique when other cabinets aren’t practical. Since we are discussing small-format setups, we’ll come back to these ideas when needed.
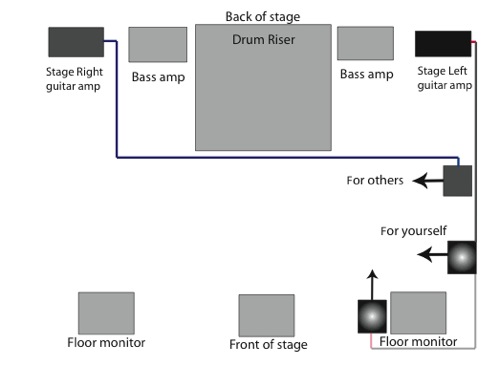
Fig. 2.8
This is just another example of “thinking outside the box.” The most important thing to remember about hotshotting is that it can put your sound exactly where it is needed in more places than a normal cabinet.
7. Use stacking as an alternative
Stacking. This is an uncommon trick where you put a bass cabinet on each side of the stage with a guitar cabinet placed on top of it. Fig. 2.9 shows an example of this. The bass cabinet is laid down on its side and becomes a great-looking “riser” for a guitar rig. There is usually less of a volume battle when the cabinets are stacked. The bass cabinet is also lower and therefore less present, but when the guitar cabinet is elevated, it becomes much more present onstage. Essentially, the differences are subtle between “stacking” and “doubling” bass cabinets, but you should be aware of both techniques. You may prefer one over the other. This works great on tight stages.
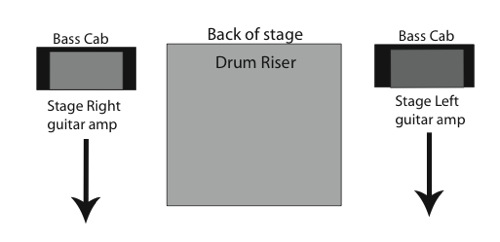
Fig. 2.9a
The stacking technique works very well when you angle (to be discussed next) your cabinets; the elevated cabinets have more coverage. It may seem louder, but it isn’t; it’s just the effect of Focus. Stacking sure does look cool when done with the right gear. Fig. 2.9A shows the front perspective of this setup.
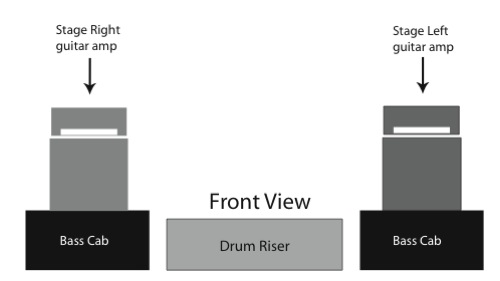
Fig. 2.9b
8. Use angling for wider coverage
Angling. Angling is just another example of thinking outside the box. I have to give credit where it is due: I picked this up from Greg Leon of the Greg Leon Invasion, and thought it was rather clever-looking with two stacks angled back to back, but I also immediately spotted the advantage. This trick requires the use of an angled 4×12 guitar cabinet set on its side. The “bottom” speakers are then pointed to the front and the “top” speakers are now angling toward the center stage. By placing them in the right spot, you can cover more of your stage area with the same cabinet. And while better coverage is just one benefit, it also keeps everything from loading up in a particular direction as well. The speakers can be angled inward or outward, depending on where the sound is needed. They can also be “corner angled” for even more
stage coverage. Fig. 2.10 shows both versions of this setup. When “angling” your cabinets, it’s a good idea to elevate them slightly with a milk crate or something when they are in close range. This allows you to hear them better and keeps your levels lower. This is highly recommended for spreading your tone out over a larger area.
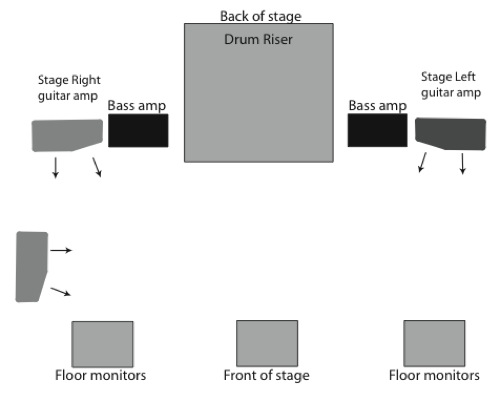
Fig. 2.10
9. Use sidelining as an alternative
Sidelining. This is essentially an extended version of crossfiring, but the cabinet is upstaged to make best use of its projection. On smaller stages or where you are close to the cabinets, you may want to use a pair of slant cabs. This will give you upward projection and allow you to hear yourself better. On larger stages where you are off the cabs more, you could use any combination of vertical slant cabs or horizontal slant cabs. Figs. 2.11A and B show examples of this. Fig. 2.11A is more for crowded stages, but Fig. 2.11B is more of a semicircle that many acoustic bands prefer and is exactly the same as crossfiring. It’s given simply for comparison.
This is one of the more unusual setups and was originally a concept for crowded stages with other bands’ gear taking up the majority of the backline. You may run into some situations where you just don’t have any room to set up like you normally would; this may help. As with many of these alternate setups, it is given to show you how to think outside the box for solutions. I had not seen this setup used very often, so I was about to pull it from the book until I saw a legendary metal band use this very same technique! In their case, the stage was so full of centerstage props that a conventional setup wasn’t possible. It’s something to think about when your band starts adding props to the show.
At this point, we have looked at several variations of conventional and unconventional approaches to setting up your gear for a small-format band. As mentioned before, these techniques can be mixed and combined to accommodate just about any situation that arises. What works in a large venue may not work in a small one, even when you have the space to work with. Sure, it’s nice to have a few options for setting up, but the real point here is to think outside the box! If the stage is very wide but shallow, try setting up where there is the most room—on the side. This can also apply when other bands’ equipment has taken up the downstage backline; set your equipment on the sides if you need to. If the stage is very narrow but deep, then the obvious choice is to use the back rather than the sides. It doesn’t have to be
all the way to the back; use staging to get comfortable levels.
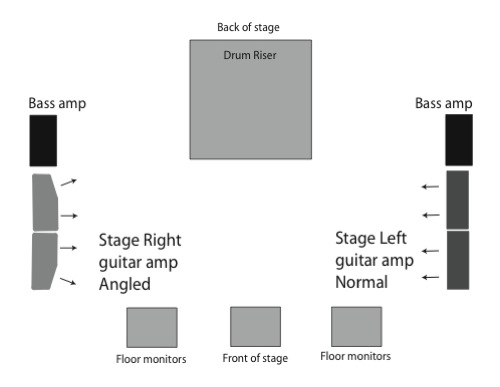
Fig. 2.11a
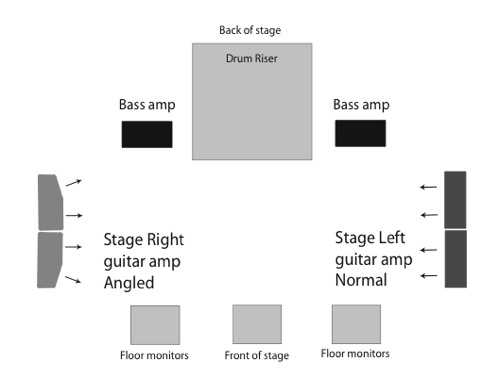
Fig 2.11b
Try some of these setups in rehearsals before you commit to any one in particular. Don’t let a short cable decide which setup you will use; that’s just too easy to fix! When you find something that really makes a difference; take note of it, but don’t let it stop you from trying other things too. This way, when you have made your decision, you will know exactly what is working best. You now have options.
Medium-Format Setups
Using the above techniques for a four-piece setup, we will look at what happens when we add another instrument. What if the lead singer plays guitar? Now we can take a look at some of these medium-size setups with a variety of instruments in different positions. While it really doesn’t matter if your frontperson is playing acoustic guitar, keyboards, or a full guitar rig, the trick will be to get his or her sound to the player without disrupting anyone else’s zone. This will be true even if he or she isn’t a primary player and only plays on a few songs.
10. Use a combo or hotshot for acoustic instruments
Acoustic instruments played by a frontperson located center stage should have a “personal monitor.” Either a small amp designed for the instrument, or a hotshot cabinet will work very well. In case you haven’t noticed, there is a “void pocket” often created by the drum riser that pushes the backline to the outer sides of the stage. If it is a couple feet tall, it also blocks sound from being directed to the singer’s area. This allows the singer to hear more of her monitors and less of the surrounding stage volume; however, this spot will always get more drums than anywhere else.
Fig. 2.12 shows a small acoustic amp placed behind the singer, directly in front of the drum riser. This void pocket is also a great place for the singer’s personal monitor. In chapter 1, we discussed how important it is to have control of your own levels onstage. Having the amp at your back isn’t always the best location to hear it from, so if you are having problems getting this method to work, then get it up off the ground a couple feet or angle it upward slightly. If this doesn’t cut it, you may want to place a hotshot directly next to the singer to get the level you need. While it seems like the simplest solution would be to add some of the direct signal to the wedges for additional level, this could create a loss of presence if the direct signal is out of phase with the acoustic signal onstage. Even slight differences in phase could cause it to sound funny. Moving the microphone will bring this back into coherency. You now have several options to work with—choose what’s right for you!
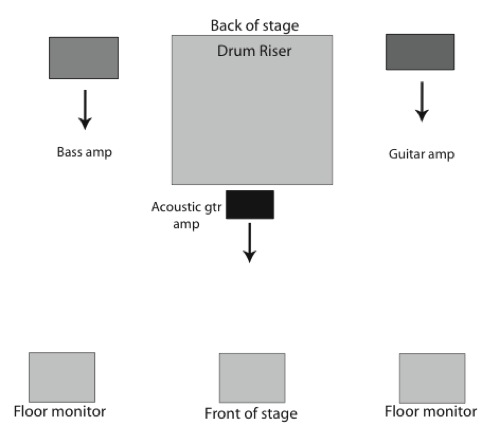
Fig. 2.12
Fig. 2.13 shows a hotshot setup next to a vocal wedge. If you have a choice, place the hotshot on the neck side of an acoustic guitar. It will be less likely to feed back than if it is placed on the body side of the guitar. The reality is that some people hear better in one ear than the other, so you may have to place the monitor on the side that hears best. Since an amp is required to power a hotshot, you can actually use both at the same time by simply plugging it in as an extension cabinet. Your frontperson will get his instrument on both sides from different directions, and this greatly reduces the need for levels by increasing the coverage. It really doesn’t matter what type of instrument it is; this setup works well for anything. The trick is always to get the right sound in the right place. Location! Location! Location!
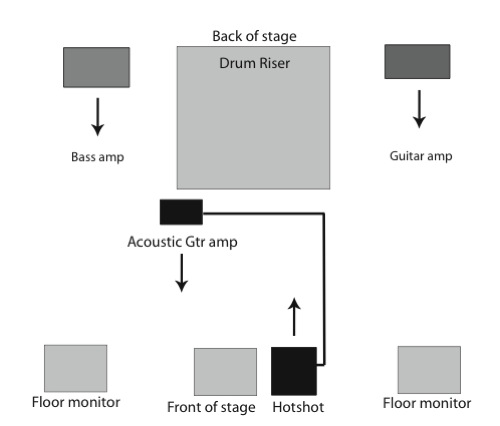
Fig. 2.13
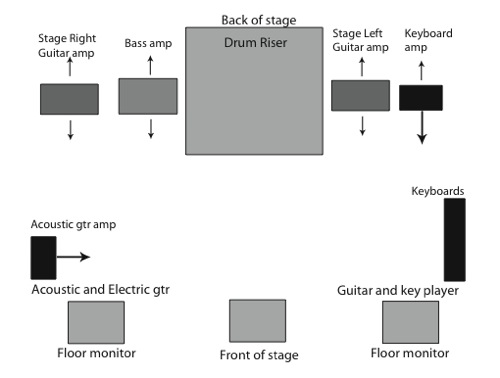
Fig. 2.14
Fig. 2.14 shows a setup for the additional amps that a multi-instrumentalist located up front would want. As you can see, a zone has been created for each player, and both musicians have personal monitors set up in their zones. While most people would simply run these instruments into direct boxes and through their monitor wedges, this won’t give you the control you need to have. Unfamiliar venues, no soundchecks, and inadequate monitor systems make personal monitor amps the choice of consistency; without them you are at the mercy of chance.
Each multi-instrumentalist is using a different technique; the stage right player has his combo amp in the “crossfired” position, and the stage left player has his combo “staged” on the backline, as he has more room on his side of the stage. This works well for small, narrow stages, but on wider stages, everyone could be set up on the backline. You can still make a stage balance adjustment by staging the backline cabs forward as you need to.
11. Use a full-sized amp for soloists
Sometimes a frontperson will have a very strong presence onstage, and in addition to primary vocals, may be a primary instrumentalist. Electric instruments played by a frontperson require a second look before deciding on the right approach. If he/she is using a small- to medium-size combo amp, then you could use the same technique as you would for acoustic. However, if your frontperson is using a large combo or full-size rig, then they should set up with the backline, staged to the inside, where the bass is typically
set up. You don’t want this amp to be on the outside of the backline or there’ll be a volume war between the two players. Make sure that there is a zone for every player, and always keep your amps as close as possible to you.
A hotshot in addition to that would be helpful, or it can be used as the cabinet itself. If your frontperson is also playing leads, then a full-size rig should be onstage. Nothing replaces the tone of a full-size rig, especially on a larger stage. It projects well, and the extra stage level is helpful for someone playing leads, especially when there’s a lot of interaction with other players. Trying to get this much level with stage monitors is asking a lot. If your frontperson is a keyboardist who is trading licks with a guitarist, this
setup should also be your first choice. This is exactly the same as if the frontperson were a lead vocalist and primary guitarist; why should keys be any different? Fig. 2.15 shows an example.
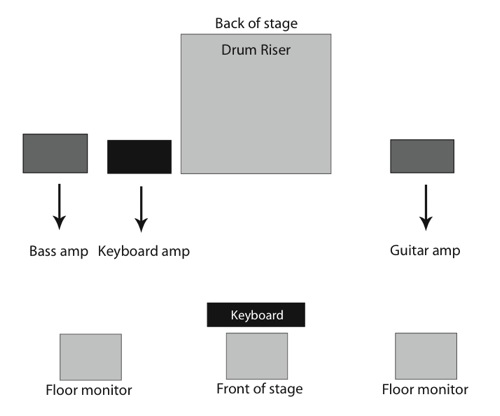
Fig. 2.15
12. Know exactly how long it takes to set up
Large keyboard rigs that include several different types of keys like Fender Rhodes, Hammond B-3s, and Leslie cabinets need lots of room. Oftentimes, these setups are so large that they will take up an entire corner of the stage. Cornering will allow them to run in both directions and still leave room elsewhere on stage.
Fig. 2.16 shows this type of setup in a five-piece band. In this illustration, there are two players on each side of the stage, as well as a frontperson. When a large key rig is located upstage like this, it can sonically take over the zone and create a problem for the other player located on that side. Upstaging that player’s amp will bring back some of the presence needed for him without having to jack the levels up to a ridiculous setting, but it will take careful balancing of both players’ levels to keep a battle from ensuing on this side of the stage. Try to keep everything within the volume level of the stage monitors if you want
them to be of any use at all!
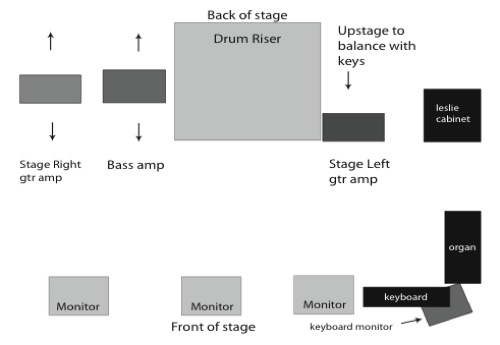
Fig. 2.16
I really love the sound of these rigs, but if you aren’t headlining with a full soundcheck and a limited strike, you may be asking for trouble. It’s been done, but rarely in the 15-minute set change that most bands get. You have to make sure that the stage is large enough and that there is enough time to set up and line check. The place to figure this out is at rehearsals. Try pulling up to your rehearsal room, start a stopwatch, load in and set up, wire it up and get mics in front of it. Then test your sounds, check them in the mixer, assign monitors and levels: now you can hit the stopwatch again. After you time yourself, then pull out a tape measure and write down just how much space your rig needs. Oh, and don’t forget that you will need a stage monitor wedge included in that space as well. This is helpful if you want to hear the rest of the band or your vocals. Just make sure that you know exactly how much time it takes to set up, how much space you need to set up, and don’t bite off more than you can chew. At some point, this will become essential to know if you plan on touring. Most national acts keep track not only of how much space each member needs, but also exactly how much space the whole band needs, among other
vital information.
No wonder electronic keyboards have become so popular over the past couple of decades, but even they have many of the same problems. Bad cables, forgotten adapters, and stands, and incorrect wiring can all affect your setup time. The more you can prewire, the better! It’s also a good idea to mark both ends of every audio cable and your AC power cords. Once they get tied up together, it’s darn near impossible to tell which is which unless you separate them, which not a practical idea in a live performance. Using different colored cables is the very best way, but even this can be hard to coordinate. Also, use the right length cable in the right spot. Custom lengths are recommended for really sophisticated rigs, but this won’t be necessary for the spares. Marking both ends also keeps the same cables in the same location of the signal path. If a particular unit keeps having the same intermittent problems, you have a good idea of where to look first.
This comes in very handy when troubleshooting problems in the middle of a show. If you used the same problem cable in a different place every time you played, it’d be much harder to find, and would make it seem as if everything were having a different problem every time, so spare yourself some insanity. The setup suggestions in this section are designed to give you a variety of perspectives in regard to your stage setup, so don’t feel obligated to conform to the norm. And while they may not solve every situation, they will solve most. These are the basic components of the more complex stage setups that you may be faced with, and it’s important to have a firm grasp of these concepts in their basic forms. Take the time to get familiar with these individual concepts so that you can seize opportunities when they arise, as they surely will. You will recognize them in various forms in the next section on large-format bands.
Large-Format Bands
You may be asking yourself, “What the h#%! does a symphony have to do with my band?” But there was a very good reason for choosing this image in regard to large-format bands: If they can do it, so can you.
For centuries, long before mics and amps, PA systems and monitors, these orchestras and symphonies have been able to accomplish what many modern bands haven’t: balance. It’s one of the principles I’ve been trying to drive home in this book. Location, Focus, and Balance are what makes an orchestra sound as incredible as it does. And while there are many great recordings that get close, nothing can compare to the impact of actually being there. This is the “gold standard” of live performance, and there’s a lot to be learned from orchestras, especially in regard to dynamics. But take a look at the way they’re set up; does this resemble crossfiring? Very few orchestras set up exactly the same way. So before we jump right into large-format bands, let’s take a closer look at orchestras and find some common elements you can use for your band.
Location. While there are endless possibilities for setting up a 96-piece symphony orchestra, there seems to be a common practice among all of them called dynamic placement. This means that particular instruments are located in certain places to achieve a desired effect. In all actuality, the softer instruments are usually placed toward the front, where you can hear them better, and the louder instruments are often placed toward the back so that they don’t overpower the quieter sounds. Isn’t this what you do with vocals and drums? What would happen if this were reversed? However, there’s more to this than meets the eye; risers are used to help backline instruments project.
Zones. Another common practice among these giants is the use of zones. All of the violins are grouped together to form a single zone. You wouldn’t scatter them throughout the orchestra in a random fashion, would you? When grouped together, they form a single area where the violinists can hear themselves better than if they were placed otherwise. While there are quite a few reasons for this that have nothing to do with your band, it does illustrate the importance of having zones in your setup.
Focus. Not only are instruments grouped and placed in specific locations, but also face in particular directions. Interesting . . . that’s what this chapter has been about! Of course, there’s a considerable difference between an acoustic instrument and one with an amp or monitor; an amp gives you the choice of exactly where your tone is projected as well as the opportunity to hear yourself better. This is the primary reason I have been emphasizing the use of personal amplifiers; without them you have no choice but to depend on the house monitor system. Depending on monitor systems to solve all your problems is like asking a waiter for more vocals on your plate. He may get around to it, sooner or later . . .
Balance. Originally, symphonies didn’t require microphones to perform, but they still had a sound engineer—called the conductor. That’s right, conductors were the very first sound engineers in history. One of the conductor’s many responsibilities is to control the dynamics of certain instruments and the levels of the orchestra as a whole. This sounds like a soundperson to me. Since you don’t have a conductor, you have a sound engineer, it would be wise to follow his or her stage level cues.
Many times during a difficult soundcheck, I will bring down the PA system to hear the balances from the stage, and almost every time there will be one member that is substantially louder than everyone else. Not only does this create a problem for the rest of the band, but it’s a problem for the engineers that have to mix above this level. It’s an easy problem to fix: balance!
In a large-format band, you need to have a zone for each player, but there’s only so much space onstage. Your zones will have to be smaller, and your stage volumes will have to be lower than they would for a trio; everyone’s a little closer together. More often that not, you may be short on stage monitors with a large-format band. This means you need to find a balance that is good for everyone: not too soft, not too loud; present, but not overbearing. This includes drummers, too. Just because you don’t have a volume control doesn’t mean that you don’t have to “turn it down” a bit. If the verses are as loud as the choruses, you may have a problem. Dynamics are very important with a large-format band.
Now that we’ve had our orchestral history lesson and made some comparisons, it’s time to look at what all this means to a large-format band. Most bands of this type have the basics: drums, bass, guitar, keys, and vocals. This is the core of the band, and under normal circumstances would not be much of a problem. We have already looked at what it takes to get these elements working together, but a large band will often have another two or three players to contend with, and this is where the problem lies—creating effective zones for them. Since everything will revolve around the core of the band, you should examine these instruments first and decide who belongs on the frontline. Typically, it should be the players that sing the most, because this is where the monitors are, and they will need them.
Now before anyone gets their panties in a bunch over being stuck on the backline, let’s get something straight. You’re putting on a show, right? You do plan on moving around the stage, right? Good. Because standing on the frontline and making funny faces while you play isn’t really putting on a show. There are a couple ways to get you back into the spotlight without having to bask in it.
- Guitarists and other mobile players can simply step up to the frontline when it’s their turn to shine. It takes a bit of coordination between the players in that area, but once the idea of shifting positions onstage sinks in, it becomes second nature.
- Stationary players like keyboardists and percussionists can have stage lighting focused on them. By dropping the frontline lighting and spotlighting them onstage, they can get their five minutes of fame without having to be up front the whole night. It also helps when the frontline players move out of the way for the audience to see them do their thing. Choreography and good lighting are essential to any professional live performance. We’ll look at that in Chapter 5: Getting Organized.
If your core players don’t sing, they could become the backline, and a conventional setup should be fine. This leaves the frontline open for some noncore players, and this should take care of bands that have seven or eight players. Fig. 2.17A shows an example of this type of setup. Each player has their own zone in a different shade. You could have two lead singers, two background vocalists and two sax/horn players for a total of 10 players onstage with room to move around. This is a two-layer setup. Larger bands will want to become friends with this concept.
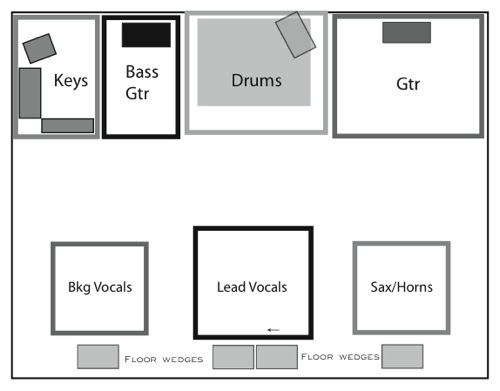
Fig. 2.17a
This setup uses some of the orchestral techniques we discussed earlier:
- Dynamic placement puts the louder sounds toward the back and the quieter sounds toward the front. It also groups like sounds together.
- Zones have been created for all players, and like instruments are grouped together.
But there are also other variations to consider, such as what if your guitarist is a primary vocalist? This setup can be adjusted to handle that by swapping zones with the sax/horn players.
Fig. 2.17B shows a variation of this. Not only did the guitarist swap locations with the sax/horn players, but his amp was relocated as well. This keeps his amp close enough to him to not have to turn it up or cross the sax/horn player’s zone. Your band may or may not have the exact same type of players, but the idea of this layout will work for most instruments regardless of type. The real point here is the proper use of zones in your stage setups. Every player that needs an amp has one close by, and every singer that needs a mic has a monitor close by as well. While this chapter is mainly concerned with your setup, monitor zones will be discussed in the next chapter.
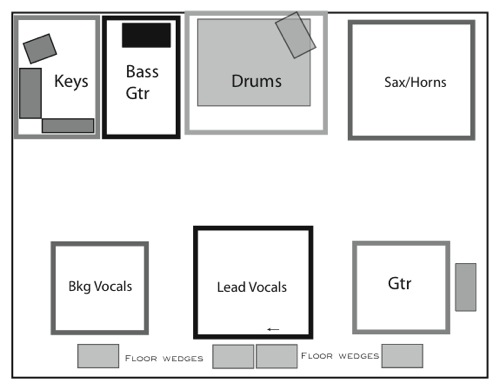
Fig. 2.17b
Large-format bands can be complex, and the resources they have to work with can be rather limited. When equipment resources are lacking, you must make the best use of physical resources through dynamic placement, zones, and location, focus, and balance. Usually an approach can be found by combining these principles. If your band has even more players than shown on the previous pages, then you might want consider these next setups before picking out a location for them: they all interact together. In reality, these principles apply to all sounds placed onstage. You can use the previous examples as a starting point.
Choosing Stage Locations
Looks are important—after all, you are putting on a show—but so is your ability to get up there and sound good. Finding a balance of both is essential to both looking and sounding great. You’re going to have to be flexible and adjust your setup for different venues and the various member changes that happen with larger bands. I can’t tell you what “looks good” to you; that’s a decision you’ll have to make on your own, but I can tell you what to look for when choosing stage locations for various members.
There are three general concepts you may want to consider for any member’s location onstage: what, where, and how. What is it? Where is it? How are you going to make it work in the PA system? These are the questions I ask myself any time someone sets up on my stage. But don’t just ask yourself these three questions; use the following criteria to arrive at some useful answers.
13. Consider the dynamics of the sound
Dynamics. This is the What in the equation. Is this a loud (dominant) sound? If so, consider the backline as a first choice. Make sure it doesn’t violate a quiet sound’s zone.Is it a quiet sound? If so, consider a spot up front. Make sure it isn’t close to a loud sound. Is it similar to one of the other instruments onstage? Consider grouping it with like instruments. Horns and reeds belong together and voices belong together, especially when they are blending together. For acoustic guitars, violins, and other instruments that use a personal monitor, you will have more options to work with. Once you have fully
considered the dynamics of each sound, then you can select a proper location for them. Some bands may need a two-layer setup, and others may need a three-layer setup.
14. Consider the location of the sound
Location. This is the Where part. Where will this instrument be located in relation to the other dominant sounds? Microphone bleed increases with every mic that is placed on the stage. Try to find a spot where there is some “sonic space.” You want to make sure that this member is not blocking the sound from anyone else’s monitor or cabinet. Each player needs a zone, or at least share one. Does this player use an amp? That not only requires more physical space for the amp, but it makes their zone larger. These aspects should be considered when picking the right spot for an instrument.
15. Find the best way to mic the sound
Input. The is the How part of the equation. How are you going to mic it? No matter what instrument you place onstage, you will need some way to get it into the console for mixing and monitor returns, and this makes your choice of location very important. If it requires a mic, then be sure you have some separation from other dominant sounds. You want to select the right mic and the miking technique that will get the best sound. If it has a pickup or direct out, there will be less to worry about, and this is the best way to get a signal into the monitors. We will look at your options in Chapter 4: Input Sources.
16. Find the best way to monitor the sound
Output. Last but not least, the player has to have some way of hearing themselves onstage. An electric instrument has the ability to use an amp, and it should not be a problem to hear. A dynamic acoustic instrument like sax or horns should also not be a problem for its performer to hear onstage, but vocals, flute, and delicate percussion may often require a stage monitor for its performer. If you decide that this instrument needs a monitor, then it may need to be relocated if monitors are limited.
Putting all this into action may be simpler than you think. Fig. 2.18A shows a three-layer setup that could handle up to 12 performers onstage.
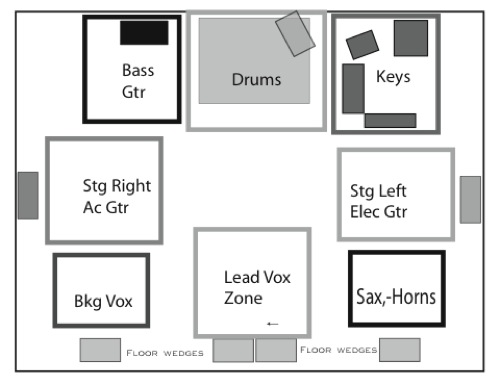
Fig. 2.18a
That’s right, I said 12! Drums, bass, acoustic guitar, electric guitar, and keys = five, plus three sax/horn players, three background singers, and one lead vocalist. And more importantly, everyone has a zone!
Why this setup works: When you look at a large band as a “small orchestra” and employ some of the principles that allow it to function properly, it becomes easier, but never simple.
• Similar instruments and vocals are grouped together.
• Instruments and vocals are dynamically placed onstage correctly.
• Effective zones are created for each group.
• Amps and personal monitors are located and focused correctly.
•The stage monitors are maximized.
These illustrations are three-layer setups: there’s a frontline, backline, and a middle layer. Let’s take a look at even more players onstage. Fig. 2.18B shows 15 performers. This should cover the majority of fairly large bands, but it’s possible for an additional zone to be created center stage. If your band has even more performers than this, I would suggest posting specific information on the www.rockinyourstagesound.com website and include exact stage and equipment dimensions for best results. Don’t forget to list the stage monitor resources as well.
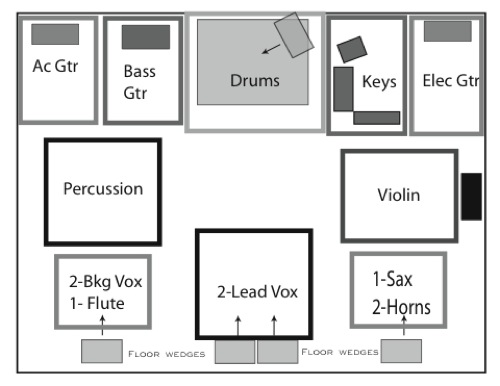
Fig.2.18b
Using Personal Monitors
17. Use a personal monitor for best results
Just as guitarist needs an amp and a singer needs a monitor, any other instrument that can have a pickup mounted on it should have a monitor of some kind. One of the main purposes of this book is to put control back in your hands! If you don’t have control of your ability to hear yourself, you will always be at the mercy of someone else. Here are some of the reasons why you want this control.
- You can control your stage level. You don’t have to ask for more, you just reach over and get what you need. Even more important, you get control over the EQ, which is something you don’t get on most small and mid-size PA systems. Your tone is just as important as your levels.
- The engineer is usually busy with your mix. There’s a lot to a FOH mix, and it’s not like the engineer is just standing around waiting for a monitor cue, unless you are working on a Type III or IV system (this will be discussed in the Chapter 3: Monitor Systems).
- The more you put in the vocal wedges, the less you can hear the vocals. It’s only a mono mix, and things get jumbled up real fast when you load the wedges. This amp can be focused precisely without sacrificing the vocal monitor. Having a personal amp onstage will give you staging options as well.
- A personal monitor will allow acoustic instruments to compete with the more dominant sounds onstage, instead of Bambi vs. Goliath! It allows other musicians to hear these instruments much better than simply through a wedge.
You want to remember that some of the sound being heard out front is coming from the stage in smaller shows, so if a loud guitar is onstage and a soft acoustic with no stage monitor is playing, chances are good that the other players won’t hear that acoustic very well. Using just the monitor system for acoustic sounds requires it to be assigned to all the monitors onstage, and that means more time and details. It also clutters up their monitor mixes. Give the acoustic instruments a chance to be heard by using a personal monitor.
Anything that can have a pickup should! While most people would readily agree that a mic sounds better, using a microphone exclusively on a sound is very limiting. Using a mic means having to remain precisely in the same position for the sound to be consistent. Move away slightly, and the tone goes away. Move into the mic slightly and it may feed back. Nobody ever goes on stage and is perfectly still when performing, so right away the mic becomes a bit of a problem, even with a compressor on it. Slight movements onstage can really be a devil in the monitors.
This is why it’s a good idea to use a pickup or a transducer: It always stays near the sound. You can move around and the level never changes. Another reason for using a pickup is that it is often closer to the sound. This means less background noise and less chance of feeding back. These two points alone make the use of a pickup your first choice for monitors, even if that is the only reason for using a pickup. You need to get your sound into your personal monitors and/or stage monitors, and pickup/transducers are the best way. These devices don’t have much, if any, control over their sound, so you will want to use a personal monitor when using them.
18. Almost anything can work as a monitor
There are several different kinds of “purpose made” monitors, like acoustic guitar amps, keyboard monitors, and even small PAs, but they are all essentially similar: preamp and EQ, power amp, and speaker, even when they are all one unit. You can use one of these purpose-made units with nice features like XLR outputs for the PA system and pre/post EQ switching, but even a practice amp works just fine. If you have a lot of money and want the convenience, buy one of these dedicated units. However, if you are looking for something different and don’t mind experimenting, try using a tube guitar amp.
Tube Amps
For an acoustic guitar they might not be the best, but for keyboards they are awesome. They seem to warm up all that digital sound and take the edge off the harsh tones, which is precisely why we love them on guitars. Set them for clean tones and your digital sounds will come out as you want them to in most cases. If the amp has a couple channels and a footswitch, you can get creative with some of your unusual sounds. If it has an effects loop, you are in for even more fun. Since a digital keyboard isn’t subject to feedback like an acoustic guitar would be, you can create some crazy stuff with a decent keyboard and a guitar rig with effects. You will want to put a mic on all this craziness; otherwise it will just get lost onstage. Using a direct box off the dry keys and a miked guitar rig with effects could be just what you’re looking for. No doubt someone has already done it, but it hasn’t become an everyday item yet.
Digital Modeling Amps
Today’s technology has gotten very advanced, with sounds and options that you could never get on a standard guitar amp. The programmability of these units makes them very useful for this purpose. They even have controller inputs for parameters that aren’t available on a standard amp. Consistent, portable, and reliable, these units are a great choice to create something new with.
Plain Old Amps
If all you are looking for is good, clean volume, a solid-state guitar amp will work great. If you have great sounds and don’t want to spend much, you can find lots of these lying around pawnshops for a reasonable price. There may be one already available in your band. For those who prefer the convenience of a special-purpose unit that has all the dedicated features you would need for that instrument, they make some very nice keyboard amps with multiple inputs for several sets of keys, EQs, and levels. They come in all sizes and price ranges, so take a look at some of them and give them a try.
But for those of you who don’t mind experimenting and insist on the very best, a small PA system is a great choice. You can place a set of speakers on both sides of the stage, like you would with the guitars. You can have your keyboards “spread out” in stereo, or have one keyboard sound on one side and another sound on the other. You could even program your keyboard sounds to certain “panorama” positions and have them move around the stage as you change sounds. Even the PA system would reflect these changes, enhanced by the moving stage sound.
This suggestion is meant more for the adventurous type with some technical expertise, but sometimes you just have to roll up your sleeves and get dirty. We will be examining these types of systems in the next chapter, so you should find all you need to know about operating a small system as a stage monitor.
19. Keyboard and guitar sounds should be balanced
Balancing your patches and channel levels is really important. This is true for both keyboards and guitar amps alike. Anything that has multiple sounds and levels should be carefully balanced to dynamic levels. The gain structures involved in PA systems can greatly exaggerate the volume changes between patches, and what may seem just fine onstage can be excruciating in the system. If your patches aren’t balanced, the engineer will turn down your channel to make the loudest sound work. If one is particularly loud, the rest will often be undermixed. This is the instinctive reaction by almost every sound engineer on the planet. They can’t possibly imagine when your changes will happen and how much to compensate, so they will always be chasing your levels around. At some point they will just set it for some compromised balance and leave it. Is this what you really want?
Another consideration is the monitors—these drastic changes will come blaring out of other player’s wedges as well! They may not get noticed as quickly by the monitor engineer and become irritating onstage. This is why it is important to grasp the concept of balancing your sounds. Using a compressor on your outputs can smooth things out. Different techniques should be used for different applications.
Keyboard Patches
Luckily, most keyboard patches have individual levels for each sound, as well as an overall master level. Having individual levels for each sound does not mean that you can set them all to “7” and they will all match. A “bell” patch will need to have a different volume level than a “square wave synth” patch. The majority of keyboardists have gotten used to using a volume pedal to control these differences on the fly.
Most of the time this works, but it is extremely difficult to memorize all the changes. This process becomes even more difficult when a player is using several keyboards at once. There is an alternative to this method: by using some mathematical magic in the individual volume assignments of each patch, you can get them to come very close without having to rely so heavily on the volume pedal.
This is a two-step process that requires setting all patch levels to 66 percent, whatever that may be for each type of keyboard. Some keyboards have volume levels ranging from 0–127; others range from 0–99. Some of the simpler and older keys have 0–9 or 0–67. There is a very good reason why a level of 66 percent was chosen; it brings all sounds to the upper middle of the adjustment range. Once all patches have been set for a 66 percent volume level, you can then go through every patch and match them correctly. Otherwise it would be difficult to make a simple downward adjustment of the loud sounds because there is no true perspective.
If you tried to turn down the loud sounds to match the softer ones, you might have to go back and adjust every patch whenever you find a softer one that doesn’t work, because you would have no way to turn up the softer sound as well as turn down the louder one. Setting them all to 66 percent gives you a reasonable amount of upward adjustment for the softer sounds, while giving you considerable downward adjustment on the louder sounds.
There is no escaping the fact that you will have to balance them all against each other, and the closer you can get them to match each other, the better and more consistent your patches will sound. This is very crucial to large multiple-key rigs. It is a big time saver in the end, especially when a new module comes in and you need to dial it in. This should make things adjustable without having to commit to either end of the adjustment.
Guitar Patches and Channel Switching
There are many different methods of channel switching: some people use dual or multi-channel amps, some use amp-modeling devices, and others use stompboxes to change sounds. Each method should be approached differently, but the results should all be similar: consistency of tone. Some of you may disagree with this, but you may change your mind after you consider the implications involved in a PA system.
Why should your tone be consistent? Most people think that having the ability to radically change their sound means that they should. I agree with this to some degree, but it should be done with a specific range in mind. This is because your rig is dialed in and set for stage levels, then a mic is placed in front of it and dialed in as well. The levels and EQ settings on the PA are very specific for that sound. If your level and/or your tone changes drastically, those settings no longer work in the PA.
The PA may be multiplying certain aspects of the sound by a factor of three (or more), and if your level/tone changes by 4 dB in any way, you have created a 12 dB (or more) difference! This is how gain structure works in a PA system. Everything is very specific.
When there is no mic involved, larger differences in gain/tone can work just fine onstage, as a certain amount of distance “tempers” and softens the changes, but between the combination of the gain/tone change onstage and the exponential increase due to gain structure in the PA, it can jump out of the mix and become obnoxious. Guess what happens . . . yep! The engineer turns your PA level down instinctively, and it probably won’t come back up. Now your loud channel works, but everything sounds “small.” If these channel settings were relatively close in EQ and level, then this phenomenon would not happen. It should be apparent that serious level and tone differences will not work, but how much is enough? This is the most difficult part: finding a balance that does work.This will depend on your style of playing and range of tones. Make sure that they are “progressive,” meaning that the clean sound is the lowest and the rhythm sound is slightly louder, and lastly that the lead sound is slightly louder still. They should all be fairly close so that you can hear them well onstage, but progressive enough to get the dynamic range you need.
Digital Modeling Amps
These seem to be the easiest to program of the bunch. Line 6 and other similar amps will have several choices for each program, A/B/C/D or whatever. You will want to find your primary sound first. This is the one that you play the most and are most comfortable with. Try to set the controls as close to medium as possible, as this will allow you to copy this program and vary it according to your range.
By using this main program as a master model, you can copy the program and back off the gain for crunch or clean while keeping the same EQ and level. Slight adjustments are okay, but don’t change too much. This closely resembles the way a real amp would work. For the other side of the spectrum, you can copy your basic program and make gain and/or level adjustments to get your drive or lead sound.
Keep the EQs and levels close; only moderate adjustments will work. Save this to a different program bank. You can copy it and add effects for variety. Store your programs in a left-to-right order, beginning with the cleanest first, and step through the channels progressively with the loudest and dirtiest channel last. You should be able to step through your programs with only dynamic changes in volume and small EQ differences. The actual sound can change as a normal amp would, but the levels and EQs should be fairly close; just like a normal amp would. I would like to make the point of not having your clean sound louder than your crunch sound: It’s just not natural sounding and will make your crunch sound “small.” For those of you who prefer many different sounds and find this a bit confining, you could set up other program banks if available. Just bear in mind that if the levels and tones change drastically, you will probably be disappointed with the end result in the PA. There will be nothing an engineer can do to fix this, except turn your mic down to where the loudest sound works. Even when you have your own sound engineer and he is willing to ride the fader for you, it would only compensate level changes, not EQ differences.
Channel-Switching Amps
This should be a bit easier, but you will often have less options. The separate channels should sound similar, so setting up a consistent tone from channel to channel should be easy. Keep your settings dynamically progressive and smooth. Most amps have two channels, and that isn’t quite enough for most guitarists. The use of a footpedal with a slight gain and level boost will give a lead sound for both clean and crunch settings. It doesn’t have to be much, just enough to take the sound of each channel
up to a dynamic difference. While it won’t give you “four channels,” it will give “four ranges” of two channels.
Footpedal Overdrive
This is one of the more tricky setups to dial in: not only do the tones of these devices vary dramatically, but you usually have very little control over their tone. Most guitar rigs should have three sounds: Clean, Crunch, and Drive. They should all sound like different gain stages of the same amp, not three different amps. If you engage a pedal and it sounds like a completely different guitar, this may not be the right pedal. Stay away from dramatic EQ changes; they just don’t translate well in the mix. Be careful to keep everything dynamically progressive and smooth and you should have no problems.
In Conclusion
By now the idea should be apparent: Think outside the box! The gear that you set up, the way you set up, and how you run it can set you apart from the crowd. Moving a sound just a few feet can make all the difference in your show. I suggest you start at rehearsal with a simple setup and try moving one thing at a time to different places. Push your backline all the way back one set, then push it all the way up front the next. Stark changes made back to back like that will reveal hidden subtleties that wouldn’t be noticeable any other way.
Once you have found the right spot for your backline, try using different equipment or running your equipment differently until you are sure you know what will happen when you have to make a change. Once you have a simple setup dialed in and you feel confident about getting it set up correctly every time, then you can add some of the more complicated aspects. When you run into a small problem, look this chapter over and decide if it is a location issue or an equipment issue. There are tools for both in this
chapter. Always create zones for each player and use Location, Focus, and Balance when you can to solve problems.
Remember to use a personal monitor whenever possible. This will enable you to take control of your sound. Your levels and EQ will be important to making yourself feel comfortable and don’t forget that they can be set up in several different places and several different ways.
Keep in mind that stage problems begin at rehearsal; if you have bad habits there, they will come back to haunt you onstage. For this reason alone, rehearse with what you perform with! There are some of you who are making use of some less-than-adequate places to rehearse, but if this is forcing you to set up incorrectly, then it will be a problem later. Anything you save by using a rehearsal space like this will cost much more in the long run. You are not just rehearsing your songs; you are rehearsing your sound as well. Rehearse as you would perform! This is the only way to resolve the minute details that will present
themselves at showtime.
So let’s take a look at what we have covered in this chapter.
- Put the Right Sound in the Right Place
- Find the Right Spot for Your Backline
- Use Doubling to Get More Stage Level
- Use Crossfiring to Use Less Offstage Level
- Use Cornering to Get More Stage Coverage
- Use a Hotshot for Tight Spots
- Use Stacking as an Alternative
- Use Angling for Wider Coverage
- Use Sidelining as an Alternative
- Use a Combo or Hotshot for Acoustic Instruments
- Use a Full-Sized Amp for Soloists
- Know Exactly How Long It Takes to Set Up
- Consider the Dynamics of the Sound
- Consider the Location of the Sound
- Find the Best Way to Mic the Sound
- Find the Best Way to Monitor the Sound
- Use a Personal Monitor for Best Results
- Almost Anything Can Work as a Monitor
- Keyboard and Guitar Sounds Should Be Balanced
Want more great insight into rockin' your stage sound? Pick up a copy of the complete book, Rockin' Your Stage Sound, at this link.


