 It would be hard to imagine that anyone involved in pro music hasn’t heard of Auto-Tune, but for those who have never made use of the industry-standard pitch correction software, an in-depth review of Auto-Tune 5 from a few years ago is available here. Additionaly, our review of Auto-Tune Evo (which some might consider “Auto-Tune Light” version 6) is available here.
Once again, Antares has upped the ante by not only allowing pitch correction, but now also time manipulation, in the same graphical window. Further, Auto-Tune 7 borrows technology from Auto-Tune Evo and upgrades it, providing finer pitch control and throat modeling for changing the actual vocal timbre and character of the source.
It is hard to believe Auto-Tune was originally introduced 15 years ago, and clearly the team at Antares is not content to rest on past accomplishments. This is no less a great product than it was in previous iterations. The only small nugget of concern is the learning curve to take advantage of the new features. Are you up for it?
Features
![]()
Auto-Tune 7 introduces some cool new features, but first, here’s a quick overview of some of the previously established features:
Auto-Tune 7 is available in the Native version that supports RTAS, VST, and AU formats, and separately in a TDM version for Pro Tools HD systems. At the moment, if you purchase the TDM version, Antares is bundling the native version along with it as a “bonus.”
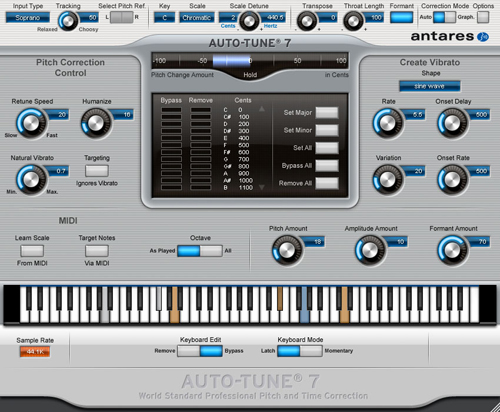
In Automatic mode, you select a key, a scale type, and a vocal range (alto, soprano, etc.) and let Auto-Tune correct vocal performances on-the-fly. The other mode, Graphical Mode, is what the name implies. The waveform is displayed graphically and the plug-in provides various tools to visually correct/edit the waveform with surgical precision (i.e., time and pitch).
The Retune Speed function lets you adjust how fast or slow pitch correction is applied to the audio source. Faster settings are useful in pitch correcting vocals with short words/notes, while the slower settings are better for use with long-held notes and performances with portamento. In Graphical mode, you can assign a unique retune speed to each individual note or range of corrected audio material.
Bypass and Remove buttons let you select notes in the chosen scale to either remove (thus causing a note to be pitch-corrected to the nearest available note in the scale) or to bypass correction, leaving certain notes unaffected by pitch correction.
Pitch doesn’t have to be corrected to a predefined scale. Not only can you define custom scales, but with Auto-Tune’s MIDI capabilities, you can either play notes to match the vocal performance or you can supply the “proper” vocal melody via a keyboard sequence and have your vocal track pitch corrected to the performance.
A Targeting Ignores Vibrato button enables a feature that attempts to discern vibrato in a vocal performance and not pitch correct it.
Scales can be detuned from standard A-440 Hz pitch in case you’re working with a performance matched to an out of tune instrument like an old organ, a lazy guitar player who didn’t tune properly, or most likely, recording with an acoustic piano that had concert tuning or otherwise drifted from standard pitch.
The Humanize feature exists for use with vocal performances that incorporate a mix of short words and long-held notes. If you set the Retune Speed to optimally treat the short words, it could render long-held notes a little sterile. The Humanize feature lets you apply slower retune speeds to only the sustained notes.
The Natural Vibrato feature lets you increase or decrease the depth of vibrato in a performance. Note that this particular feature only works if there is vibrato in the performance – it doesn’t magically create vibrato. But if you do want to magically create vibrato, there are controls for that, too!
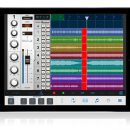
Now that we have gotten through all that, the big news today is certainly the Time Correction set of tools, as shown here:

IThe audio (your track) loads into the plug-in in real time, and you get an overview of the waveform’s amplitude behind the editing display’s pitch-tracking curves. Below the editing window is either a zoomed-out overview of all tracked audio, or a direct mirror of the editing window’s time selection. The bottom display splits into two waveforms during Time Correction, displaying the original timing on the bottom and the corrected timing on the top.
Usability
![]()
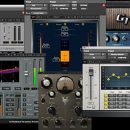
We used Auto-Tune 7 on our Apple Mac Pro (8 core, 8 GB) running Avid Pro Tools LE 8.0.5. Installation and registering via iLok authorization was easy and without any problems.
Using Auto-Tune for pitch manipulation has been well documented, and the Auto-Tune 7 interface is very similar to the interface in Auto-Tune Evo. A good review of this interface is covered in our Auto-Tune Evo review here.
In our testing, the Automatic mode, while quick and easy, did not give us the desired results with a falsetto male harmony line. The program couldn’t discern whether to sharp or flat the pitch, and oscillated between both (presumably, the sung note was hovering at the midpoint just between two notes). However, once we switched to Graphical mode, we quickly and easily drew in our desired pitch correction, and our Cher moment was a thing of the past.
The other full voice harmonies worked just as well. As is always the case with any kind of processing, the better the original signal (or pitch) the better the processed (pitch corrected) output will be. We were very pleased with the results, which sounded quite natural… though we admit we did play around with the effects just for fun for a while! Throat modeling, as present in other iterations, is also included in the version of Auto-Tune.
The big news, of course, is the addition of time correction tools. While not new to other pitch correction plug-ins, it is new to Auto-Tune.
To use Time Correction, the audio records into the plug-in in real time, resulting in an overview of the waveform amplitude along with the more the more familiar pitch curves. Another display below the editing window can either be a mirror of the editing window’s time selection or a zoomed-out overview of all tracked audio. The bottom display is divided into two waveforms, displaying the original timing on the bottom and the corrected timing on the top.
There are two new tools for making timing adjustments. The Move Point tool selects a length of time in which your editing is done; you can then drag a single time event, while simultaneously compressing or expanding the surrounding audio within the selection. The Move Region is similar, although in this case you make a second region selection within the initial time range. Audio that falls within that region stays intact relative to itself against the rest of the selection when dragged into place. While this took a little bit to get used to, once we became more familiar with the concept, each of these tools were easy to operate, and we created very natural sounding results. Again, one could work the opposite way, stretching notes beyond the original length. While not always natural sounding, we could produce interesting effects as well, and we can envision many pop producers making creative use of this new feature. Maybe we can call it the “Buchwald Effect” this time around and put it on a massive hit record.
There are a couple of confusing points we encountered: When using Time Correction, after loading the audio into the correction engine, our DAW’s visual waveform looked different than the actual playback’s timing, which was a little confusing. This can’t really be helped, though, because as a plug-in, Auto-Tune can’t change the waveform display on the track of your DAW, so the processed waveform may appear slightly different in the plug-in window.
Tip: After correcting for time or pitch, print the corrected audio to a new track and then freeze/deactivate the original track, which is better from a CPU processing/performance perspective, anyway.
Tip: For best results, Auto-Tune should be the first insert on an audio track.
Another Time Correction (small) shortcoming is its limited ability to return only a portion of the corrected audio back to its original state. An Undo button (specific to Time Control) can step backward a number of steps, but you can’t easily return to a single section of your audio’s original timing unless it was the last edit you made. Perhaps a workaround would be to have multiple bounced tracks of various points in the editing process, but that would likely be time consuming and disruptive to your workflow.
Other controls in the graphical interface include vibrato controls, an auto-scrolling option for the graphical data, Throat Length settings, a bars and beats timeline view, and the ability to make pitch correction follow a MIDI performance (either live or from a sequenced part). Vertical zooming in the edit window has also been expanded from previous versions (early versions of Auto-Tune did not have resizable edit windows).
Sound
![]()
Simply, Auto-Tune 7 delivers. It sounds great, and when used as originally intended, its pitch correction sounds transparent and natural. Performances that are “close” can have corrections applied that are essentially undetectable and natural sounding; while more errant pitches can be corrected fairly well, too.
The same can be said for timing correction, which is a great tool to have handy in your studio. If the automatic mode doesn’t quite get what you’re after, it is easy enough (with a little learning curve) to fix things manually in Graphic Mode, just as most engineers became comfortable editing pitch in this manner years ago.
Documentation and Product Support
![]()
We did not get a paper manual, since we downloaded the product from the Antares website. However, the manual is available for download in PDF form, and it is very useful. We strongly encourage all users to read it, as some things may not be obvious to figure out at first glance. If you’re upgrading from more than two versions ago, forget about your old methods of working and read the manual! You need to re-learn the modern day Antares workflow.
Antares also provides a link to tutorial videos from Groove 3, though we wish more of the video content was free!
Price
![]()
Antares Auto-Tune 7 Native (MSRP $399) sells for $299 and the TDM version (MSRP $649) sells for approximately $520. Fortunately, upgrades are significantly cheaper, some starting at only $129. With Avid’s new AAX plugin format, though, which Antares is undoubtedly working on supporting, we find it hard to justify the price difference for the TDM version. Considering most engineers make manual pitch corrections and then print the corrected tracks, we suggest just sticking with the Native version for now and upgrading to AAX whenever that becomes available.
Other Comments
Antares has another winner with Auto-Tune 7, and fantastic results are possible with only a little bit of patience. While the EFX 2 product may be cheaper and simpler to use, it doesn’t have anywhere near the power or flexibility of Auto-Tune 7 (and it’s not cross compatible with the full Auto-Tune, so if you rely on EFX in your home studio, you’ll have bring the plug-in along to other studios if you’re working on a project in multiple locations). If you don’t have pitch correction in your studio, you owe it to yourself to check out Auto-Tune 7. There’s a good reason everything else in the product category is benchmarked against it.
Contact Information
Antares
www.antarestech.com
Overall Rating - Product Summary