If you’ve got a multi-channel amp (or multiple amps), a variety of effects (pedals and/or rack gear), audio loopers, and such, there comes a time when you’re ready to move past the pedal tap dance and control everything with instantaneous, single-button simplicity. That’s where MIDI foot controllers come into play, and there is no foot controller more powerful or easier to use than the RJM Mastermind GT.
Having used MIDI foot controllers from the most basic to the most elaborate, we have plenty of praise to bestow upon the Mastermind GT. It sets a new benchmark for ease of use in this category, which is directly tied to how easily you can configure it to control your gear. The Mastermind GT’s combination of 23 LCD displays and a computer-based software editor ensure that even the most complex guitar rigs can be operated with ease, and equally important, setup/configuration of your rig is easier than ever. Gone are the days of complex foot controller programming.
Whether you’ve got the behemoth GT/22 (reviewed) or its more compact siblings (there are 16- and 10-button versions), if you like the idea of easy configuration and customizable displays associated with every footswitch—because any button can be configured to do whatever you’d like, then this is one big box you’re going to love stepping on.
Features
The focus of this review is on the Mastermind GT/22, the largest MIDI foot controller in the family. The sixteen-button GT/16 and ten-button GT/10 are nearly identical, with extremely minor differences.
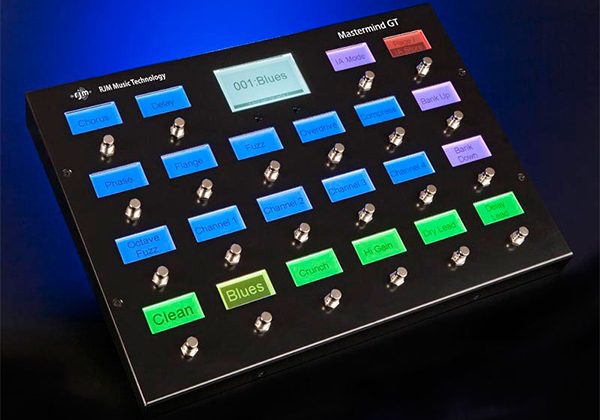
The first thing you’re sure to notice about the Mastermind GT is the size: at 19.4” x 8.1” x 3.25”, the foot controller is pretty substantial in size (and housed in a metal case), but this also allows for comfortable spacing of the Carling style footswitches. Photos are somewhat misleading—there are three inches of space between footswitches. And as you may have surmised, there are 22 buttons on the GT/22.
While many foot controllers designate specific foot switches for tasks such as selecting presets, toggling functions on your amps or effects via CC messages, setting tap tempo, or selecting banks of sounds, the sky is the limit with the Mastermind GT. You can assign function you need to any footswitch, and the individual displays associated with each footswitch let you change your switch labeling instantly, with assignable colors and customizable text. The Mastermind GT provides a completely masking tape- and Sharpie pen-free experience!
We used to get excited talking about all of the different MIDI program change (PC) and continuous controller (CC) messages that could be sent from a single button press, but it seems almost trivial to reduce the Mastermind GT to such a conversation. For those who need to know, up to twenty MIDI instructions of any type can be sent from a single button press: program changes, continuous controller messages, tap tempo, bank select, MIDI notes, etc.
When it’s time to add some expression to your performance, have no stage fright. The Mastermind GT has jacks to connect up to four expression pedals, with typical use being: MIDI controlled volume, delay/effect time manipulation, wah, and so on. There are two external switch jacks, too. These can function just like the built-in footswitches minus the display. Many players like to use these for things like connecting an external switching pedal for inputting Tap Tempo instead of dedicating one of the footswitches on their MIDI foot controller.
There are two pedal power jacks, too! They are rated for 9V DC, up to 100mA total. These won’t replace your pedalboard’s dedicated power supply, but for a tuner or compact pedal, it’s handy to have these around in a pinch.
Most users will power the MasterMind GT over phantom power. If you’re using RJM switching products like the Rack Gizmo, Effects Gizmo, etc., the included six-pin XLR cable is all it takes for power and connectivity. [It should be noted that only the GT/22 offers the custom RJM XLR interface.] If you’re using other rack solutions, the Mastermind GT also works via 7-pin DIN MIDI. And finally, if you’re slumming it old school, you can use a standard 5-pin DIN MIDI cable, but you’ll also have to connect the supplied external power supply. Big rig users can daisy chain a couple of Mastermind GTs in case you need to have one somewhere else across the stage or tucked away with your guitar tech.
About those numerous displays: The Mastermind GT enables you to label each footswitch any way that you desire, and you can set custom colors for each button. You might color code the buttons according to the color scheme of your favorite effect pedals, by pedal function, or just by whatever looks the most menacing on stage (that would probably be black lettering on a red background). The large display in the middle of the foot controller is used for displaying the names of your patches or song titles in large letters, and if you pair the foot controller with the right rack gear (G-Major 2, Axe FX, for example), those devices can pass through their built-in tuners to a tuner display on the screen, so you don’t even need to look back at your rack when tuning up.
USB type A and B ports are provided, one for storage of settings to a thumb drive, and one for connectivity to your computer.
Computer connectivity is part of what makes the Mastermind GT shine: simple configuration and patch management for your rig! The downloadable (free) software editor is part of what makes this such a powerful yet easy-to-use solution for complete amp and effects control. Of course, once you see what 23 LCD displays can do to simplify configuring a MIDI foot controller, you may find yourself rarely firing up the computer-based editor.
Usability
Without question, there has never been a MIDI foot controller as easy to use as the Mastermind GT—at least, not one that you would actually configure to do more than basic program changes. We put the Mastermind GT to the test as the foot controller for a reasonably complex guitar rig comprised of an ENGL Powerball II head (four channels, switches for solo/boost, mid shift, and effects loop bypass), a TC Electronic G-Major II multi-effects processor, a bunch of advanced pedals, and an RJM Effects Gizmo audio looper/function switcher.
MIDI foot controllers in guitar rigs are focused on two things: program change (PC) messages and continuous controller (CC) messages. For an in-depth tutorial, read our feature story all about understanding MIDI in guitar rigs, or check out Scott Kahn's book, Modern Guitar Rigs: The Tone Fanatic's Guide to Integrating Amps & Effects.
The Mastermind GT comes with numerous templates that map the default CC values of popular products for easy control from the foot controller. Our G-Major II processor and Eventide Space pedal were among the popular items already known to the Mastermind GT, so after selecting them, it was easy to assign any of their common features to specific footswitches in the Mastermind GT. Other popular templates are provided for the entire range of Eventide pedals, Fractal Audio’s Axe-FX processors, various TC Electronic products, and more.
It was also easy to manually specify MIDI channels and CC values for devices that were not known to the Mastermind GT by default.
The biggest trick with the Mastermind GT is determining how you want to arrange operation of the foot controller, because its flexible arrangement goes so far beyond the familiar fixed layout of most MIDI foot controllers. Here’s what we came up with:
First, we created a number of presets, without regard for which footswitch they would be assigned to. A preset could be something like this: step on a footswitch and have our amplifier switch to channel 3, turn on the FX loop, activate the audio loop in our Rack Gizmo for our G-Major II, set the G-Major II to a specific patch with some delay and a noise gate. We could then name the patch anything, like “Crunch Delay.” In the illustration below, you can see just how easy it was to select actions that take place when a specific pedal is selected: the editor displays an image of the foot controller, and you literally click on a footswitch and then click your way through selecting pieces of your gear and choosing what happens with them.

In the set list manager portion of the editor, we were able to arrange set lists, songs, and our presets. Multiple presets could be easily assigned to specific songs via a drag-and-drop interface, and those songs arranged in various set list orders. Here’s how our Mastermind GT ultimately was laid out operationally:
We used the first five buttons on the bottom row of the Mastermind GT for preset selection within a specific song, and the far right footswitch was assigned to the Tap Tempo CC value in our G-Major II, which was used for our digital delays. Since the ENGL Powerball II amp has four channels, for every song, we kept a “standard” arrangement, where on each of the songs in our set list, button 1 (from left) was our clean channel, button 2 was light crunch, button 3 was high gain crunch, and button 4 was our lead sound.
We assigned bank up/down buttons higher up on the foot controller, and those enabled us to scroll through a list of our song titles. Once we scrolled to the next song in our set, we could then step on buttons 1 through 4 to call up the right starting sound. With this layout, clean sounds were always assigned to our first footswitch, but in some songs, the clean sound might include chorus, reverb, delays, tremolo, etc. From one song to the next, button 3 would be our high-gain crunch, but sometimes with delay, sometimes bypassing the effects loop, etc.
What about all those other buttons? That was our virtual stomp box pedalboard. Some buttons would turn on/off the audio loops for our favorite pedals sitting on a shelf in our rack, but we could also save the default on/off state to the presets in specific songs, too. For example, when we select one of our “Van Halen tribute” presets, it could have been saved with our phaser pedal audio loop in the On state, but once we got into the meat of the song, we could simply step on the footswitch assigned to the phaser pedal’s audio loop to turn the effect off.
Not all footswitches controlled pedal audio loops, though. Some footswitches were assigned to turn individual effects blocks on/off within the G-Major II, so we could easily turn on/off the modulation, delay, reverb, and compressor blocks within a specific preset. To expand further, we would scroll through our list of songs, step on one of our presets for the song—which calls up an effect preset in our G-Major II that happens to have specific effect blocks activated to start. And then, midway through our song, we could individually turn specific effect blocks on/off within the G-Major II.
We also assigned a dedicated footswitch to our ENGL amplifier’s solo/boost feature, and another to the amp’s mid frequency shift feature. And to keep track of all of this, besides each button being clearly labeled on the individual displays, we color coded things! Our preset selection buttons on the bottom were one color (the selected switch would appear in reverse color between the text and background), while effect blocks and audio loops were another color. Our control buttons, like bank up/down and our Tuner/Mute footswitch were a third set of colors.
Additionally, we used a BOSS expression pedal plugged into one of the expression pedal jacks, and we configured the Mastermind GT to pass its CC values through to our G-Major II to control reverb depth and delay repeats as needed.
All of this was accomplished easily through the software editor, no “programming” required. But if you’re used to the operations of a hardware-only solution like the Voodoo Lab Ground Control Pro for example, you’ll be equally impressed configuring your sounds from the Mastermind GT directly.
With “classic” foot controllers, you typically have a one- or two-line display, and you scroll through pages of options, then tab your way across various items to adjust the parameters (probably where the scary feeling of “programming” foot controllers came about). With 22 displays, though, there is no scrolling to find settings! Calling up a particular setting maps out all of its options across the remaining buttons on the footswitch, so everything you want to adjust is just a button press away. It really is this straightforward, though typing names of presets and managing set lists is a faster and even easier task when using the computer-based editor software.
If we had a simpler rig setup, like a two-channel Marshall head and an Axe-FX for effects, we wouldn’t need an audio looper/function switcher like the Rack Gizmo mentioned in the big rig above. With its built-in function switches, we could have used the Mastermind GT to directly handle our amp channel switching, and then to have full control over patch selection and effect block control with our Axe-FX. Additionally, if we were looking for a foot controller to run a guitar rig built entirely around a modeling amp or profiler like the fantastic Kemper Profiling Amplifier, a Mastermind GT/16 or GT/10 would make a great choice.
Our only complaint, if we had to throw one out there, has to do with the color choices for the display. We would love to have more vibrant colors available, or user definable colors, rather than being limited to choosing from a specified color palette. That said, this is still a great solution that we had no trouble observing under a wide variety of lighting conditions.
Documentation and Product Support
The Mastermind GT comes with an easy to follow instruction guide (as do all RJM Music Technology products), plus the company provides numerous video tutorials online demonstrating how to set up and configure the Mastermind GT to work with a variety of popular devices from Fractal Audio, Kemper, Strymon, and more.
The Mastermind GT has a one-year warranty.
Price
The Mastermind GT/22 sells direct for $1,899, which certainly isn’t cheap. But if you’ve invested thousands of dollars in a pro rig, there is no more elegant solution to controlling the whole thing, and it makes setting up and controlling your rig easier than any products that came before it. This is a landmark product in the world of MIDI foot controllers, and one that we’re going to use to control many of our big rigs.
If you don’t need so many buttons for instant-access control over audio loops and effect blocks, also consider the smaller GT/16 for $1,599 or the GT/10 for $1,299. They all feature the same large set list/song title display in the middle, and then either 10 or 16 footswitchs with LED displays for your rig control.
Contact Information
RJM Music Technology
www.rjmmusic.com
Overall Rating - Product Summary
| Category | Value | Rating |
| Features | 20% | |
| Usability | 25% | |
| Documentation & Support | 10% | |
| Price | 20% | |
|
|
||
| OVERALL RATING = 3.5
3.6 stars or better: Outstanding, WIHO Award |
||

