If you play mid-level guitars, one area where some manufacturers try to save money is in the quality of the pickups they install. Fortunately, replacing pickups in your guitar is an inexpensive upgrade option that can radically transform the tone of your instrument from something average or typical to something that really screams.
Even on higher-priced instruments that ship with premium pickups, some players still choose to replace pickups in order to achieve specific sonic results. It’s the easiest way to make an off-the-shelf instrument sound a little bit more personal. Plus, with specific changes to the wiring scheme, you can further customize an instrument’s output to suit your personal tastes.
My quest began the day I foolishly sold the one guitar I should have kept in my collection – an Ibanez JPM-100 P2, one of the John Petrucci signature models from his days as an Ibanez endorsee (he’s now playing Music Man). I went through an “I’m sick of dealing with a Floyd Rose Tremolo” phase as changing strings was such a royal time-consuming pain (you have to cut the balls off the strings on many Floyd Rose-style tremolos before locking the strings into the bridge).
The great things about the JPM-100, though, were: superb playability of the Wizard neck, the gorgeous tone from the DiMarzio Air Norton and Steve’s Special pickups, and custom three-way wiring. Rather than using a typical five-way switch, the guitar featured a three-position toggle – neck, bridge, and in the middle position, it used the inner coils from each pickup in parallel to achieve a tone similar to the middle/bridge combination from a single-coil-equipped strat.
My quest for a suitable replacement ended when I found the Ibanez RGT42DXFM guitar – a beautiful flamed top RG-series instrument that was somewhat similar to the JPM guitars – Wizard-series neck, a flat finish like the JPM-100 P4 (I had one of those too but the camouflage color didn’t suit me), and it also had some features I liked even better – neck-thru-body construction, a mahogany body for that deep Les Paul kind of sound, and the updated Edge Pro II tremolo didn’t require cutting balls off the strings. Click here to read our in-depth review of this guitar.
As we noted in the review, this guitar only fell short of more-costly Prestige and Signature Ibanez guitars in the tone department, but it was the perfect base from which to begin our customization project.
My plan was to replace the stock pickups with a DiMarzio Air Norton in the neck position and a Steve’s Special pickup in the bridge, as well as to replace the five-way switch with the same custom three-way pickup wiring that I loved in the JPM-100. I didn’t expect to get the same exact sound – the mahogany body yields a different tone than the basswood body of a JPM. At the end of this workshop, I’ll let you know how the upgraded guitar sounds.
Special Thanks
Before jumping into the details, MusicPlayers.com wants to extend a special thank-you to the people who helped make this tutorial possible:
Mike Panek, [former] lead guitar tech at Victor's House of Music (store was acquired by Guitar Center). Mike performed the actual installation with us to speed things along (he’s a pro at this – our solo efforts would have taken hours). Plus, it was easier for us to write about the process and photograph it while he performed the surgical procedure. Mike provided lots of great tips for do-it-yourselfers, some of which I’ll be sure to use the next time I undertake a wiring job for myself. He's also a great guitar player. Check out his band, Cool Days End, or contact him via email if you need a great guitar tech in northern NJ.
Steve Blucher, pickup guru at DiMarzio, who not only supplied us with the custom wiring specs but who actually conceived this wiring scheme in the first place, originally for use in the Parker Fly guitars when they were first designed.
No Degree Necessary
If you would like to get a better understanding of guitar pickups before proceeding with this tutorial, be sure to read our other tutorial, Pickups 101: A Primer on Passive Electric Guitar Pickups.
To do your own pickup work, you should be comfortable with a soldering iron and have the ability to read simple wiring diagrams. If you’re just replacing one set of like pickups for another – a set of single coils for new single coils, or replacing two humbuckers with another pair – you may not even need any help from a wiring diagram because the replacement pickups may use an identical wiring scheme. Of course, the wires may be colored differently, but we’ll help you with that later in the tutorial.
Hopefully, this article will give you the general background to feel more comfortable pulling your own guitar apart, but if not, fortunately, the world is filled with guys like Mike who can do this work for very little cost. But hey, we all want to be like Mike, right? So go ahead and try to do your own wiring. The worst thing that can happen is you have to hang your head in shame and bring the guitar to someone with more experience to finish the job. Don’t worry – we won’t tell anyone.
Tools of the Trade
 You should be able to purchase all the required supplies at either a well-stocked hardware store or your local Radio Shack.
A good soldering iron is a must. By good, we mean one that generates at least 350W of heat, preferably with a control that enables you to set the level of the heat.
60/40 Rosin-core solder is recommended. It melts quickly at low temperatures – important so that you don’t need to leave a hot soldering iron in contact with the pots and assorted components inside your possibly vintage instrument.
A small clamp for holding your pickup selector switch. This essential device leaves both hands free for important things like… soldering! I’ve wired pickups in the past without one, but after seeing how the pros do it, I wouldn’t consider soldering without this ever again.
Additionally, get some spare heat shrink to place around exposed wires to better shield/insulate them. A good wire splicing tool will help with your pickup wiring work, too.
Getting Started
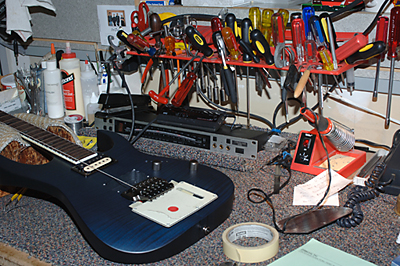
1. Mask the guitar. A little bit of masking tape on the body of your guitar will help to protect key work areas from scratches.
 2. Block the tremolo. Especially with floating tremolos of the Floyd Rose variety (or Ibanez Edge Pro II in this case), blocking the tremolo will retain tension on the bridge once the strings are removed, making retuning the guitar much easier when finished.

3. Leave one string on the guitar – in particular, your low E or B (on a seven-string). This is essential for two reasons: It helps maintain counter-pressure against the tremolo, and more importantly, it allows you to test the wiring to make sure it has been done correctly before you finish putting your guitar back together.

4. Disassemble! Remove the plate on the back of your guitar (the smaller one covering the wiring, not the large one covering your tremolo springs), remove the old pickups, and remove the five-way switch if you’re working on a guitar with the switch mounted directly to the body. Even if you’re not doing our precise modification, it will be easier to solder wires to the switch if it is removed from inside the guitar.
Cut the wires – but do not unsolder them! Leaving a tiny bit of the ends of the wire in place on our old switch ensures that if we ever want to switch back to the five-way selector, we’ll have a great idea which wires from the pickup go to which termination point based on color. Easy!
5. Label your old pickups! If you have any plans to re-use or re-sell the old pickups, they may not have visual indicators of what model they are. At the very least, write a B, M, or N on the back of each with a permanent marker to identify pickup position on the guitar (that’s Bridge, Middle, Neck). If they are valuable vintage pickups, put a sticker on them that you label – don’t permanently mark an expensive hand-wired classic.
6. When orienting pickups in your guitar, be consistent to avoid polarity/out-of-phase issues. It’s quite likely that the wiring exits both pickups on the same end (bottom, in the case of our DiMarzio pickups). If you have a humbucking pickup with one set of poles that have flat head screws (and the other set of poles are just flat-headed without screws), typically you orient the side of the pickup with the flat head screws towards the neck of the guitar, though in the case of our JPM-style wiring, the actual orientation of the Air Norton pickup was just the opposite.
7. Mark your pickup leads! In the case of our Ibanez, the leads from each pickup (the bundle of wires) enter the wiring area from separate cavities routed through the body (making it easy to distinguish whether the lead was coming from the neck or bridge position), but in some guitars (strat-style bodies) you may not have this clear distinction. Put a piece of masking tape on one of the leads and mark it with a B, M, or N to help avoid confusion during the soldering.
 8. Be careful when splicing. You have to remove the outer heat shrink wrap at least an inch or two to expose the multiple wire leads. In the case of DiMarzio pickups, the individual leads are further wrapped in a cellophane plastic that we removed before soldering.
Once the leads are separated – the red, green, black, white, and ground, we recommend putting some heat shrink around the exposed ground wire to insulate it and reduce the risk of electrical noise/interference within the guitar.
Leave plenty of extra wire in case you make mistakes, need to rewire, etc. There’s enough room for the wires to fit inside the guitar when you’re finished working. Also, note that other manufacturers’ wires may follow different color schemes.
9. Solder your wires. If you’ve never soldered before and are installing a new switch as we did, you’ll want to first pre-solder the contact points on the switch – basically, this just involves burning some solder onto the contact points. After this is done, you can attach the appropriate wires to the contact points.
Grounds should be soldered to the back of the volume or tone pots. Again, if there’s not already some solder in place from a previous ground wire, pre-solder the pot.
 You can wrap the ground wires from both pickups to each other to take up less space (and wrap them in heat shrink).
10. Test it out! Plug in the guitar and make sure that you’ve wired things correctly. Tap on each of the pickup poles with a metal object (e.g., screwdriver, hex wrench) in each switch position to make sure that the wiring is correct. It’s quite easy to accidentally wire the leads backward, or to a wrong contact point on the switch, so if things sound incorrect, carefully compare your wiring diagram to the work you actually did.
 A multimeter like this $30 model from Radio Shack is useful whether you’re planning to implement complex wiring or to make use of vintage pickups and you want to make sure that they are in perfect working order. When set to measure Ohms, touching the two leads to a pair of wires from your pickup will provide numerical measurements that you can compare to the specs for your pickup. You’ll notice significant differences in resistance when comparing the pickup output between series and parallel wiring schemes, and the meter may prove helpful if you’re trying to diagnose why a particular wiring scheme doesn’t seem to be generating the signal levels and tone you expected.
A polarity tester is an even less costly device that can determine which end of the magnetic pickup is true north to help you troubleshoot out-of-phase issues.
11. Once you’ve confirmed that your wiring job was completed successfully, either by ear or by equipment, re-attach the pickup switch to the guitar, re-assemble the guitar, adjust pickup height to taste, and play!
Our Ibanez RGT42DXFM
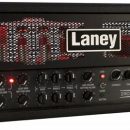
 So how does it sound? In a word, toneful. While slightly different from our JPM-100, this guitar sounds gorgeous with the DiMarzio pickups. Our Steve Special provides just the right kind of clean high-gain tone we sought. Low notes remain clearly articulated when playing bar and power chords with high-gain sounds in our Mesa/Boogie Road King Series II amp.
The neck-position Air Norton is just creamy! The guitar generates beautiful Les Paul-esque neck tone for an outstanding flutey, hollow, blues tone.
In the middle position, we get a beautiful clean tone ideally suited to rhythm playing. There is a very slight volume drop in the middle position – something that some people don’t like about this particular wiring scheme – but players like us love it because when you switch from your clean verse tone in the middle to the bridge or neck position for the chorus of your songs, you get a very subtle volume boost.
We also prefer the three-way tele switch that we installed to the original JPM’s toggle switch that was physically harder to switch, and the black and cream zebra colored pickups we selected (DiMarzio pickups are available in a wide range of color choices) make this guitar look even better.
Additional Resources
If you’re ready to get obsessed with pickups and guitar wiring, Stewart-MacDonald provides some outstanding educational and reference materials online. See their free online guide, Understanding Guitar Wiring.
If you love tinkering with pickup wiring and want to start tearing your guitars apart, a great book to pick up (no pun intended) is the Book of Standard Wiring Diagrams from Schatten Design. It provides detailed wiring diagrams for most guitars and many popular makes of pickups.