 PreSonus has a reputation for building quality audio products at highly competitive prices, and given the great value proposition, many of the editors at MusicPlayers.com have at least one PreSonus product in active use within their professional studios.
The single-fader PreSonus FaderPort has been a wildly successful accessory for the DAW-based studio, but hey, it’s just a single fader. If only it had… more faders!
| Category | Value | Rating |
| Features | 35% | |
| Usability | 35% | |
| Sound | n/a | n/a |
| Documentation & Support | 10% | |
| Price | 20% | |
|
|
||
| OVERALL RATING = 3.7 Stars, which earns it a WIHO Award! 3.6 stars or better: Outstanding, WIHO Award 3 stars or better: Worth considering 2 stars or better: Suited to specific needs 1 star or less: Not recommended |
||
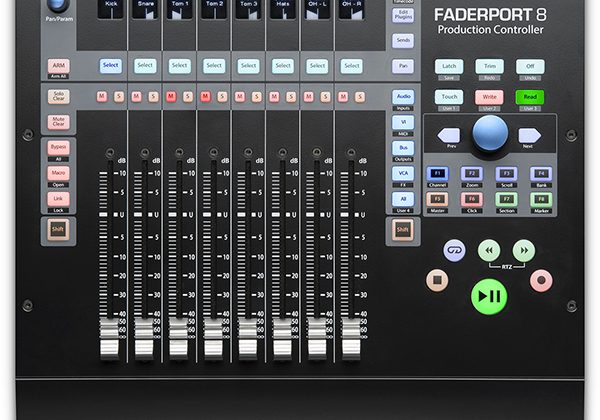
Obviously the folks at PreSonus were thinking the same thing, and here we find ourselves with the USB-based FaderPort 8. With eight touch-sensitive, motorized, 100mm faders and 57 buttons covering 78 different functions, there’s a lot the FaderPort 8 can accomplish in a remarkably small footprint. While optimized for native use with PreSonus’s respectable Studio One DAW, it is compatible with numerous other DAWs, including Pro Tools, when used in HUI mode. Perhaps best of all, you get all this functionality—and digital scribble strips, too, for under $500. Is the new FaderPort 8 exactly what your studio needs? Let’s take a look and find out!
Features
The FaderPort 8 has, as you can probably guess, eight touch-sensitive, 100mm, long-throw, motorized faders. Above each one of the faders is are scribble strip displays, and these are way better than anything you ever did with a wax pencil on a large console given that they provide a wealth of information including track name, channel metering, panning position, and parameter level.Below the screen but above the fader are the buttons, Select (which selects that channel), Mute, and Solo.
At the bottom right corner are the transport controls: Play, Stop, Fast Forward, Rewind, Record, and Loop buttons are there, each with a backlit glowing color.
 Select button modifiers include the Arm, Solo Clear, Mute Clear, and Macro buttons, as well as the Shift button to access additional features from the same buttons (like toggling the effects insert window, for example).
The largest knob on the whole unit is part of the Session Navigator, which provides control over track scrolling, channel banking, and timeline scrolling. There are dedicated buttons for Master, Zoom, Click (for metronome On/Off), Scroll, Section, and Bank (which toggles channels in groups of eight, i.e., changing the eight faders to control tracks1- 8, then 9-16, etc.). These buttons also double as function buttons when Shift is also pressed, providing shortcuts to open the editor, open the tempo track, open the mixer, and more.
Above the Session Navigator knob are the automation controls, and here there are dedicated buttons for Latch, Trim, Read, Write, and Touch. By pressing the Shift button, these buttons serve double-duty with alternate functions based on the DAW in use. In our Pro Tools studio, for example, the alternate functions were save/redo/undo. Additionally, there are three user-defined function buttons, which are set by default to auto-scroll toggling, snap to grid, and show/hide automation.
Just to the left of this section are four buttons to choose what the faders are controlling: tracks, plug-ins, sends, and pan. There is a dedicated rotary knob to control panning, but if your brain doesn’t process panning in a “rotational manner,” you can choose to use the faders to control panning as well (some mixers might find this more precise for writing panning automation).
Finally, below these buttons is the mix management section. These buttons allow you to restrict the tracks you see on your FaderPort 8 by type. The buttons include Audio, VI (virtual instrument tracks only), Bus, VCA, and All. Pressing Shift with each button accesses additional options including inputs, MIDI, outputs, effects, and User.
The FaderPort 8 has native Studio One support, but also supports HUI and Mackie Control Universal emulation for use with other digital audio workstations. There is also a footswitch input for hands-free start/stop.
A USB 2.0 port makes the connection to your computer, and the FaderPort 8 requires an included (external) power supply with mid-line wall wart.

Usability
The PreSonus FaderPort 8 was easy to use, and it took us very little time to get it up and running within our Avid Pro Tools 12 host environment. After downloading and installing the Universal Control software from the PreSonus website, we plugged in the power and USB 2 cables and ran the Universal Control software. In our case, there was a firmware update that was required, and this was an easy, automated process that only took a few minutes to complete.
Once updated, we wanted to use the FaderPort 8 with Pro Tools, so we need to use the control surface in HUI mode, which was accomplished by holding down the Select keys of Channel One and Channel Two while powering the unit on. On the Pro Tools side, there’s one more thing you need to do to have Pro Tools “see” the FaderPort 8. With Pro Tools launched, go to the Peripherals menu, and select MIDI controllers. Select HUI as the type and select FaderPort (FP8) on Receive and Send, and be sure to select eight as the number of channels.
Those easy moves behind us, the FaderPort 8 sprang to life, with the faders jumping to their appropriate positions in our open session file. We were impressed with the feel of the smooth, motorized faders, and we may have had a brief Frankenstein moment, thinking “It’s alive!” Jokes aside, this kind of feel at this price point is quite an accomplishment. The default behavior is for the faders to control track volume, and a backlit track button to the right upper side of the faders glowed blue to signify this. While incredibly useful for volume moves alone, the FaderPort 8 does much, much more.
Nearly all of the buttons are back lit with various colors. Unfortunately, however, the faders themselves didn’t light up, nor the values markers along the faders. It’s not a deal breaker, but with the unit otherwise being well suited to working in a dimly lit studio, this would have been an awesome addition.
We were intrigued by the Edit Plug-ins button right below the aforementioned Track button. Pressing this enables you to control the plug-in on the selected track (using the Link button on the left side of the FaderPort 8). The faders and select buttons now control some parameters of the plug-in, and the digital scribble strips above the faders identify which parameters you are controlling.
In our Pro Tools studio, we could only assign the first four faders to specific plug-in parameters, while the other four were left unusable. Please note that this was a HUI protocol limitation; not a product limitation. Users of DAWs like Studio One—or users of DAWs supporting MCU—will have use of all eight faders. Obviously, plug-ins such as seven- or eight-band EQs can really benefit from this capability. Hopefully a future update to the HUI protocol will resolve this limitation. Further, a slightly smoother procedure to get the FaderPort 8 to link to the plug-in would be welcomed—at times, we found the process a little temperamental.
There are, of course, other modes to assign the faders, including Pan and Send. Pressing Pan allows the faders to control the panning, which we could see on the scribble strip display. Of note, however, there is already a dedicated Pan control at the top left of the FaderPort 8, which allows a knob to be turned instead of using a sliding fader. The choice is yours! Pressing the Send button enabled us to control bus Send levels. Of note, in HUI mode, only the first five Send slots, A-E, were listed in the screen areas. This appears to be more of a limitation of the HUI protocol, though, and not the FaderPort 8.
The other expected buttons function well. Mute and solo buttons are dedicated buttons to every track, and the transport buttons on the bottom right worked without any issues, including the handy Return-to-Zero function, accessed by pressing Rewind and Forward at the same time.
Other nice touches include dedicated buttons to control the click track and master track (if they are in your session). Also useful was a dedicated Marker button. Pressing this, and then turning the large knob above it enables you to scroll through your session, and wherever you’d like to place a marker/label, just punch down on the knob and it inserts into the timeline, ready for you to enter a label for the marker. And while we’re talking about large knobs, this knob can also be used to zoom in and out of your session. We definitely found improvements to our workflow with the FaderPort 8, even if we still prefer to write our mix automation by mouse.
Speaking of improved workflow, if your session has more the eight tracks, don’t worry. Pressing the bank button shifts your tracks, from 1-8, 9-16, etc. So while you only have eight faders under hand, you can “transpose” these eight faders to control all of the tracks in your session.
While not necessarily a replacement for the mouse and keyboard, in conjunction with them, the FaderPort 8 provides an obviously improved work flow. We did, however, on several occasions, wish the screens on the FaderPort were slightly angled towards the user. They are best viewed when looking down from above, but realistically, there’s some space between the desktop and the user. From a working distance, the digital scribble strips are challenging to read.
It should be noted that the purchase of the FaderPort 8 includes a free download of PreSonus Studio One Artist. This is a great DAW alternative to Pro Tools, and some of our editors are big fans. Though we didn’t spend as much time within Studio One as Pro Tools for this review, the integration, as you can imagine, is even better when running in native mode (versus HUI) talking to a PreSonus DAW.
Sound
No audio actually passes through the FaderPort 8, but we found the faders were smooth and quiet, and obviously did not add any additional noise/sound to our sessions.
Documentation and Product Support
While the FaderPort 8 includes a printed Quick Start guide, you have to download the full PDF manual from the website—and given all the buttons and functionality, you’ll want to at least glance at it. Surprisingly, PreSonus doesn’t have any video tutorials explaining the FaderPort 8’s use, though they do provide an amusing, 30-second video featuring a cat at a studio desk watching his master use the FaderPort 8.
In all fairness, though, the downloadable manual is as well written as any PreSonus documentation we’ve ever encountered (and that would be a lot). There are numerous diagrams to get you going.
Price
The FaderPort 8 (MSRP $599.95) sells for $500, and delivers a lot of bang for the buck. It wasn’t that long ago where you had to spend at least double this for a bank of motorized faders, so you can expect this to be quite popular in the project studio workspace.
With the ability to work in PreSonus Native, HUI, and Mackie modes, this control surface is truly universal in its appeal. And if you haven’t invested in a DAW yet, the included Studio One Artist bundle is a great place to get your feet wet (or it’s simply a useful opportunity to explore an alternative to the DAW you presently work in). If you’re looking for a control surface to improve your tracking and mixing workflow without breaking the bank, this should be high on your list for consideration.
Contact Information
PreSonus
www.presonus.com
Evaluation Short-List
PreSonus FaderPort
Avid Artist Mix
Behringer X-Touch

